
MetaKit XR effects
Updated
Use AI effects to enhance user experience.
The MetaKit extension is an innovative product designed to enhance interactive video experiences. By integrating multiple advanced AI technologies, it provides users with creative and personalized video enhancement functions.
MetaKit can add rich video interactive effects, allowing you to choose flexibly, according to your specific requirements:
- Social entertainment: Enhance social entertainment and live broadcasts with features like Animoji and portrait edge flames, providing more creativity and personalization for hosts.
- Online education: Create a more vivid and engaging teaching environment with 360-degree backgrounds to enhance students' interest in learning.
- Online conferences: Use 3D lighting to create a presentation environment comparable to professional effects, enhancing the visual impact of your presentations.
Understand the tech
The MetaKit extension includes the following key functions:
| Function | Description |
|---|---|
| Virtual human | Easily generate virtual characters and create unique virtual images with custom options like face pinching and fashion dressup. Capture user expressions in real time and render them back on the virtual image to enhance interaction. |
| Animoji | Apply various Animoji effects to portraits in real time using AR and face capture technology. Show real-time changes in head dynamics and expressions to display a unique personality. |
| Lighting | Provide users with precise and efficient light and shadow effects, including 3D light (one light with customizable motion trajectory), atmosphere light (simulating multiple real light effects with fixed motion trajectory), advertising light, and other modes. Intelligent light and shadow control allows users to experience more realistic effects in a virtual environment. |
| Atmospheric effects | Create an artistic atmosphere using lighting effects, including portrait edge flames, aurora, ripples, and other modes. |
| 360 Background | Provide users with customized panoramic virtual background effects. |
The MetaKit extension offers an open art ecosystem, supporting one-click import of Animoji and avatar images created according to Agora art standards. This provides users with more flexible creation and integration options. To use this feature, contact technical support.
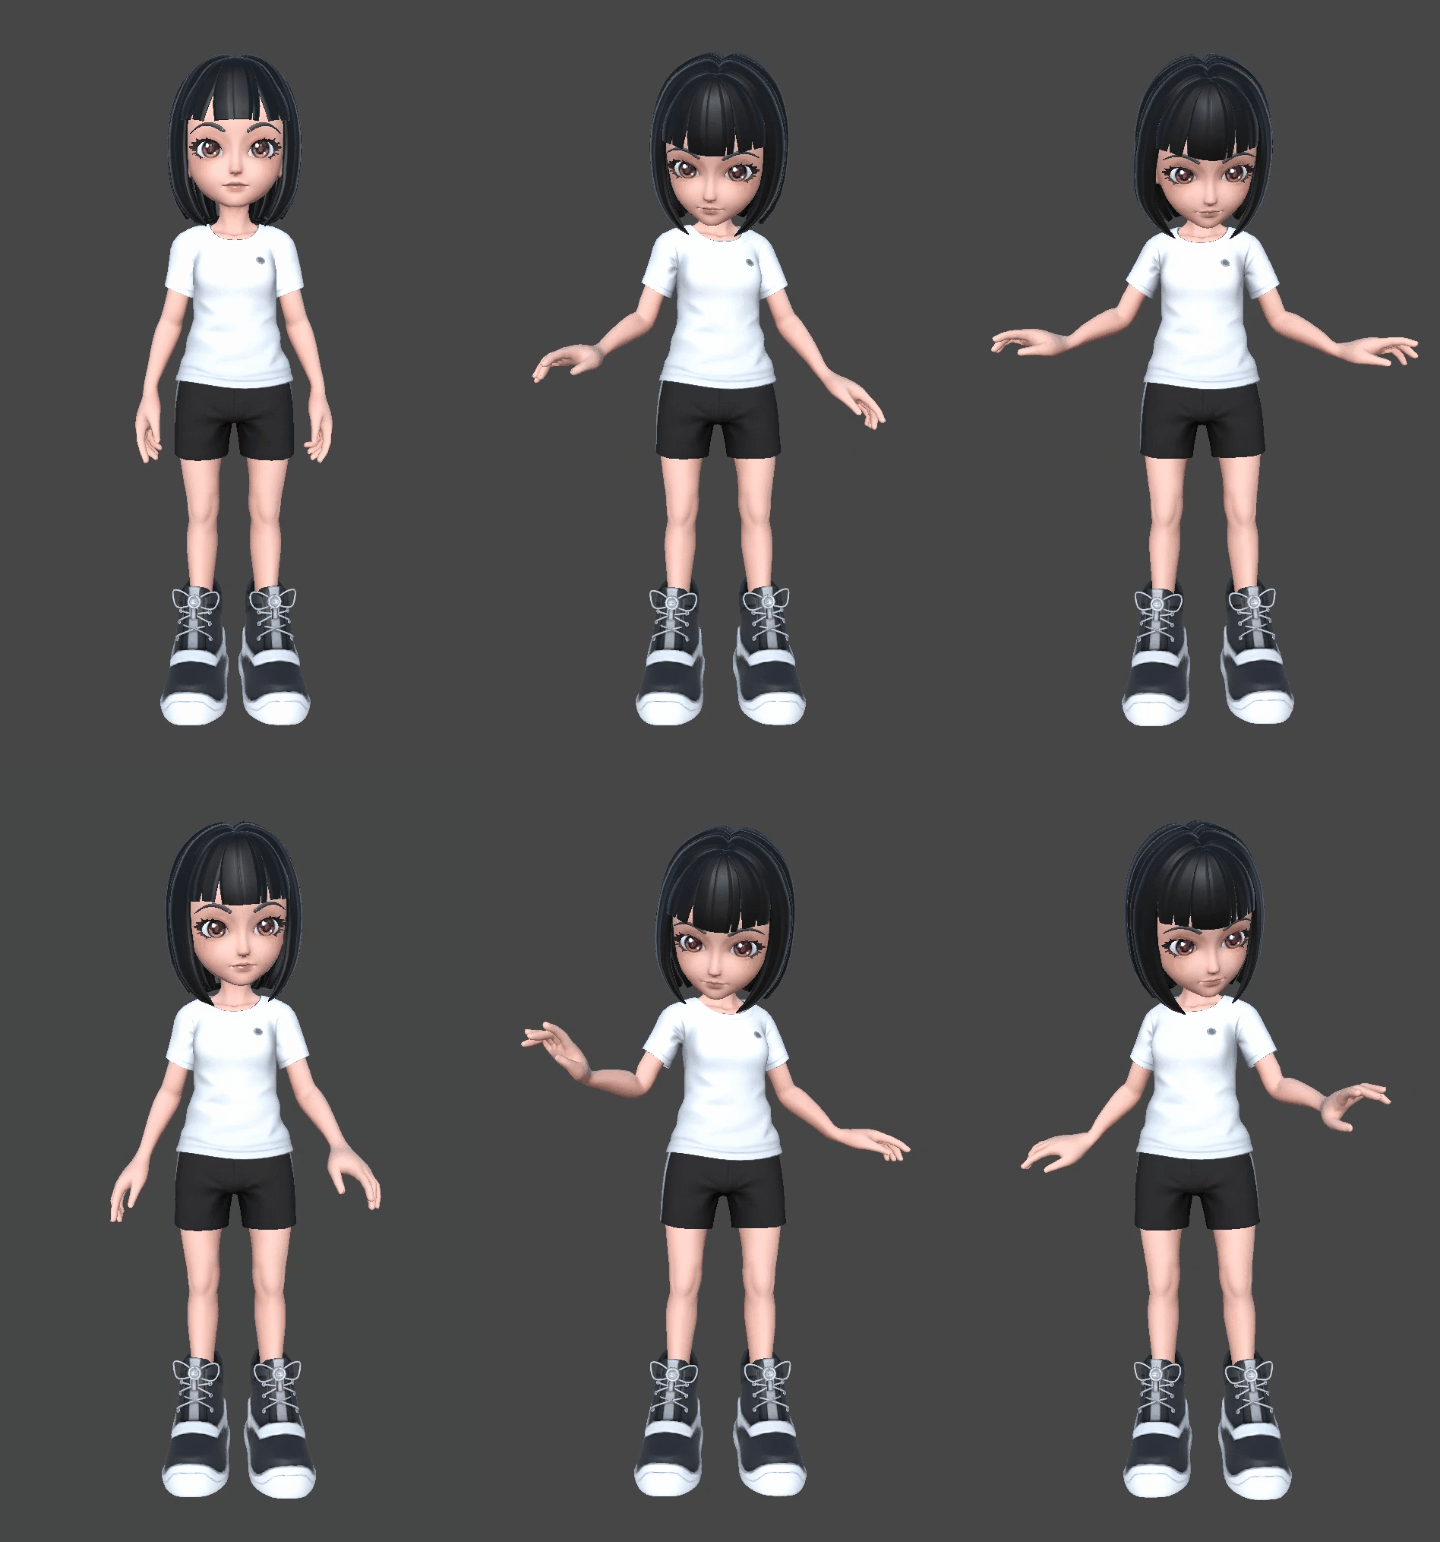
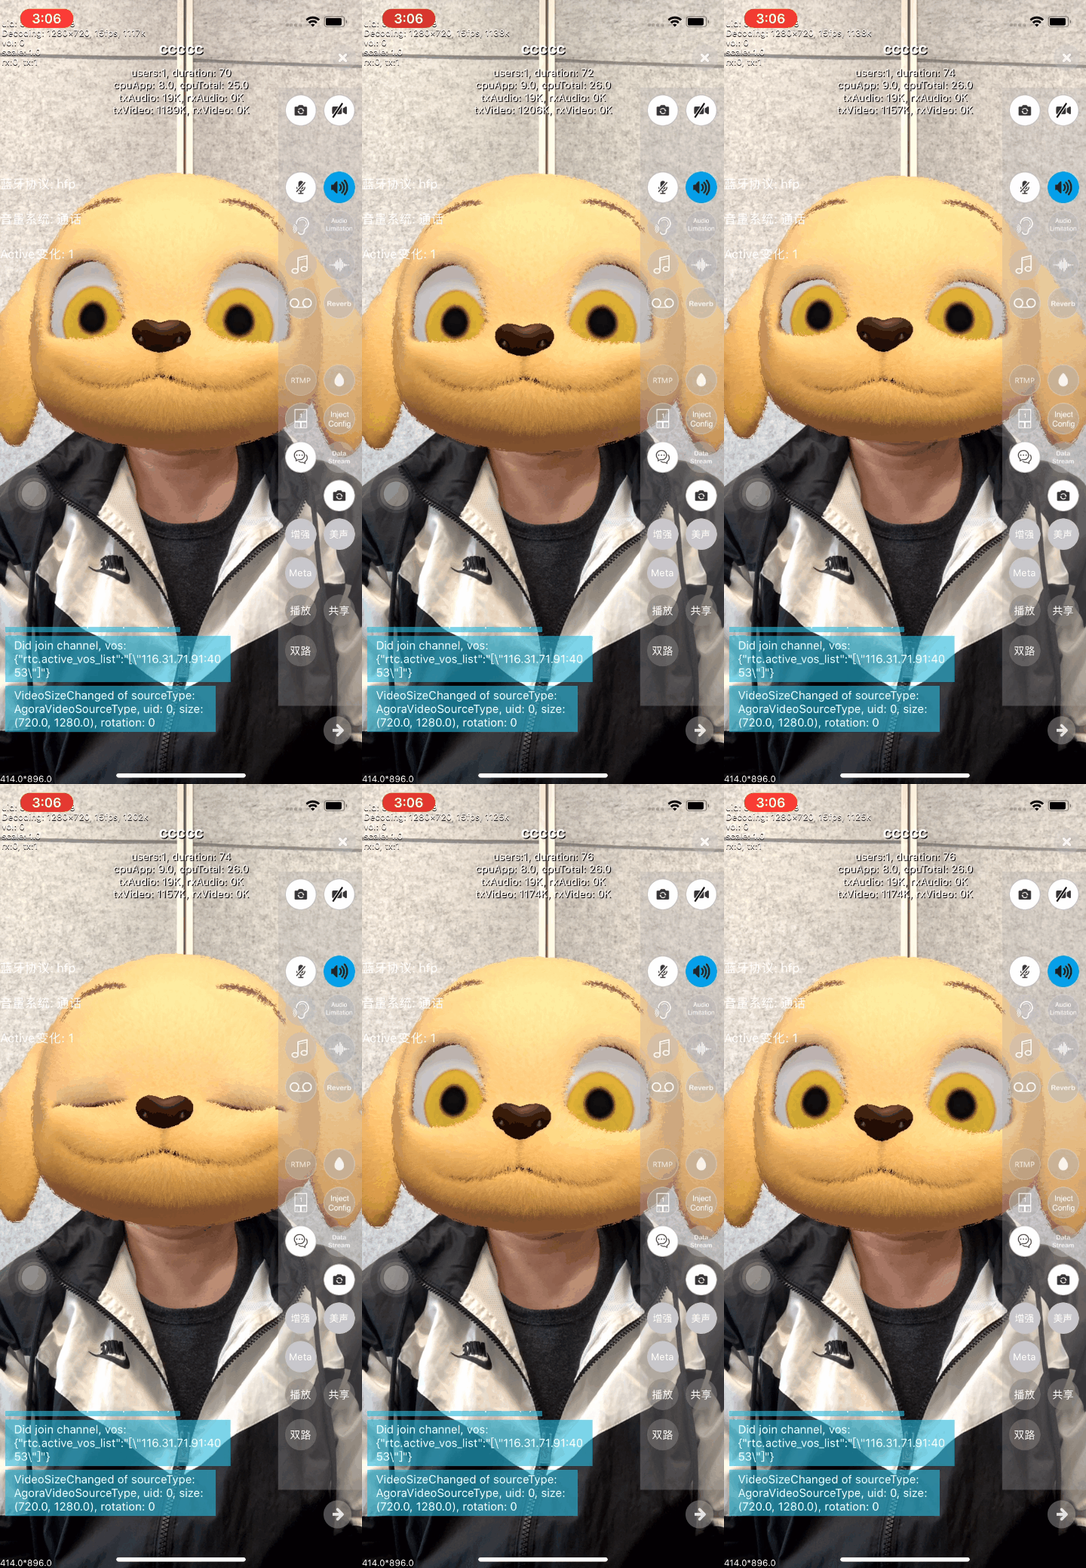
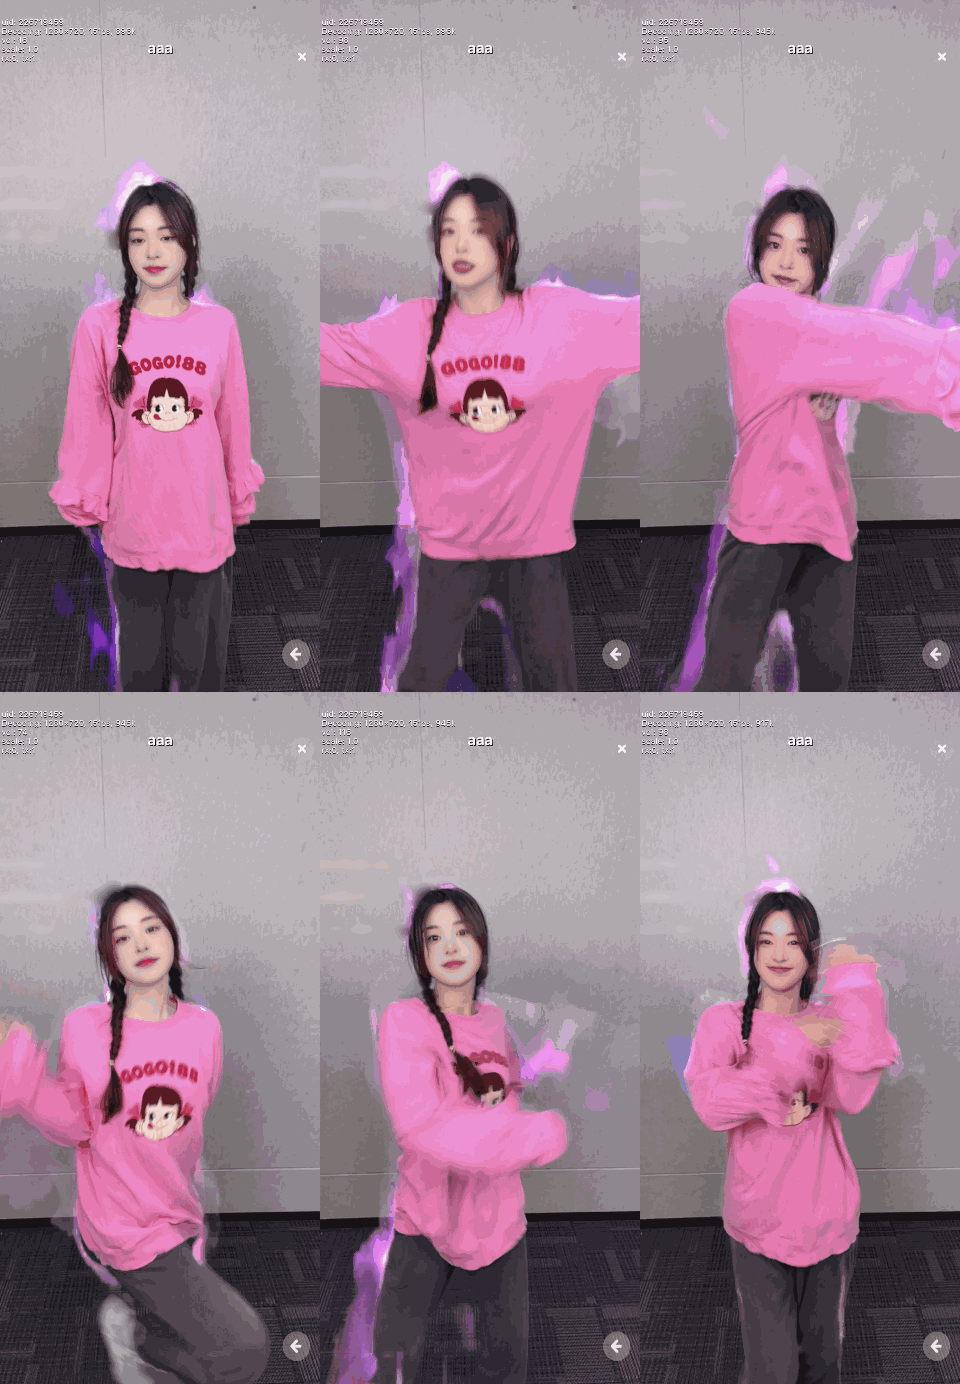
The effects of some functions are as follows:
Virtual human (girl)
Animoji (dog)
Atmospheric effects (portrait edge flames)
Lighting (ambient light)
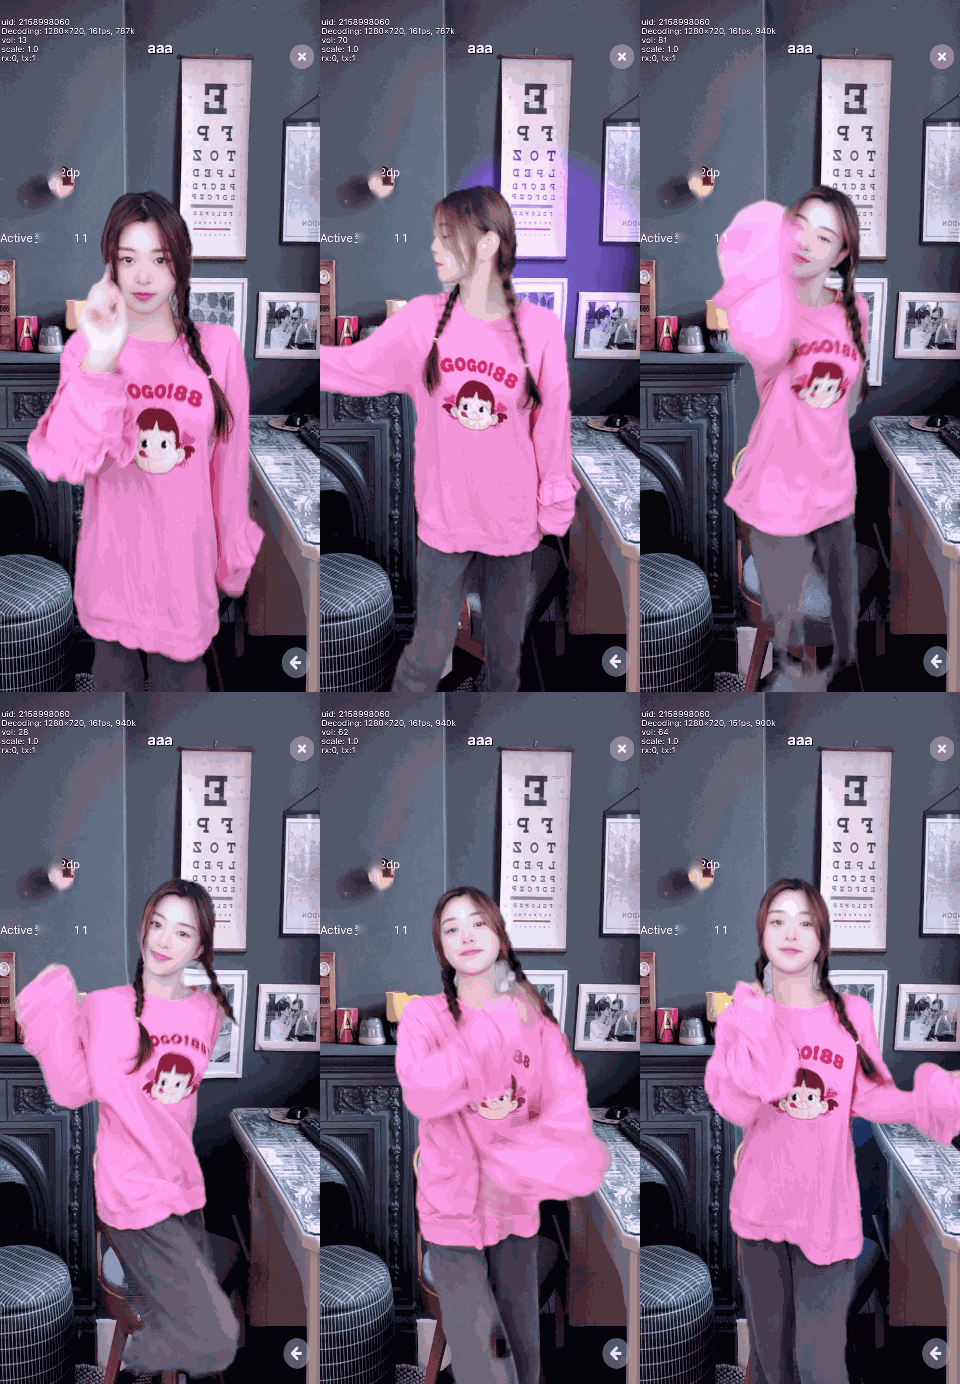
Lighting (3D light)
This page explains how to integrate MetaKit extension into your project to utilize the virtual human, Animoji, lighting effects, and 360 background functions.
Prerequisites
To follow this procedure, you must have:
- Integrated the v4.2.x or v4.3.x of the Video SDK and implemented basic real-time audio and video functions in your app. See SDK quickstart.
- When integrating through CocoaPods, specify pod
AgoraRtcEngine_Special_iOSand replacex.y.zwith the specific SDK version number. - The MetaKit extension uses the Face Capture extension (
AgoraFaceCaptureExtension.xcframework) and the Virtual Background extension (AgoraVideoSegmentationExtension.xcframework). You can delete unnecessary extensions as needed to reduce the size of the app.
-
Xcode 13.0 and above
-
A physical device running iOS 14.0 or above, with the front camera and microphone functioning normally.
-
An Apple developer account.
-
Installed CocoaPods. See Getting Started with CocoaPods.
-
A computer that can access the Internet. If your network environment has a firewall deployed, refer to Firewall requirements to use the Agora services normally.
Project setup
To implement MetaKit effects in your app, open the SDK quickstart for Video Calling project and take the steps described below.
Before using the MetaKit extension, follow these steps to configure your project.
Integrate the extension
To integrate the MetaKit extension, take the following steps:
-
Download and unzip the MetaKit iOS extension.
-
Open the folder and copy the files from the
/SDKpath to the corresponding project path.
| Library | Integration path |
|---|---|
AgoraMetaKitExtension.xcframework | /SDKExtension |
AgoraMetaKit.xcframework | /SDKExtension |
Agora provides extension support in the XCFramework format for the arm64 architecture but not for the armv7 architecture.
-
Open your project in Xcode and add the required dynamic libraries, ensuring that the Embed attribute of the added dynamic libraries is set to Embed & Sign.
Configure MetaKit
To configure the extension, take the following steps:
- Open the MetaKit iOS extension folder. The
/assetspath contains Bundle file resources needed for different scenes and functions. The table below lists the resource name, purpose, and size:
| Resource | Required/Optional | Description | Size |
|---|---|---|---|
SceneBase | Required | Basic scene resources. All functional modules are built on these resources, which include support for hot updates. | 2.5 MB |
Avatar | Function-specific | Virtual human model resources, including the virtual human figures girl and huamulan. Supports face capture, face pinching, and dress-up capabilities. |
|
Animoji | Function-specific | Animoji model resources, including the Animoji figures dog, girlhead, and arkit. Supports face capture. |
|
AREffect | Function-specific | Lighting effects and 360 background resources, including 3D lighting, ambient lights, advertising lights, screen ripples, aurora effects, and portrait edge flames. | 4.9 MB |
- Combine the basic resources (
SceneBase) and the subpackage resources of specific functional modules (Avatar,AvatarHeadMask, andAREffect) into a single resource package to experience the corresponding functional modules. The functional modules and their corresponding resource package combinations are shown in the table below:
| Functional module | Resource package combination |
|---|---|
| Virtual human | SceneBase and Avatar |
| Animoji | SceneBase and AvatarHeadMask |
| Lighting effects | SceneBase and AREffect |
| 360 Background | SceneBase and AREffect |
For example, to experience the virtual human and 360 background, combine the SceneBase, Avatar, and AREffect into a single resource directory (as shown in the image below). Once the resource directory is prepared, place it in the iOS sandbox. When loading scene resources, set the absolute path of this resource directory to MetaKit.
Add iOS device permissions
Open the project's Info.plist file and edit the property list to add the microphone and camera permissions required for the MetaKit extension.
| Permission | Description |
|---|---|
Privacy - Microphone Usage Description | Required for audio functions. |
Privacy - Camera Usage Description | Required for features like facial animation and background segmentation for AI inference. |
Implement the logic
After configuring your project, follow these steps to experience the various functional modules of the MetaKit extension.
Listen to extension events
-
Initialize
AgoraRtcEngineKitby callingsharedEngineWithConfig. InAgoraRtcEngineConfig, create the event callback interface classAgoraMediaFilterEventDelegatefor the extension and register extension event callbacks such asonEvent.let config = AgoraRtcEngineConfig() config.appId = appID config.eventDelegate = self // Create and initialize AgoraRtcEngineKit agoraEngine = AgoraRtcEngineKit.sharedEngine(with: config, delegate: self) // Create the event callback interface class for the extension and register extension event callbacks extension ViewController: AgoraMediaFilterEventDelegate { func onEvent(_ provider: String?, extension: String?, key: String?, value: String?) { } func onExtensionStarted(_ provider: String?, extension: String?) { } func onExtensionStopped(_ provider: String?, extension: String?) { } func onExtensionError(_ provider: String?, extension: String?, error: Int32, message: String?) { } } -
In the callback, specify
providerasagora_video_filters_metakitandextensionasmetakitto filter events from the MetaKit extension.onEventwill pass through engine states such asunityLoadFinish(Unity environment loaded) andaddSceneViewResp(scene view loaded).func onEvent(_ provider: String?, extension: String?, key: String?, value: String?) { guard let provider = provider, let extension = extension, provider == "agora_video_filters_metakit", extension == "metakit" else { return } guard let status = key else { return } switch status { case "initializeFinish", "unityLoadFinish", "loadSceneResp", "addSceneViewResp", "removeSceneViewResp", "unloadSceneResp": // Capture and handle events such as Unity environment loaded and scene view loaded break default: break } } func onExtensionError(_ provider: String?, extension: String?, error: Int32, message: String?) { if provider == "agora_video_filters_metakit" && extension == "metakit" { print("[MetaKit] onExtensionError, Code: \(error), Message: \(message ?? "")") } }
Enable extensions
Before enabling the MetaKit extension, ensure that both the Facial Capture extension and the Virtual Background extension are enabled.
Enable the Face Capture extension
To enable the Face Capture extension, follow these steps:
-
Call
registerExtensionWithVendorandenableExtensionWithVendorto register and enable the extension, specifying the extension service provider name (agora_video_filters_face_capture) and extension name (face_capture). -
Call
setExtensionPropertyWithVendorto authenticate and authorize the AI module of the extension, wherekeyisauthentication_information, andvalueincludes the company name (company_id) and face capture license (license).Contact Agora to obtain the company name and face capture license.
// Register Face Capture extension
agoraEngine?.registerExtension(withVendor: "agora_video_filters_face_capture", extension: "face_capture", sourceType: AgoraMediaSourceType.primaryCamera)
// Enable Face Capture extension
agoraEngine?.enableExtension(withVendor: "agora_video_filters_face_capture", extension: "face_capture", enabled: true)
// Authorize Face Capture extension
agoraEngine?.setExtensionPropertyWithVendor("agora_video_filters_face_capture",
                      extension: "face_capture",
                      key: "authentication_information",
                      value: "{\"company_id\":\"agoraDemo\", \"license\":\"xxxxxxxxxx\"}",
                      sourceType: AgoraMediaSourceType.primaryCamera)
Enable the Virtual Background extension
- Call
setParametersto set"rtc.video.seg_before_exts"totrue, ensuring that the Virtual Background extension executes before MetaKit. - Call
enableVirtualBackgroundto enable the extension, specifying the following:backgroundSourceTypeasAgoraVirtualBackgroundNoneto process the background as alpha information, separating the subject from the background.modelTypeasSegModelAgoraAifor background processing suitable for all use-cases.
// Ensure Virtual Background executes before MetaKit
agoraKit.setParameters("{\"rtc.video.seg_before_exts\":true}")

let bg_src = AgoraVirtualBackgroundSource()
// Process background as alpha information, separate subject from background
bg_src.backgroundSourceType = .none
let seg_prop = AgoraSegmentationProperty()
seg_prop.greenCapacity = 0
// Choose background processing suitable for all use-cases
seg_prop.modelType = .agoraAi
// Enable Virtual Background
agoraEngine?.enableVirtualBackground(true, backData: bg_src, segData: seg_prop)
Enable the MetaKit extension
Call registerExtensionWithVendor and enableExtensionWithVendor to register and enable the MetaKit extension, specifying the extension service provider name (agora_video_filters_metakit) and extension name (metakit).
// Register MetaKit
agoraEngine?.registerExtension(withVendor: "agora_video_filters_metakit", extension: "metakit", sourceType: AgoraMediaSourceType.primaryCamera)
// Enable MetaKit
agoraEngine?.enableExtension(withVendor: "agora_video_filters_metakit", extension: "metakit", enabled: true)
Initialize MetaKit
Initialize the MetaKit extension by calling setExtensionPropertyWithVendor, with key set to initialize and value set to an empty JSON object ({}).
agoraEngine?.setExtensionPropertyWithVendor("agora_video_filters_metakit", extension: "metakit", key: "initialize", value: "{}")Load scene resources
When the onEvent callback captures the unityLoadFinish event, it indicates that the Unity environment has finished loading. At this point, use setExtensionPropertyWithVendor to load MetaKit scene resources, with key set to loadScene and value containing relevant scene information.
// Set the scene resource path
// Assume the resource path is /first/second/DefaultPackage/, where scenePath should only be /first/second
let infoDict = ["sceneInfo": ["scenePath": "xxxx"]] as [String: Any]
let infoData = try? JSONSerialization.data(withJSONObject: infoDict, options: [])
let infoStr = String(data: infoData!, encoding: .utf8)

// Load scene resources based on JSON configuration
agoraKit?.setExtensionPropertyWithVendor("agora_video_filters_metakit",
                     extension: "metakit",
                     key: "loadScene",
                     value: infoStr!)
Use the avatar effect
-
Use
setExtensionPropertyWithVendorto add a scene view for a virtual human, with key set toaddSceneViewand value containing scene view configuration information. To experience the virtual human functionalities, setavatarModeto0for the scene view, indicating virtual human mode, and specifyavataras the desired character such asgirlorhuamulan.// Get the view's address handle let address = unsafeBitCast(sceneView!, to: Int64.self) let extraDict = [ "sceneIndex": 0, // Scene index, currently supports only 0 "avatar": "huamulan", // Set avatar to "huamulan" "avatarMode": 0 // Set scene mode to 0, i.e., virtual human mode ] as [String: Any] let extraData = try? JSONSerialization.data(withJSONObject: extraDict, options: []) let extraStr = String(data: extraData!, encoding: .utf8) ?? "" let dict = [ "view": String(address), "config": [ "width": 720, "height": 1280, "extraInfo": extraStr ] ] as [String: Any] let data = try? JSONSerialization.data(withJSONObject: dict, options: []) let dataStr = String(data: data!, encoding: .utf8) // Add virtual human scene view based on JSON configuration agoraKit?.setExtensionPropertyWithVendor("agora_video_filters_metakit", extension: "metakit", key: "addSceneView", value: dataStr!)
When the onEvent callback captures the addSceneViewResp event, the scene view has been successfully added. It will display a Blendshape-driven virtual human character that mimics your facial expressions and follows head movements.
-
Use
setExtensionPropertyWithVendorto manipulate the virtual human's facial features, with key set toupdateFaceand value supporting multiple sets of resourceIDsand corresponding adjustment amplitudes. See Facial pinching resources for details.let parts = [ ["key": "C_updown_2", "value": 20], ["key": "EB_thickness", "value": 40], ["key": "E_width_1", "value": 60], ["key": "N_width_1", "value": 80] ] let dict = ["value": parts] let data = try? JSONSerialization.data(withJSONObject: dict, options: []) let str = String(data: data!, encoding: .utf8) // Perform facial manipulation based on JSON configuration agoraKit?.setExtensionPropertyWithVendor("agora_video_filters_metakit", extension: "metakit", key: "updateFace", value: str!) -
Use
setExtensionPropertyWithVendorto change the virtual human's outfit, withkeyset toupdateDressandvaluesupporting an array of integers representing the resource IDs for different outfit parts. See Dress-up resources for details.// Set the ID to an array of resource IDs let dict = ["id": [10002, 10102, 10402, 12102, 12501, 14102, 15002]] let data = try? JSONSerialization.data(withJSONObject: dict, options: []) let str = String(data: data!, encoding: .utf8) // Change outfit based on JSON configuration agoraKit?.setExtensionPropertyWithVendor("agora_video_filters_metakit", extension: "metakit", key: "updateDress", value: str!)
Additionally, MetaKit supports switching the virtual human's appearance and perspective. For more details, refer to the virtual human key-value description.
Use the Animoji effect
Use setExtensionPropertyWithVendor to add an Animoji scene view, with key set to addSceneView and value containing the scene view configuration. To experience Animoji features, set avatarMode to 1 for the scene view, indicating Animoji mode, and specify avatar as the desired Animoji character, such as dog, girlhead, or arkit.
In addition to the already available Animoji images (dog, girl, headarkit), the Agora MetaKit extension provides an open art ecosystem. It supports one-click import of Animoji images created according to Agora's art standards, offering users more flexible creation and integration options. Contact Agora technical support to use this feature.
// Get the view's address handle
let address = unsafeBitCast(sceneView!, to: Int64.self)

let extraDict = [
  "sceneIndex": 0,    // Scene index, currently supports only 0
  "avatar": "dog",    // Set Animoji to "dog"
  "avatarMode": 1     // Set scene mode to 1, that is, Animoji mode
] as [String: Any]

let extraData = try? JSONSerialization.data(withJSONObject: extraDict, options: [])
let extraStr = String(data: extraData!, encoding: .utf8) ?? ""

let dict = [
  "view": String(address),
  "config": [
    "width": 720,
    "height": 1280,
    "extraInfo": extraStr
  ]
] as [String: Any]

let data = try? JSONSerialization.data(withJSONObject: dict, options: [])
let dataStr = String(data: data!, encoding: .utf8)

// Add Animoji scene view based on JSON configuration
agoraKit?.setExtensionPropertyWithVendor("agora_video_filters_metakit",
                     extension: "metakit",
                     key: "addSceneView",
                     value: dataStr!)
When the onEvent callback captures the addSceneViewResp event, it indicates that the scene view has been successfully added. At this point, the view will display a dog head covering your face, capturing your facial expressions and mimicking them, as well as following your head movements. Additionally, the MetaKit extension allows you to switch Animoji characters and adjust the rendering level of the Animoji characters. For more details, refer to the Animoji key-value description.
Use the sticker effect
Call setExtensionPropertyWithVendor to add a sticker scene view. Set key to loadMaterial and value to the material configuration. Specify the corresponding resource name depending on the sticker that you want to use. For example, material_sticker_glass for glasses.
In addition to the already available stickers veil, glass, facemask, and dragonhat, the Agora MetaKit extension provides an open art ecosystem and supports one-click import of sticker images created according to Agora's art standards. This offers users more flexible creation and integration options. Contact Agora technical support to use this feature.
let address = unsafeBitCast(sceneView!, to: Int64.self) // 获取视图的地址句柄
let dict = ["path": path_to_material_sticker_glass, "view": String(address)]
let data = try? JSONSerialization.data(withJSONObject: dict, options: [])
let dictInfo = String(data: data!, encoding: String.Encoding.utf8)

self.agoraKit?.setExtensionPropertyWithVendor("agora_video_filters_metakit", extension: "metakit",
                      key:"loadMaterial",
                      value:dictInfo ?? "")
When the onEvent callback captures the materialLoaded event, it means that the scene view has been added. At this time, a glasses sticker covering the eyes will be displayed in the view, following your head movements.
Apply lighting effects and 360 background
-
Use
setExtensionPropertyWithVendorto add a scene view, withkeyset toaddSceneViewandvaluecontaining the scene view configuration. To experience lighting effects and 360 background features, setbackgroundEffecttotruewhen adding the scene view.// Get the view's address handle let address = unsafeBitCast(sceneView!, to: Int64.self) let extraDict = [ "sceneIndex": 0, // Scene index, currently supports only 0 "backgroundEffect": true // Enable lighting effects and 360 background ] as [String: Any] let extraData = try? JSONSerialization.data(withJSONObject: extraDict, options: []) let extraStr = String(data: extraData!, encoding: .utf8) ?? "" let dict = [ "view": String(address), "config": [ "width": 720, "height": 1280, "extraInfo": extraStr ] ] as [String: Any] let data = try? JSONSerialization.data(withJSONObject: dict, options: []) let dataStr = String(data: data!, encoding: .utf8) // Add scene view with lighting effects and 360 background based on JSON configuration agoraKit?.setExtensionPropertyWithVendor("agora_video_filters_metakit", extension: "metakit", key: "addSceneView", value: dataStr!) -
Experience lighting effects and 360 background.
-
Lighting effects:
Use setExtensionPropertyWithVendor to set lighting effects, with key set to setEffectVideo and value containing a series of lighting materials and their corresponding parameter configurations. MetaKit offers lighting effects such as 3D lighting, ad lights, screen ripples, aurora effects, portrait edge flames, and ambient light groups, and allows fine-tuning of parameters like color, intensity, and range.
The following example demonstrates how to implement 3D lighting. Once the effect is successfully set, a 3D light will sweep across the screen.
let lightDict = [
  "id": 1001, // Set effect material ID to 1001, i.e., 3D lighting
  "param": ["intensity": 2.0, "scale": 0.3] as [String: Any],
  "enable": true // Enable the 3D lighting effect
] as [String: Any]

let lightData = try? JSONSerialization.data(withJSONObject: lightDict, options: [])
let lightInfo = String(data: lightData!, encoding: .utf8)

// Add 3D lighting effect based on JSON configuration
agoraKit?.setExtensionPropertyWithVendor("agora_video_filters_metakit",
                    extension: "metakit",
                    key: "setEffectVideo",
                    value: lightInfo!)
The following example demonstrates how to implement portrait edge flames. Once the effect is successfully set, purple flames will surround the portrait in the frame.
let lightDict = [
  "id": 2001, // Set effect material ID to 2001, i.e., purple flames
  "enable": true // Enable the portrait edge flames effect
] as [String: Any]

let lightData = try? JSONSerialization.data(withJSONObject: lightDict, options: [])
let lightInfo = String(data: lightData!, encoding: .utf8)

// Add portrait edge flames effect based on JSON configuration
agoraKit?.setExtensionPropertyWithVendor("agora_video_filters_metakit",
                    extension: "metakit",
                    key: "setEffectVideo",
value: lightInfo!)- 360 background
Use setExtensionPropertyWithVendor to set the 360 background, with key set to setBGVideo and value specifying the background mode, resource path, and rotation angle.
let panoPath = "https://img.zcool.cn/community/010cab5aab3eeda80120be1412c007.jpg@3000w_1l_0o_100sh.jpg"
let bgDict = [
  "mode": "tex360", // Set background mode to 360 panorama mode
  "param": [
    "path": panoPath, // Set the file path of the background resource
    "rotation": "0"
  ]
] as [String: Any]

let bgData = try? JSONSerialization.data(withJSONObject: bgDict, options: [.withoutEscapingSlashes])
let bgInfo = String(data: bgData!, encoding: .utf8)

// Add 360 background based on JSON configuration
agoraKit?.setExtensionPropertyWithVendor("agora_video_filters_metakit",
                    extension: "metakit",
                    key: "setBGVideo",
                    value: bgInfo!)
You can also use setExtensionPropertyWithVendor to enable the gyroscope, by setting key to setCameraGyro and enabling the gyroscope function in value, enhancing the interactivity and immersion of the background.
let gyroDict = ["state": "on"] as [String : String] // Set state to "on" to enable the gyroscope
let gyroData = try? JSONSerialization.data(withJSONObject: gyroDict, options: [])
let gyroInfo = String(data: gyroData!, encoding: .utf8)

// Enable the gyroscope function based on JSON configuration
agoraEngine?.setExtensionPropertyWithVendor("agora_video_filters_metakit", extension: "metakit",
                      key:"setCameraGyro",
                      value:gyroInfo!)
Once the effect is successfully set, the video background will be replaced with the specified resource, and rotating the phone will allow you to experience the panoramic effect. For more configurations, see 360 Background key-value description.
Release resources
When you stop using the extension, you can refer to the following sample code to remove the scene view, unload the scene resources, and destroy the engine.
// 1. Remove the scene view
let address = unsafeBitCast(view, to: Int64.self)
agoraKit?.setExtensionPropertyWithVendor("agora_video_filters_metakit", extension: "metakit",
                     key: "removeSceneView",
                     value: "{\"view\":\"\(address)\"}")

// 2. Unload the scene resources
agoraEngine?.setExtensionPropertyWithVendor("agora_video_filters_metakit", extension: "metakit",
                      key: "unloadScene",
                      value: "{}")

// 3. Destroy the engine
agoraEngine?.setExtensionPropertyWithVendor("agora_video_filters_metakit", extension: "metakit",
                      key: "destroy",
                      value: "{}")
Reference
This section completes the information on this page, or points you to documentation that explains other aspects about this product.
Key-value description
To implement the capabilities of the MetaKit extension, use the setExtensionPropertyWithVendor method provided by Agora Video SDK v4.x. Pass in the specified key and value as follows:
key: Corresponds to different interfaces of the MetaKit extension.value: Encapsulates some or all of the interface parameters in the JSON format.
This guide explains how to use different key-value pairs to implement the MetaKit virtual human, Animoji, lighting effects, and 360 background function modules.
Basic functions
This section covers how to implement the basic functions of the MetaKit extension, such as initialization, loading scene resources, and adding scene views. Once you have implemented the basic functions, you can explore the specific functional modules.
Initialize the engine
key:initializevalue:{}
Load scene resources
key:loadScenevalue: Object. Contains the following fields:sceneInfo: Object. Contains the following field:scenePath: String. The path of the scene asset package, for example,"/sdcard/metaAssets/15".extraCustomInfo: Object. Contains the following field:sceneIndex: Int. The index of the scene, currently only supports0.
Add scene view
Add a MetaKit scene to a native view and render the specified scene content. This includes virtual people, Animoji, lighting effects, and 360 backgrounds.
- Supports adding up to 7 scene views.
- Currently, only lighting and background effects for video capture are supported. To enable
backgroundEffect,avatarModemust be set to2.
key:addSceneViewvalue: Object. Contains the following fields:view: Int64. The address handle of the view.config: Object. Contains the following fields:width: (optional) Int. The width of the view (px). Defaults to full screen if not specified.height: (optional) Int. The height of the view (px). Defaults to full screen if not specified.extraInfo: Object. Contains the following fields:sceneIndex: Int. Scene index, currently only supports0.avatarMode: (optional) Int. Scene mode.0: (default) Avatar;1: Animoji;2: Video capture screen.avatar: (optional) String. Avatar or Animoji image. IfavatarModeis0(avatar), set togirlorhuamulan(default isgirl). IfavatarModeis1(Animoji), set todog,girlhead, orarkit(default isdog).backgroundEffect: (optional) Boolean. Enables lighting effects and 360 background functions.true: Enable;false: (default) Disable.
Switch scene view
After adding a scene view, you can switch the scene mode, or the virtual human or Animoji image in the scene.
key:switchAvatarModevalue: Object. Contains the following fields:viewAddress: Int64. The address handle of the view.mode: (optional) Int. Specifies the scene mode to switch to.0: Avatar;1: Animoji;2: Video capture screen.avatar: (optional) String. Specifies the avatar or Animoji to switch to. IfavatarModeis0(avatar), set togirlorhuamulan. IfavatarModeis1(Animoji), set todog,girlhead, orarkit.
Enable scene view
After enabling scene view capture, call joinChannel to join the channel and publish the scene view's video stream.
key:enableSceneVideovalue: Object. Contains the following fields:view: Int64. The address handle of the view.enable: (optional) Boolean. Enables scene view capture.true: Enable;false: (default) Disable.
Remove scene view
Remove the MetaKit scene view from view.
key:removeSceneViewvalue: Object. Contains the following fields:view: Int64. The address handle of the view.
Unload scene resources
key:unloadScenevalue:{}
Destroy the engine
key:destroyvalue:{}
Virtual human
The MetaKit extension allows you to switch the image, viewpoint, face, and outfit of the avatar. To experience the avatar-related functions, set avatarMode to 0 when adding a scene view.
In addition to the existing girl and huamulan avatars, the Agora MetaKit extension provides an open art ecosystem and supports one-click import of avatar models made according to Agora's art standards, providing users with more flexible creation and integration options. Contact Agora technical support to use this feature.
Switch virtual human perspective
key:setCameravalue: Object. Contains the following field:viewMode: Int. The avatar camera view.0: Show the avatar's full body;1: (default) Focus on the avatar's upper body;2: Focus on the avatar's face.
Virtual human face-pinching
The MetaKit extension provides a set of face-pinching resources for virtual images.
Currently only the girl avatar supports face pinching.
-
key:updateFace -
value: Object. Contains the following fields:key: String. Resource ID, such asMC_updown_1(upward bend of the mouth corner) andMC_updown_2(downward bend of the mouth corner). See Face pinching resources for details.value: Int. Adjustment range, range is [0, 100], default value is 50. Supports passing in multiple sets of face-pinching resource IDs (key) and corresponding adjustment ranges (value) to achieve the final face-pinching effect. The example of settingMC_updown_1andMC_updown_2to 100 respectively is as follows:
Avatar dressup
The MetaKit extension provides a set of dressup resources for avatars.
Currently only the girl avatar supports dressup.
-
key:updateDress -
value: Object. Contains the following field:id: Int[]. An Int array consisting of resource IDs of multiple clothing items or body parts. Supports dressing operations on multiple items or parts, such as hair, tops, jackets, pants, and so on. Each part provides multiple dressing resources to choose from, that is, each part corresponds to multiple dressing resource IDs. Only one resource can be specified for each part at a time. See Dress-up resources for details.
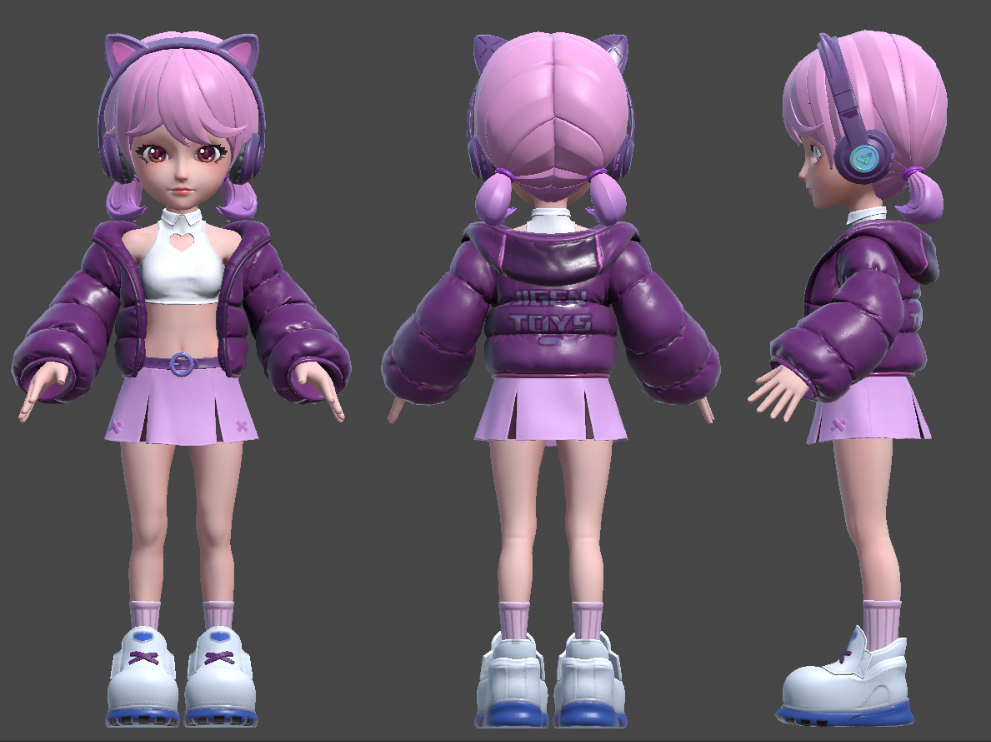
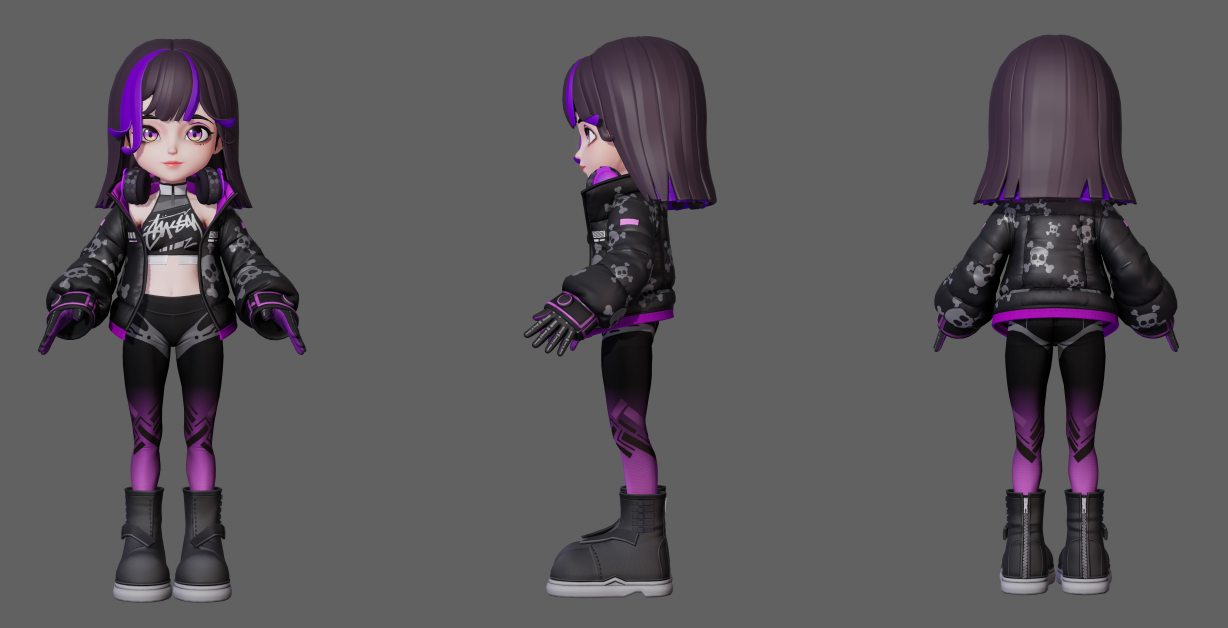
The recommended set combinations are as follows:
-
Set 1
 // The following resource IDs correspond to the following clothing items/body parts [hair, eyebrows, blush, headdress, top coat, pants, shoes]
 "id": [10001, 10101, 10401, 10801, 12101, 14101, 15001]
-
Set 2
 // The following resource IDs correspond to the following clothing items/body parts [hair, eyebrows, blush, coat, gloves, pants, shoes]
 "id": [10002, 10102, 10402, 12102, 12501, 14102, 15002]
Animoji
The MetaKit extension allows you to switch the image of Animoji. To experience Animoji-related functions, set avatarMode to 1 when adding a scene view.
In addition to the existing girl and huamulan avatars, the Agora MetaKit extension provides an open art ecosystem and supports one-click import of avatar models made according to Agora's art standards, providing users with more flexible creation and integration options. Contact Agora technical support to use this feature.
Adjust the rendering level
The MetaKit extension provides three rendering levels: Low, medium, and high. You can choose the corresponding rendering level according to the device performance to achieve the best match between device performance and rendering effect.
Currently, only the dog Animoji supports adjusting the rendering level.
key:setRenderQualityvalue: Object. Contains the following field:general: Int.0: Low configuration;1: (default) Medium configuration;2: High configuration.
Lighting effects
The MetaKit extension provides lighting effects such as 3D lighting, screen ripples, aurora effects, and portrait edge flames, and supports fine-tuning the color, intensity, range, and other parameters of the lighting effects. To experience the lighting effect-related functions, set backgroundEffect to true when adding a scene view.
Set special effect material
key:setEffectVideovalue: Object. Contains the following fields:id: Int. Special effect material ID.enable: Boolean. Whether to enable the special effect.true: Enable;false: Disable.param: (optional) Object. Each special effect material ID corresponds to a set of configuration parameters, which allows you to fine-tune the color, intensity, range, and so on of the lighting effect. If you do not fill in the parameters, the default parameter configuration will be used.
The mapping relationship between special effect material ID and configuration parameters is as follows:
| ID | Effect | Parameters |
|---|---|---|
1001 | 3D Lighting | - color (Int64): Lighting color. When passing the parameter, the hexadecimal color needs to be converted to an Int64 value. For example, for red, the hexadecimal color is #FF0000, and the converted Int64 value is 16711680.- intensity (Float): Light intensity. The recommended value range is [1.0, 2.0]. The default value is 1.6.- scale (Float): Lighting scale. The recommended range is [0.3, 0.6]. The default value is 0.4. |
1002 | Screen ripples | - color (Int64): Ripple color. When passing parameters, the hexadecimal color needs to be converted to an Int64 value. For example, for red, the hexadecimal color is #FF0000, and the converted Int64 value is 16711680.- speed (Float): Fluctuation speed. The recommended value range is [-0.2, 0.2]. The default value is -0.12.- scale (Float): Ripple size. The recommended value range is [3.0, 6.0]. The default value is 4.0. |
1003 | Aurora | - color (Int64): Aurora color. When passing parameters, the hexadecimal color needs to be converted to an Int64 value. For example, for red, the hexadecimal color is #FF0000, and the converted Int64 value is 16711680.- intensity (Float): Aurora intensity. The recommended value range is [0.8, 1.5]. The default value is 1.0. |
2001 | Portrait edge flame | - color (Int64): Flame color. When passing parameters, the hexadecimal color needs to be converted to an Int64 value. For example, for red, the hexadecimal color is #FF0000, and the converted Int64 value is 16711680.- intensity (Float): Flame intensity. The recommended value range is [0.2, 1.5]. The default value is 0.2. |
3001 | Ambient lighting set | N/A |
3002 | Advertising lights | - startColor (Int64): The initial color of the advertising light. When passing parameters, the hexadecimal color needs to be converted to an Int64 value. For example, for red, the hexadecimal color is #FF0000, and the converted Int64 value is 16711680.- endColor (Int64): The end color of the advertising light. When passing parameters, you need to convert the hexadecimal color into an Int64 value. After configuring the starting color, a gradient effect from the initial color to the ending color will be created.- size (Float): The size of the advertisement light texture. The recommended value range is [8, 15]. The default value is 10.- intensity (Float): Advertising light intensity. The recommended value range is [100, 1000], and the default value is 1000.- range (Float): The distance of the advertising light. The recommended range is [10, 40]. The default value is 15. |
360 Background
The MetaKit extension allows you to enable a 360-degree panoramic background mode, customize background replacement resources, and enable the gyroscope function to enhance the interactivity and immersion of the scene background. To experience 360-degree background-related functions, set backgroundEffect to true when adding a scene view.
Set replacement resource
After successful setting, you'll see that the video background is replaced with the specified resource. You can experience the panoramic effect by rotating the phone.
key:setBGVideovalue: Object. Contains the following fields:mode: String. Set totex360, which means 360-degree panoramic background.param:path: String. Specifies the URL or local path of the background resource.rotation: (optional) Int. Rotation angle, default value is 0.
Enable background gyroscope
The gyroscope function is only supported after successfully setting up a 360-degree panoramic background. Enabling the gyroscope function can further enhance the interactivity and immersion of the background.
key:setCameraGyrovalue: Object. Contains the following field:state: Boolean. Background gyroscope function status.on: Enabled;off: (default) Disabled.
Face-pinching resources
This section introduces the virtual human face-pinching resources provided by the MetaKit extension.
Girl
This section introduces the face-shaping resources for girl.
Face
An example of lifting (CK_raise_1) and lowering (CK_raise_2) the cheeks is shown in the following video:
The girl resource supports face-pinching operations on the following parts of the face:
| Resource ID | Location |
|---|---|
| FE_raise_1 | Forehead protrusion |
| FE_raise_2 | Forehead collapse |
| TP_raise_1 | Temple protrusion |
| TP_raise_2 | Temple collapse |
| CK_raise_1 | Cheek raise |
| CK_raise_2 | Cheek collapse |
| MD_width_1 | Mandible outward |
| MD_width_2 | Mandible inward |
| MD_updown_1 | Mandible up and down |
| MD_updown_2 | Mandible up |
| C_width_1 | Chin stretch (left and right) |
| C_width_2 | Chin tightening (left and right) |
| C_updown_1 | Chin stretch |
| C_updown_2 | Chin stretch |
Eyebrow
The following are examples of adjusting the eyebrows to be longer (EB_length_1) and shorter (EB_length_2):
The girl resource supports face-pinching operations on the following parts of the eyebrows:
| Resource ID | Location |
|---|---|
| EB_width_1 | Eyebrows moved inwards |
| EB_width_2 | Eyebrows moved outwards |
| EB_updown_1 | Eyebrows moved down |
| EB_updown_2 | Eyebrows moved up |
| EB_thickness | Adjust the thickness of eyebrows |
| EBIN_updown_1 | Inner eyebrow moved up |
| EBIN_updown_2 | Inner eyebrow moved down |
| EBMID_updown_1 | Middle eyebrow moved up |
| EBMID_updown_2 | Middle eyebrow moved down |
| EB_length_1 | Adjust eyebrow length |
| EB_length_2 | Adjust eyebrow length |
| EBOUT_updown_1 | Outer eyebrow high position |
| EBOUT_updown_2 | Outer eyebrow low position |
Eye
The following are examples of adjusting the overall enlargement (E_size_1) and shrinking of the eyes (E_size_2):
The girl resource supports face-pinching operations on the following parts of the eyes:
| Resource ID | Location |
|---|---|
| E_width_1 | Eyes inward |
| E_width_2 | Eyes outward |
| E_updown_1 | Eyes up adjustment |
| E_updown_2 | Eyes down adjustment |
| IC_width_1 | Inner corner of eye facing inward |
| IC_width_2 | Inner corner of eye facing outward |
| IC_updown_1 | Inner corner of eye upward |
| IC_updown_2 | Inner corner of eye downward |
| UEIN_updown_1 | Upper eyelid tip up |
| UEIN_updown_2 | Upper eyelid tip down |
| UE_updown_1 | Upper eyelid upwards |
| UE_updown_2 | Upper eyelid downwards |
| UEOUT_updown_1 | Upper eyelid ends upward |
| UEOUT_updown_2 | Upper eyelid ends downward |
| LE_updown_1 | Lower eyelid downwards |
| LE_updown_2 | Lower eyelid upwards |
| OC_width_1 | Outer corner of eye inward |
| OC_width_2 | Outer corner of eye outward |
| OC_updown_1 | Outer corner of eye upward |
| OC_updown_2 | Outer corner of eye downward |
| E_rotate_1 | Eye rotation 1 |
| E_rotate_2 | Eye rotation 2 |
| E_size_1 | Enlarge the entire eye |
| E_size_2 | Reduce the entire eye size |
| EL_updown_1 | Eyelids wider |
| EL_updown_2 | Eyelids narrower |
Nose
The following are examples of adjusting the overall enlargement (NT_size_1) and shrinking (NT_size_2) of the nose tip:
The girl resource supports face-pinching operations on the following parts of the nose:
| Resource ID | Location |
|---|---|
| N_width_1 | Enlarge the nose (left and right) |
| N_width_2 | Shrink the nose (left and right) |
| N_updown_1 | Nose up |
| N_updown_2 | Nose down |
| NB_raise_1 | Nose raised |
| NB_raise_2 | Nose bridge concave |
| NT_size_1 | Enlarge nose tip |
| NT_size_2 | Shrink nose tip |
| NW_width_1 | Nose wings outward |
| NW_width_2 | Nose wings inward |
| NW_updown_1 | Nose wings upward |
| NW_updown_2 | Nose wings downward |
Mouth
The following are examples of adjusting the mouth to move down (M_updown_1) and up (M_updown_2):
The girl resource supports face-pinching operations on the following parts of the mouth:
| Resource ID | Location |
|---|---|
| UL_width_1 | Wider upper lip |
| UL_width_2 | Narrower upper lip |
| LL_width_1 | Wider lower lip |
| LL_width_2 | Narrower lower lip |
| MC_updown_1 | Mouth corners curved upward |
| MC_updown_2 | Mouth corners curved downward |
| M_size_1 | Enlarge the mouth (left and right) |
| M_size_2 | Shrink the mouth (left and right) |
| M_updown_1 | Mouth downward |
| M_updown_2 | Mouth upward |
JSON example
The complete face-shaping JSON is as follows:
{
  "faceParameters": [
    {
      "avatar": "girl",
      "blendshape": [
        {
          "type": "Face",
          "shapes": [
            {
              "key": "FE_raise_1",
              "ch": "prominence of forehead"
            },
            {
              "key": "FE_raise_2",
              "ch": "forehead collapse"
            },
            {
              "key": "TP_raise_1",
              "ch": "prominence of the temple"
            },
            {
              "key": "TP_raise_2",
              "ch": "collapse of the temple"
            },
            {
              "key": "CK_raise_1",
              "ch": "prominence of cheek"
            },
            {
              "key": "CK_raise_2",
              "ch": "sunken cheek"
            },
            {
              "key": "MD_width_1",
              "ch": "mandible outward"
            },
            {
              "key": "MD_width_2",
              "ch": "mandible inward"
            },
            {
              "key": "MD_updown_1",
              "ch": "mandible down"
            },
            {
              "key": "MD_updown_2",
              "ch": "mandible up"
            },
            {
              "key": "C_width_1",
              "ch": "Stretch your jaw left and right"
            },
            {
              "key": "C_width_2",
              "ch": "chin tightening left and right"
            },
            {
              "key": "C_updown_1",
              "ch": "chin stretch"
            },
            {
              "key": "C_updown_2",
              "ch": "chin stretch"
            }
          ]
        },
        {
          "type": "Eyebrow",
          "shapes": [
            {
              "key": "EB_width_1",
              "ch": "Eyebrows move inward"
            },
            {
              "key": "EB_width_2",
              "ch": "Eyebrows move outward"
            },
            {
              "key": "EB_updown_1",
              "ch": "Eyebrows move downward"
            },
            {
              "key": "EB_updown_2",
              "ch": "Eyebrows move upward"
            },
            {
              "key": "EB_thickness",
              "ch": "Adjust the thickness of eyebrows"
            },
            {
              "key": "EBIN_updown_1",
              "ch": "Inner eyebrow moves upward"
            },
            {
              "key": "EBIN_updown_2",
              "ch": "Inner eyebrow moves downward"
            },
            {
              "key": "EBMID_updown_1",
              "ch": "Middle eyebrow curved upward"
            },
            {
              "key": "EBMID_updown_2",
              "ch": "Middle eyebrow concave"
            },
            {
              "key": "EB_length_1",
              "ch": "Adjust the length of eyebrows"
            },
            {
              "key": "EB_length_2",
              "ch": "Adjust eyebrows to short"
            },
            {
              "key": "EBOUT_updown_1",
              "ch": "high position of outer eyebrows"
            },
            {
              "key": "EBOUT_updown_2",
              "ch": "low position of outer eyebrow"
            }
          ]
        },
        {
          "type": "Eye",
          "shapes": [
            {
              "key": "E_width_1",
              "ch": "Eyes inward"
            },
            {
              "key": "E_width_2",
              "ch": "eyes outward"
            },
            {
              "key": "E_updown_1",
              "ch": "Eye adjustment"
            },
            {
              "key": "E_updown_2",
              "ch": "Under-eye adjustment"
            },
            {
              "key": "IC_width_1",
              "ch": "Inner corner of eye facing inward"
            },
            {
              "key": "IC_width_2",
              "ch": "Inner corner of eye facing outward"
            },
            {
              "key": "IC_updown_1",
              "ch": "Inner corner of eye upward"
            },
            {
              "key": "IC_updown_2",
              "ch": "Inner corner of eye down"
            },
            {
              "key": "UEIN_updown_1",
              "ch": "The front of the upper eyelid is pointing upward"
            },
            {
              "key": "UEIN_updown_2",
              "ch": "The front of the upper eyelid is facing downward"
            },
            {
              "key": "UE_updown_1",
              "ch": "Upper eyelid upward"
            },
            {
              "key": "UE_updown_2",
              "ch": "Upper eyelids move downwards as a whole"
            },
            {
              "key": "UEOUT_updown_1",
              "ch": "The upper eyelid ends upward"
            },
            {
              "key": "UEOUT_updown_2",
              "ch": "Upper eyelid ends downward"
            },
            {
              "key": "LE_updown_1",
              "ch": "Lower eyelid downward"
            },
            {
              "key": "LE_updown_2",
              "ch": "Lower eyelid upward"
            },
            {
              "key": "OC_width_1",
              "ch": "Outer corner of eye moves inward"
            },
            {
              "key": "OC_width_2",
              "ch": "Outer corners of the eyes turn outward"
            },
            {
              "key": "OC_updown_1",
              "ch": "Outer corner of eye up"
            },
            {
              "key": "OC_updown_2",
              "ch": "Outer corner of eye down"
            },
            {
              "key": "E_rotate_1",
              "ch": "Eye rotation 1"
            },
            {
              "key": "E_rotate_2",
              "ch": "Eye rotation 2"
            },
            {
              "key": "E_size_1",
              "ch": "Enlarge the eyes as a whole"
            },
            {
              "key": "E_size_2",
              "ch": "The eyes shrink overall"
            },
            {
              "key": "EL_updown_1",
              "ch": "Eyelids become wider"
            },
            {
              "key": "EL_updown_2",
              "ch": "eyelid distance narrows"
            }
          ]
        },
        {
          "type": "Nose",
          "shapes": [
            {
              "key": "N_width_1",
              "ch": "Enlarge the nose left and right"
            },
            {
              "key": "N_width_2",
              "ch": "The nose shrinks left and right"
            },
            {
              "key": "N_updown_1",
              "ch": "nose up"
            },
            {
              "key": "N_updown_2",
              "ch": "nose down"
            },
            {
              "key": "NB_raise_1",
              "ch": "convex nose"
            },
            {
              "key": "NB_raise_2",
              "ch": "concave nose"
            },
            {
              "key": "NT_size_1",
              "ch": "Enlarge the nose tip as a whole"
            },
            {
              "key": "NT_size_2",
              "ch": "Nose tip overall reduction"
            },
            {
              "key": "NW_width_1",
              "ch": "The nose wings are stretched outward"
            },
            {
              "key": "NW_width_2",
              "ch": "The nose wings are stretched inwards"
            },
            {
              "key": "NW_updown_1",
              "ch": "Stretch on nose wing"
            },
            {
              "key": "NW_updown_2",
              "ch": "Stretch under nose"
            }
          ]
        },
        {
          "type": "Mouth",
          "shapes": [
            {
              "key": "UL_width_1",
              "ch": "Upper lip widens"
            },
            {
              "key": "UL_width_2",
              "ch": "upper lip narrowing"
            },
            {
              "key": "LL_width_1",
              "ch": "Lower lip widens"
            },
            {
              "key": "LL_width_2",
              "ch": "lower lip narrowing"
            },
            {
              "key": "MC_updown_1",
              "ch": "upward curve of the mouth corner"
            },
            {
              "key": "MC_updown_2",
              "ch": "corner of mouth curved downward"
            },
            {
              "key": "M_size_1",
              "ch": "Enlarge the mouth left and right"
            },
            {
              "key": "M_size_2",
              "ch": "The mouth shrinks left and right"
            },
            {
              "key": "M_updown_1",
              "ch": "The mouth moves downward"
            },
            {
              "key": "M_updown_2",
              "ch": "The mouth moves upward"
            }
          ]
        }
      ]
    },
    {
      "avatar": "huamulan",
      "blendshape": []
    }
  ]
}
Dress-up resources
This section introduces the virtual human dress-up resources provided by the MetaKit extension.
Girl
The parts of the girl's outfit and their corresponding resource IDs are as follows:
| Clothing item/Body part | Resource ID |
|---|---|
| Hair | 10000, 10001, 10002 |
| Eyebrows | 10100, 10101, 10102 |
| Blush | 10401, 10402 |
| Headdress | 10801 |
| Tops and jackets | 12100, 12101, 12102 |
| Gloves | 12501 |
| Pants | 14100, 14101, 14102 |
| Socks | 14301 |
| Shoes | 15000, 15001, 15002 |
JSON example
The complete JSON for the replacement is as follows:
{
  "dressResources": [
    {
      "avatar": "girl",
      "resources": [
        {
          "id": 100,
          "name": "Hair",
          "assets": [
            10000,
            10001,
            10002
          ]
        },
        {
          "id": 101,
          "name": "Eyebrows",
          "assets": [
            10100,
            10101,
            10102
          ]
        },
        {
          "id": 104,
          "name": "Blush",
          "assets": [
            10401,
            10402
          ]
        },
        {
          "id": 108,
          "name": "Headdress",
          "assets": [
            10801
          ]
        },
        {
          "id": 121,
          "name": "Tops and Jackets",
          "assets": [
            12100,
            12101,
            12102
          ]
        },
        {
          "id": 125,
          "name": "Gloves",
          "assets": [
            12501
          ]
        },
        {
          "id": 141,
          "name": "Pants",
          "assets": [
            14100,
            14101,
            14102
          ]
        },
        {
          "id": 143,
          "name": "Socks",
          "assets": [
            14301
          ]
        },
        {
          "id": 150,
          "name": "Shoes",
          "assets": [
            15000,
            15001,
            15002
          ]
        }
      ]
    },
    {
      "avatar": "huamulan",
      "resources": []
    }
  ]
}