Quickstart
This guide walks you through the essential steps to get your Convo AI Device Kit R1 up and running. You'll learn how to power on the device, connect it to your network, and start talking to the AI agent.
Prerequisites
Before you begin, ensure you have the following:
- Agora Convo AI Device Kit
- Smartphone with Bluetooth capability
- Access to your Wi-Fi network and password
Power on the device
-
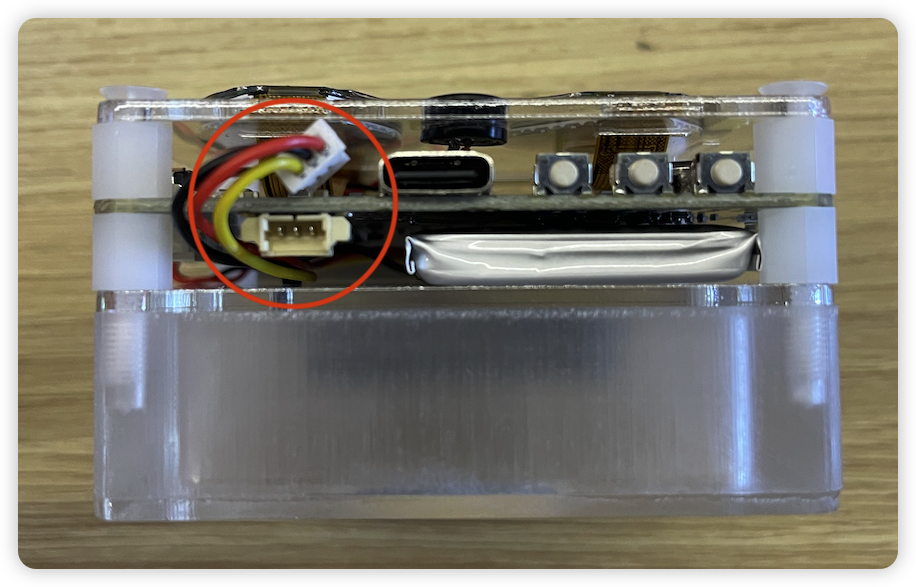
Plug the battery cable into the connector on the device.
-
Press and hold the Middle button until the vibration stops.
-
Release the button. The red LED blinks and you hear the voice prompt: "The network connection has failed, please check your network."
The device is now powered on and ready for setup.
Install the Agora Convo AI app
- Scan the QR code on the device using your smartphone camera.

- Follow the instructions to download and install the app.
- Launch the Convo AI IoT app (Mindchat).
- Tap Call AI Engine to access the login screen.
- Grant the required permissions when prompted, then complete the login.
Configure your network connection
Before starting conversations, follow these steps to connect your device to your Wi-Fi network.
-
Press and hold the Left button for 3 seconds or longer.
-
You hear the voice prompt: "Please use Bluetooth for network provisioning."
The device is now in network configuration mode and ready to pair with your smartphone.
-
On your smartphone, open the Convo AI app and tap the Menu button in the top-left corner.
-
Under Convo AI Devices, tap the + button.
-
Tap the + button in the top-right to add a new device.
-
Tap Next.
-
When your device appears in the list, tap the device name.
-
Confirm your Wi-Fi network name.
-
Enter your Wi-Fi password and tap Next.
-
Wait 3-5 seconds for the "Device Added" confirmation message.
Your device is now connected to your network.
Start a conversation
- Short press the Middle button to wake up the device.
- Wait 3-5 seconds for the eye screens to activate. The red LED stops blinking, indicating the device is ready.
- Ask your question or make a request. For example:
- "Tell me about the Agora Convo AI Device Kit."
- "Tell me about Agora."
- "Who is Bill Gates?"
- "What's 15% off a $328 dress?"
Power off the device
The device enters sleep mode automatically after 3 minutes of inactivity. You hear the voice prompt: "AI agent disconnected."
To manually disconnect:
- Sleep mode: Press and hold the Middle button until the red LED turns off and vibration stops.
- Full shutdown: Disconnect the battery cable from the device connector.
Next steps
Now that your device is set up, run the demo project.