# Fastboard quickstart (/en/realtime-media/whiteboard/build/set-up-and-build-your-first-app/get-started-uikit)
> For AI agents: see the complete documentation index at [llms.txt](/llms.txt).
The Fastboard SDK is the latest generation of the Whiteboard SDK launched by Agora to help developers quickly build whiteboard applications. The Fastboard SDK simplifies the APIs of the Whiteboard SDK and adds UI implementations. These improvements enable you to join a room with just a few lines of code and instantly experience real-time interactive collaboration using a variety of rich editing tools. In addition, the Fastboard SDK integrates [window-manager](https://github.com/netless-io/window-manager) and extensions from [netless-app](https://github.com/netless-io/netless-app), which allows developers to easily extend the functionality of their whiteboard applications and enrich their users' collaboration experience.
This page explains how to quickly join a whiteboard room and experience the interactive whiteboard features using the Fastboard SDK.
<_PlatformTabsGroup groupMode="structured" canonicalPlatform="web" platforms="["android","ios","web"]" showTabs="true">
<_PlatformPanel platform="android">
<_PlatformProcessedMarker groupMode="structured" canonicalPlatform="web" platform="android" />
## Understand the tech [#understand-the-tech]
The following figure shows the workflow to join a whiteboard room:
Interactive Whiteboard room joining workflow
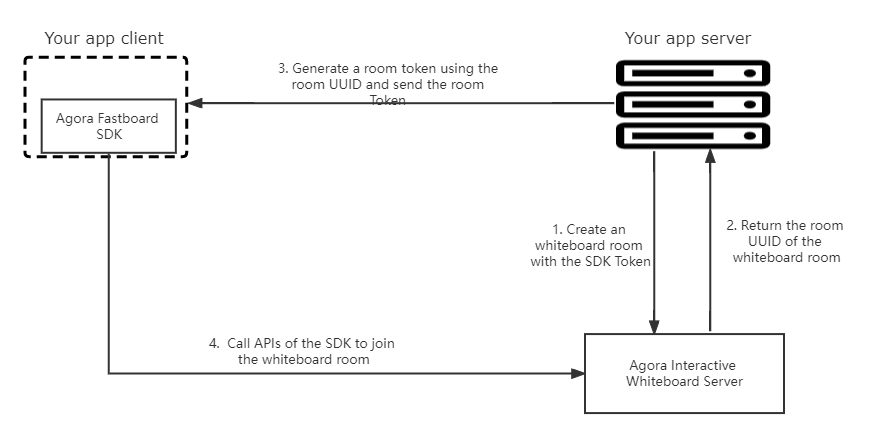
When an app client requests to join a whiteboard room, the app client and your app server interact with the Interactive Whiteboard server in the following steps:
1. The app server sends a request with the SDK token to the Interactive Whiteboard server to create a whiteboard room.
2. The Interactive Whiteboard server returns the room UUID to the app server when a room is created successfully.
3. The app server generates a room token using the returned room UUID and sends the room token and UUID to the app client.
4. The app client calls `createFastRoom` and `join` of the Fastboard SDK to create a `FastRoom` instance and join the interactive whiteboard room.
## Prerequisites [#prerequisites]
* Android Studio
* Android API level 19 or higher
* A valid [Agora account](../manage-agora-account.md#sign-up-and-log-in)
* An Agora project with the Interactive Whiteboard enabled. Get the app identifier and SDK token from Agora Console. See [Enable and configure Interactive Whiteboard](./enable-whiteboard.md).
## Project setup [#project-setup]
Before an app client can join an interactive whiteboard room, your app server needs to call the Agora RESTful APIs to create a room, get the room UUID, generate a room token, and pass the room UUID and room token to the app client.
### Create a whiteboard room [#create-a-whiteboard-room]
Call [/v5/rooms (POST)](../../reference/rest-api/room-management.md#create-a-room-post) on your app server to create a room.
```json
var request = require("request");
var options = {
"method": "POST",
"url": "https://api.netless.link/v5/rooms",
"headers": {
"token": "Your SDK Token",
"Content-Type": "application/json",
"region": "us-sv"
},
body: JSON.stringify({
"isRecord": false
})
};
request(options, function (error, response) {
if (error) throw new Error(error);
console.log(response.body);
});
```
```json
{
"uuid": "4a50xxxxxx796b",
"teamUUID": "RMmLxxxxxx15aw",
"appUUID": "i54xxxxxx1AQ",
"isBan": false,
"createdAt": "2021-01-18T06:56:29.432Z",
"limit": 0
}
```
### Generate a room token [#generate-a-room-token]
After creating a room and getting the `uuid` of the room, your app server needs to generate a room token and send it to the app client.
* Use code. See [Generate a token from your app server](../authenticate-users/generate-token-app-server.mdx). Recommended.
* Call the Interactive Whiteboard RESTful API. See [Generate a room token (POST)](../authenticate-users/generate-token-rest.md#generate-a-room-token-post).
```javascript
var request = require('request');
var options = {
"method": "POST",
"url": "https://api.netless.link/v5/tokens/rooms/",
"headers": {
"token": "Your SDK Token",
"Content-Type": "application/json",
"region": "us-sv"
},
body: JSON.stringify({"lifespan":3600000,"role":"admin"})
};
request(options, function (error, response) {
if (error) throw new Error(error);
console.log(response.body);
});
```
```text
"NETLESSROOM_YWs9XXXXXXXXXXXZWNhNjk"
```
### Create an Android project [#create-an-android-project]
1. In Android Studio, create a Phone and Tablet Android project with an Empty Activity.
2. In `/Gradle Scripts/build.gradle(Module: .app)`, add the following line to `dependencies`:
```text
dependencies {
implementation 'com.github.netless-io:fastboard-android:1.2.0'
}
```
You can find the latest SDK version number in the [Release notes](../../reference/release-notes).
### Create the user interface [#create-the-user-interface]
In `/app/res/layout/activity_main.xml`, replace the content with the following:
```xml
```
### Join the whiteboard room [#join-the-whiteboard-room]
In `/app/java/com.example./MainActivity`, add the following lines:
```java
package com.example.fastboardquickstart
import android.content.pm.ActivityInfo
import androidx.appcompat.app.AppCompatActivity
import android.os.Bundle
import io.agora.board.fast.FastboardView
import io.agora.board.fast.model.FastRegion
import io.agora.board.fast.model.FastRoomOptions
class MainActivity : AppCompatActivity() {
override fun onCreate(savedInstanceState: Bundle?) {
super.onCreate(savedInstanceState)
setContentView(R.layout.activity_main)
supportActionBar?.hide()
requestedOrientation = ActivityInfo.SCREEN_ORIENTATION_LANDSCAPE
setupFastboard()
}
private fun setupFastboard() {
val fastboardView = findViewById(R.id.fastboard_view)
val fastboard = fastboardView.fastboard
val roomOptions = FastRoomOptions(
"The App Identifier of your whiteboard project",
"The room UUID",
"The room Token",
"The unique identifier of a user",
FastRegion.US_SV
)
val fastRoom = fastboard.createFastRoom(roomOptions)
fastRoom.join()
}
}
```
## Reference [#reference]
Build the project in Android Studio, and run it on a simulator or a physical mobile device. If the project runs successfully, you can see the whiteboard page and use the toolbar to write and draw on the whiteboard.
<_PlatformProcessedMarker close="true" />
<_PlatformPanel platform="ios">
<_PlatformProcessedMarker groupMode="structured" canonicalPlatform="web" platform="ios" />
## Understand the tech [#understand-the-tech-1]
The following figure shows the workflow to join a whiteboard room:
Interactive Whiteboard room joining workflow

When an app client requests to join an Interactive Whiteboard room, the app client and your app server interact with the Interactive Whiteboard server in the following steps:
1. The app server sends a request with the SDK token to the Interactive Whiteboard server to create a whiteboard room.
2. The Interactive Whiteboard server returns the room UUID to the app server when a room is created successfully.
3. The app server generates a room token using the returned room UUID and sends the room token and UUID to the app client.
4. The app client calls `createFastRoom` and `join` of the Fastboard SDK to create a `FastRoom` instance and join the interactive whiteboard room.
## Prerequisites [#prerequisites-1]
* Xcode 12.0 or later
* iOS 9.0 or later
* The [latest version](https://cocoapods.org/) of CocoaPods
* A valid [Agora account](../manage-agora-account.md#sign-up-and-log-in)
* An Agora project with the Interactive Whiteboard enabled. Get the app identifier and SDK token from Agora Console. See [Enable and configure Interactive Whiteboard](./enable-whiteboard.md).
## Project setup [#project-setup-1]
Before an app client can join an interactive whiteboard room, your app server needs to call the Agora RESTful APIs to create a room, get the room UUID, generate a room token, and pass the room UUID and room token to the app client.
### Create a whiteboard room [#create-a-whiteboard-room-1]
Call [/v5/rooms (POST)](../../reference/rest-api/room-management.md#create-a-room-post) on your app server to create a room.
```javascript
var request = require("request");
var options = {
"method": "POST",
"url": "https://api.netless.link/v5/rooms",
"headers": {
"token": "Your SDK Token",
"Content-Type": "application/json",
"region": "us-sv"
},
body: JSON.stringify({
"isRecord": false
})
};
request(options, function (error, response) {
if (error) throw new Error(error);
console.log(response.body);
});
```
### Generate a room token [#generate-a-room-token-1]
After creating a room and getting the `uuid` of the room, your app server needs to generate a room token and send it to the app client.
* Use code. See [Generate a token from your app server](../authenticate-users/generate-token-app-server.mdx). Recommended.
* Call the Interactive Whiteboard RESTful API. See [Generate a room token (POST)](../authenticate-users/generate-token-rest.md#generate-a-room-token-post).
```javascript
var request = require('request');
var options = {
"method": "POST",
"url": "https://api.netless.link/v5/tokens/rooms/",
"headers": {
"token": "Your SDK Token",
"Content-Type": "application/json",
"region": "us-sv"
},
body: JSON.stringify({"lifespan":3600000,"role":"admin"})
};
request(options, function (error, response) {
if (error) throw new Error(error);
console.log(response.body);
});
```
### Create a project in Xcode [#create-a-project-in-xcode]
1. Open Xcode and click Create a new Xcode project.
2. Select iOS, then Single-View Application.
3. Fill in the project information:
* Product Name: `ExampleFastboard`
* Interface: Storyboard
* Language: Swift
4. Select the storage directory for your project and click Create.
### Get the Fastboard SDK [#get-the-fastboard-sdk]
1. In Terminal, go to the directory of your Xcode project and run:
```text
pod init
```
2. Add the following lines to the `Podfile`:
```ruby
platform :ios, '10.0'
use_frameworks!
target 'ExampleFastboard' do
pod 'Fastboard'
end
```
3. Run:
```text
pod install
```
### Join the whiteboard room [#join-the-whiteboard-room-1]
In `ViewController.swift`, replace the content with the following code:
```swift
import UIKit
import Fastboard
class ViewController: UIViewController {
var fastRoom: FastRoom!
override func viewDidLoad() {
super.viewDidLoad()
let config = FastRoomConfiguration(
appIdentifier: "The App Identifier of your whiteboard project",
roomUUID: "The room UUID",
roomToken: "The room Token",
region: .US,
userUID: "The unique identifier of a user"
)
let fastRoom = Fastboard.createFastRoom(withFastRoomConfig: config)
view.addSubview(fastRoom.view)
fastRoom.joinRoom()
self.fastRoom = fastRoom
}
override func viewDidLayoutSubviews() {
super.viewDidLayoutSubviews()
fastRoom.view.frame = view.bounds
}
}
```
## Reference [#reference-1]
Build the project in Xcode and run it on a simulator or a physical mobile device. If the project runs successfully, you can see the whiteboard page and use the toolbar to write and draw on the whiteboard.
<_PlatformProcessedMarker close="true" />
<_PlatformPanel platform="web">
<_PlatformProcessedMarker groupMode="structured" canonicalPlatform="web" platform="web" />
## Understand the tech [#understand-the-tech-2]
The following figure shows the workflow to join a whiteboard room:
Interactive Whiteboard room joining workflow

When an app client requests to join an interactive whiteboard room, the app client and your app server interact with the Interactive Whiteboard server in the following steps:
1. The app server sends a request with the SDK token to the Interactive Whiteboard server to create a whiteboard room.
2. The Interactive Whiteboard server returns the room UUID to the app server when a room is created successfully.
3. The app server generates a room token using the returned room UUID and sends the room token and UUID to the app client.
4. The app client calls `createFastboard` of the Fastboard SDK to create a `FastboardApp` instance and join the interactive whiteboard room.
Version 1.0.0 adds the `appliance-plugin`, which implements a high-performance whiteboard drawing tool and supports use in multi-window mode. For details, see [Appliance Plugin](../draw-and-edit-content/appliance-plugin.mdx).
## Prerequisites [#prerequisites-2]
* A web browser that meets the minimum version requirements in [Supported platforms](../../reference/supported-platforms).
* A valid [Agora account](../manage-agora-account.md#sign-up-and-log-in).
* An Agora project with the Interactive Whiteboard enabled. Get the App Identifier and SDK token from Agora Console. See [Enable and configure Interactive Whiteboard](./enable-whiteboard.md).
## Project setup [#project-setup-2]
Before an app client can join an interactive whiteboard room, your app server needs to call the Agora RESTful APIs to create a room, get the room UUID, generate a room token, and pass the room UUID and room token to the app client.
### Create a whiteboard room [#create-a-whiteboard-room-2]
Call [/v5/rooms (POST)](../../reference/rest-api/room-management.md#create-a-room-post) on your app server to create a room.
```javascript
var request = require("request");
var options = {
"method": "POST",
"url": "https://api.netless.link/v5/rooms",
"headers": {
"token": "Your SDK Token",
"Content-Type": "application/json",
"region": "us-sv"
},
body: JSON.stringify({
"isRecord": false
})
};
request(options, function (error, response) {
if (error) throw new Error(error);
console.log(response.body);
});
```
### Generate a room token [#generate-a-room-token-2]
After creating a room and getting the `uuid` of the room, your app server needs to generate a room token and send it to the app client.
* Use code. See [Generate a token from your app server](../authenticate-users/generate-token-app-server.mdx). Recommended.
* Call the Interactive Whiteboard RESTful API. See [Generate a room token (POST)](../authenticate-users/generate-token-rest.md#generate-a-room-token-post).
```javascript
var request = require('request');
var options = {
"method": "POST",
"url": "https://api.netless.link/v5/tokens/rooms/",
"headers": {
"token": "Your SDK Token",
"Content-Type": "application/json",
"region": "us-sv"
},
body: JSON.stringify({"lifespan":3600000,"role":"admin"})
};
request(options, function (error, response) {
if (error) throw new Error(error);
console.log(response.body);
});
```
### Create a basic web application [#create-a-basic-web-application]
Create a new directory named `fastboard_quickstart`. For a minimal web app client, create the following files in the directory:
* `package.json`
* `index.html`
* `main.js`
### Add dependencies [#add-dependencies]
Run the following line to install the latest version of the Fastboard SDK and other dependencies:
```text
npm add @netless/fastboard @netless/window-manager white-web-sdk
```
### Create the user interface [#create-the-user-interface-1]
In `index.html`, add the following code:
```html
Vite App
```
### Join the whiteboard room [#join-the-whiteboard-room-2]
Open `main.js` and add the following code:
```javascript
import { createFastboard, mount } from "@netless/fastboard";
let app;
async function mountFastboard(div) {
app = await createFastboard({
sdkConfig: {
appIdentifier: "Your App Identifier",
region: "cn-hz",
},
joinRoom: {
uid: "User ID",
uuid: "Room UUID",
roomToken: "Room Token",
},
managerConfig: {
cursor: true,
},
});
window.app = app;
return mount(app, div);
}
mountFastboard(document.getElementById("app"));
```
## Reference [#reference-2]
1. To install dependencies, run `npm install`.
2. To run the project, run `npm run dev`.
Running the web app through a local server (localhost) is for testing purposes only. In production, ensure that you use the HTTPS protocol when deploying your project.
<_PlatformProcessedMarker close="true" />