# Whiteboard SDK quickstart (/en/realtime-media/whiteboard/build/set-up-and-build-your-first-app/get-started-sdk)
> For AI agents: see the complete documentation index at [llms.txt](/llms.txt).
Interactive Whiteboard rooms enable users to present ideas, share multi-media content, and collaborate on projects on a shared whiteboard from multiple devices simultaneously.
This article describes how to create a basic project and use the Whiteboard SDK to implement basic whiteboard features.
<_PlatformTabsGroup groupMode="structured" canonicalPlatform="web" platforms="["android","ios","web"]" showTabs="true">
<_PlatformPanel platform="android">
<_PlatformProcessedMarker groupMode="structured" canonicalPlatform="web" platform="android" />
## Understand the tech [#understand-the-tech]
The following figure shows the workflow to join an Interactive Whiteboard room.
Interactive Whiteboard room joining workflow
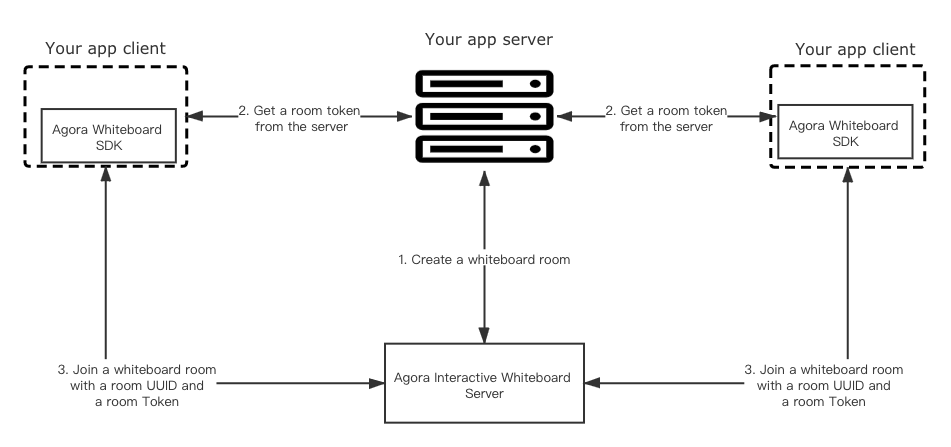
When an app client requests to join an Interactive Whiteboard room, the app client and your app server interact with the Interactive Whiteboard server in the following steps:
1. The app server sends a request with the SDK token to the Interactive Whiteboard server to create a whiteboard room.
2. The Interactive Whiteboard server returns the room UUID to the app server when a room is created successfully.
3. The app server generates a room token using the returned room UUID and sends the room token and UUID to the app client.
4. The app client initializes a Whiteboard SDK instance with the App Identifier received from the Agora Console.
5. The app client calls a method to join the Interactive Whiteboard room using the room UUID and room token.
## Prerequisites [#prerequisites]
* Android Studio
* Android API level 19 or higher
* A valid [Agora account](../manage-agora-account.md#sign-up-and-log-in)
* An Agora project with the Interactive Whiteboard enabled. Get the app identifier and SDK token from the Agora Console. See [Enable and configure Interactive Whiteboard](./enable-whiteboard.md)
## Project setup [#project-setup]
### Create an Android project [#create-an-android-project]
[Create a project](https://developer.android.com/studio/projects/create-project) in Android Studio.
* Set the project name as `WhiteBoard`.
* Set the package name as `com.example.whiteboard`.
* Select Empty Activity.
* Select API 19 for Minimum SDK.
### Add Android device permission [#add-android-device-permission]
```xml
```
### Get Whiteboard SDK [#get-whiteboard-sdk]
```text
dependencies {
implementation 'com.github.netless-io:whiteboard-android:'
}
```
You can find the latest SDK version number in the [Release Notes](../../reference/release-notes).
### Prevent code obfuscation [#prevent-code-obfuscation]
```text
-keep class com.herewhite.** { *; }
```
### Create a room [#create-a-room]
Call the Interactive Whiteboard RESTful API on your app server to create a room. See [Create a room (POST)](../../reference/rest-api/room-management.md#create-a-room-post).
```javascript
var request = require("request");
var options = {
"method": "POST",
"url": "https://api.netless.link/v5/rooms",
"headers": {
"token": "Your SDK Token",
"Content-Type": "application/json",
"region": "us-sv"
},
body: JSON.stringify({
"isRecord": false
})
};
request(options, function (error, response) {
if (error) throw new Error(error);
console.log(response.body);
});
```
### Generate a Room Token [#generate-a-room-token]
After creating a room and getting the `uuid` of the room, you need to generate a Room Token on your app server and send it to the app client.
* Use code. See [Generate a Token from your app server](../authenticate-users/generate-token-app-server.mdx). Recommended.
* Call the Interactive Whiteboard RESTful API. See [Generate a Room Token (POST)](../authenticate-users/generate-token-rest.md#generate-a-room-token-post).
```javascript
var request = require('request');
var options = {
"method": "POST",
"url": "https://api.netless.link/v5/tokens/rooms/",
"headers": {
"token": "Your SDK Token",
"Content-Type": "application/json",
"region": "us-sv"
},
body: JSON.stringify({"lifespan":3600000,"role":"admin"})
};
request(options, function (error, response) {
if (error) throw new Error(error);
console.log(response.body);
});
```
### Create user interface and join the whiteboard room [#create-user-interface-and-join-the-whiteboard-room]
```java
package com.example.whiteboard;
public class MainActivity extends AppCompatActivity {
final String appId = "Your App Identifier";
final String uuid = "Room UUID";
final String roomToken = "Room Token";
final String uid = "User uid";
WhiteboardView whiteboardView;
WhiteSdkConfiguration sdkConfiguration = new WhiteSdkConfiguration(appId, true);
RoomParams roomParams = new RoomParams(uuid, roomToken, uid);
@Override
protected void onCreate(Bundle savedInstanceState) {
super.onCreate(savedInstanceState);
setContentView(R.layout.activity_main);
whiteboardView = findViewById(R.id.white);
sdkConfiguration.setRegion(Region.us);
WhiteSdk whiteSdk = new WhiteSdk(whiteboardView, MainActivity.this, sdkConfiguration);
whiteSdk.joinRoom(roomParams, new Promise() {
@Override
public void then(Room wRoom) {
MemberState memberState = new MemberState();
memberState.setCurrentApplianceName("pencil");
memberState.setStrokeColor(new int[]{255, 0, 0});
wRoom.setMemberState(memberState);
}
@Override
public void catchEx(SDKError t) {
Object o = t.getMessage();
Log.i("showToast", o.toString());
Toast.makeText(MainActivity.this, o.toString(), Toast.LENGTH_SHORT).show();
}
});
}
}
```
## Reference [#reference]
Build the project in Android Studio, and run it on a simulator or a physical mobile device.
<_PlatformProcessedMarker close="true" />
<_PlatformPanel platform="ios">
<_PlatformProcessedMarker groupMode="structured" canonicalPlatform="web" platform="ios" />
## Understand the tech [#understand-the-tech-1]
The following figure shows the workflow to join an Interactive Whiteboard room.
Interactive Whiteboard room joining workflow

When an app client requests to join an Interactive Whiteboard room, the app client and your app server interact with the Interactive Whiteboard server in the following steps:
1. The app server sends a request with the SDK token to the Interactive Whiteboard server to create a whiteboard room.
2. The Interactive Whiteboard server returns the room UUID to the app server when a room is created successfully.
3. The app server generates a room token using the returned room UUID and sends the room token and UUID to the app client.
4. The app client initializes a Whiteboard SDK instance with the App Identifier received from the Agora Console.
5. The app client calls a method to join the Interactive Whiteboard room using the room UUID and room token.
## Prerequisites [#prerequisites-1]
* Xcode 12.0 or later
* iOS 9.0 or later
* The [latest version](https://cocoapods.org/) of CocoaPods
* A valid [Agora account](../manage-agora-account.md#sign-up-and-log-in)
* An Agora project with the Interactive Whiteboard enabled. Get the app identifier and SDK token from the Agora Console. See [Enable and configure Interactive Whiteboard](./enable-whiteboard.md)
## Project setup [#project-setup-1]
### Create a project in Xcode [#create-a-project-in-xcode]
* Set Product Name to `Whiteboard`.
* Set Organization Identifier to `agora`.
* Select `Swift` for Language.
* Select `Storyboard` for User Interface.
To use the Objective-C SDK in your Swift app, create a bridging header and add:
```objc
#import
```
### Get Whiteboard SDK [#get-whiteboard-sdk-1]
```text
pod init
```
```ruby
platform :ios, '10.0'
target 'Whiteboard' do
pod 'Whiteboard'
end
```
```text
pod install
```
### Create a room [#create-a-room-1]
Call the Interactive Whiteboard RESTful API on your app server to create a room. See [Create a room (POST)](../../reference/rest-api/room-management.md#create-a-room-post).
```javascript
var request = require("request");
var options = {
"method": "POST",
"url": "https://api.netless.link/v5/rooms",
"headers": {
"token": "Your SDK Token",
"Content-Type": "application/json",
"region": "us-sv"
},
body: JSON.stringify({
"isRecord": false
})
};
request(options, function (error, response) {
if (error) throw new Error(error);
console.log(response.body);
});
```
### Generate a Room Token [#generate-a-room-token-1]
After creating a room and getting the `uuid` of the room, you need to generate a Room Token on your app server and send it to the app client.
* Use code. See [Generate a Token from your app server](../authenticate-users/generate-token-app-server.mdx). Recommended.
* Call the Interactive Whiteboard RESTful API. See [Generate a Room Token (POST)](../authenticate-users/generate-token-rest.md#generate-a-room-token-post).
```javascript
var request = require('request');
var options = {
"method": "POST",
"url": "https://api.netless.link/v5/tokens/rooms/",
"headers": {
"token": "Your SDK Token",
"Content-Type": "application/json",
"region": "us-sv"
},
body: JSON.stringify({"lifespan":3600000,"role":"admin"})
};
request(options, function (error, response) {
if (error) throw new Error(error);
console.log(response.body);
});
```
### Join the whiteboard room [#join-the-whiteboard-room]
```swift
import UIKit
class ViewController: UIViewController {
var config: WKWebViewConfiguration?
var boardView: WhiteBoardView?
var roomConfig: WhiteRoomConfig?
var memberState: WhiteMemberState?
var room: WhiteRoom?
var sdk: WhiteSDK?
var sdkConfig: WhiteSdkConfiguration?
var commonDelegate: WhiteCommonCallbackDelegate?
var roomCallbackDelegate: WhiteRoomCallbackDelegate?
func setupViews() {
self.config = WKWebViewConfiguration()
self.boardView = WhiteBoardView(frame: CGRect(x: 0, y: 0, width: self.view.bounds.width, height: self.view.bounds.height), configuration: self.config!)
self.view.addSubview(self.boardView!)
}
func initSDK() {
self.sdkConfig = WhiteSdkConfiguration(app: "Your App Indentifier")
sdkConfig.region = WhiteRegionUS
self.sdk = WhiteSDK(whiteBoardView: self.boardView!, config: self.sdkConfig!, commonCallbackDelegate: self.commonDelegate)
}
func joinRoom() {
self.roomConfig = WhiteRoomConfig(uuid: "Your uuid", roomToken:"Your room token", uid: "user uid")
self.memberState = WhiteMemberState()
self.memberState?.currentApplianceName = WhiteApplianceNameKey.AppliancePencil
self.memberState?.strokeColor = [255,0,0]
self.sdk!.joinRoom(with: self.roomConfig!, callbacks: roomCallbackDelegate, completionHandler: { (success, room, error) in
if success {
self.room = room
self.room!.setMemberState(self.memberState!)
}
})
}
}
```
## Reference [#reference-1]
Build the project in Xcode, and run it on a simulator or a physical mobile device.
<_PlatformProcessedMarker close="true" />
<_PlatformPanel platform="web">
<_PlatformProcessedMarker groupMode="structured" canonicalPlatform="web" platform="web" />
## Understand the tech [#understand-the-tech-2]
The following figure shows the workflow to join an Interactive Whiteboard room.
Interactive Whiteboard room joining workflow

When an app client requests to join an Interactive Whiteboard room, the app client and your app server interact with the Interactive Whiteboard server in the following steps:
1. The app server sends a request with the SDK token to the Interactive Whiteboard server to create a whiteboard room.
2. The Interactive Whiteboard server returns the room UUID to the app server when a room is created successfully.
3. The app server generates a room token using the returned room UUID and sends the room token and UUID to the app client.
4. The app client initializes a Whiteboard SDK instance with the App Identifier received from the Agora Console.
5. The app client calls a method to join the Interactive Whiteboard room using the room UUID and room token.
## Prerequisites [#prerequisites-2]
* A web browser that meets the minimum version requirements in [Supported platforms](../../reference/supported-platforms).
* A valid [Agora account](../manage-agora-account.md#sign-up-and-log-in).
* An Agora project with the Interactive Whiteboard enabled. Get the app identifier and SDK token from the Agora Console. See [Enable and configure Interactive Whiteboard](./enable-whiteboard.md).
## Project setup [#project-setup-2]
### Create a basic web application [#create-a-basic-web-application]
```text
agora_join_whiteboard_room/
├── index.html
└── joinWhiteboard.js
```
```html
```
### Create a room [#create-a-room-2]
Call [/v5/rooms (POST)](../../reference/rest-api/room-management.md#create-a-room-post) on your app server to create a room.
```javascript
var request = require("request");
var options = {
"method": "POST",
"url": "https://api.netless.link/v5/rooms",
"headers": {
"token": "Your SDK Token",
"Content-Type": "application/json",
"region": "us-sv"
},
body: JSON.stringify({
"isRecord": false
})
};
request(options, function (error, response) {
if (error) throw new Error(error);
console.log(response.body);
});
```
### Generate a room token [#generate-a-room-token-2]
After creating a room and getting the `uuid` of the room, your app server needs to generate a room token and send it to the app client.
* Use code. See [Generate a Token from your app server](../authenticate-users/generate-token-app-server.mdx). Recommended.
* Call the Interactive Whiteboard RESTful API. See [Generate a Room Token (POST)](../authenticate-users/generate-token-rest.md#generate-a-room-token-post).
```javascript
var request = require('request');
var options = {
"method": "POST",
"url": "https://api.netless.link/v5/tokens/rooms/",
"headers": {
"token": "Your SDK Token",
"Content-Type": "application/json",
"region": "us-sv"
},
body: JSON.stringify({"lifespan":3600000,"role":"admin"})
};
request(options, function (error, response) {
if (error) throw new Error(error);
console.log(response.body);
});
```
### Join the whiteboard room [#join-the-whiteboard-room-1]
In `index.html`, add `` right below the `` line.
Open `joinWhiteboard.js` and add the following code:
```javascript
var whiteWebSdk = new WhiteWebSdk({
appIdentifier: "Your App Identifier",
region: "us-sv",
});
var joinRoomParams = {
uuid: "Your room UUID",
uid: "user uid",
roomToken: "Your room token",
};
whiteWebSdk.joinRoom(joinRoomParams).then(function(room) {
room.bindHtmlElement(document.getElementById("whiteboard"));
}).catch(function(err) {
console.error(err);
});
```
## Reference [#reference-2]
Open `index.html` in your browser. If the application runs successfully, you can use your mouse to write and draw on the page.
<_PlatformProcessedMarker close="true" />