# Quickstart (/en/realtime-media/video/get-started-sdk/web)
> For AI agents: see the complete documentation index at [llms.txt](/llms.txt).
This page provides a step-by-step guide on how to create a basic Video Calling app using the Agora Video SDK.
## Understand the tech [#understand-the-tech-3]
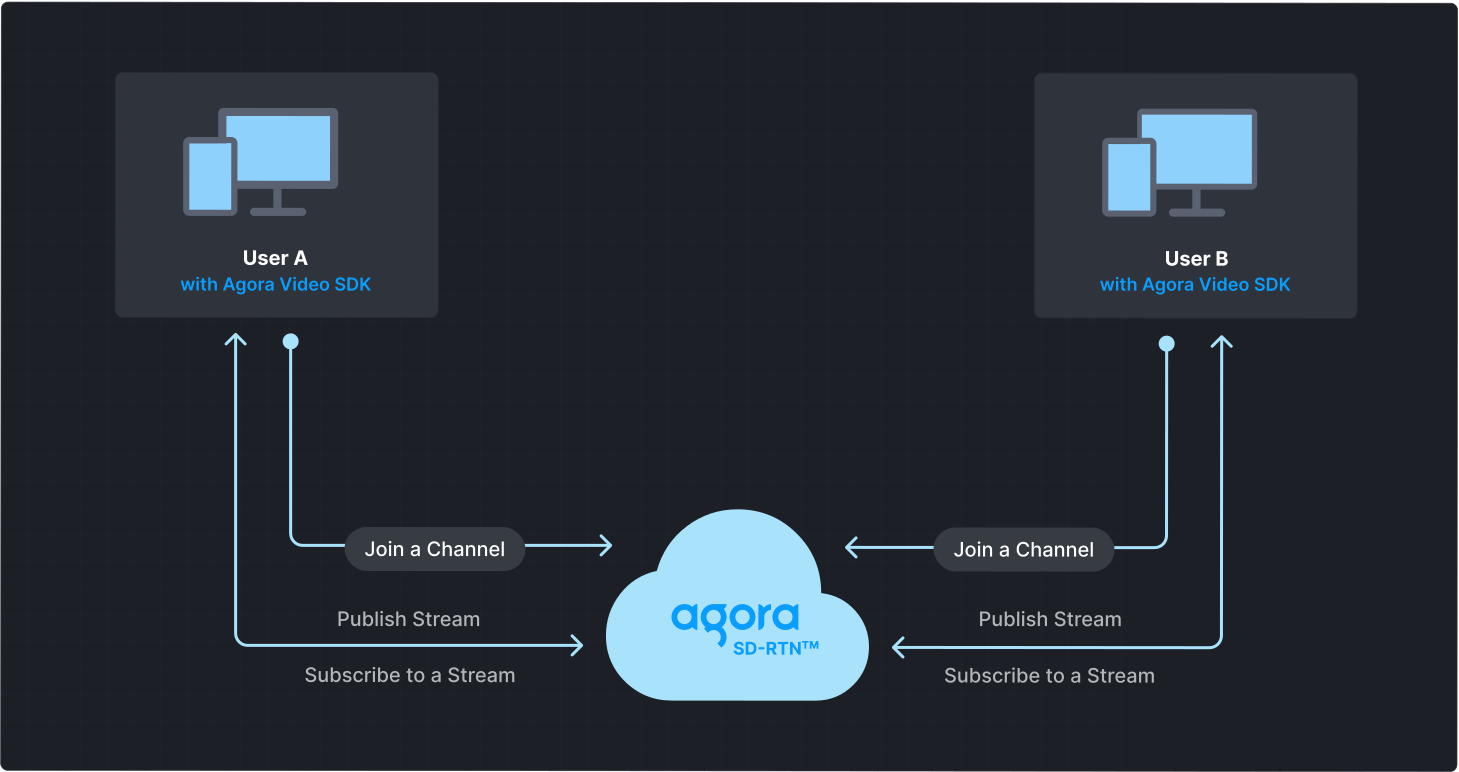
To start a Video Calling session, implement the following steps in your app:
* **Initialize the engine**: Before calling other APIs, create and initialize an engine instance.
* **Join a channel**: Call methods to create and join a channel.
* **Send and receive audio and video**: All users can publish streams to the channel and subscribe to audio and video streams published by other users in the channel.
## Prerequisites [#prerequisites-3]
* A camera and a microphone.
* A valid Agora account and project. See [Agora account management](/en/realtime-media/video/manage-agora-account) for details.
* A [supported browser](/en/realtime-media/video/reference/supported-platforms#mobile-browsers).
Agora strongly recommends using the latest stable version of Google Chrome.
* [Node.js and npm](https://docs.npmjs.com/downloading-and-installing-node-js-and-npm)
## Set up your project [#set-up-your-project-3]
Create a new project
Add to an existing project
To initialize a new Vite project, take the following steps:
1. Open a terminal and run the following command:
```
npm create vite@latest agora_web_quickstart -- --template vanilla
```
This creates a new folder named `agora_web_quickstart` and initializes a Vite project inside it using the `vanilla` JavaScript template.
2. Navigate to the newly created folder. Download and set up dependencies for your project:
```
cd agora_web_quickstart
npm install
```
3. Create a user interface for your project. The UI consists of buttons to join and leave a channel. Refer to [Create a user interface](#create-a-user-interface) to get a bare bones html layout.
To add Video Calling to your existing project, take the following steps:
1. Create a JavaScript file in your project's `src` folder to add `AgoraRTCClient` code that implements specific application logic.
2. Add an HTML file to your project to create a user interface. The UI consists of buttons to join and leave a channel. Refer to [Create a user interface](#create-a-user-interface) to get a bare bones HTML layout.
3. Include the JavaScript file in your HTML file.
```html
```
### Install the SDK [#install-the-sdk-3]
Add the Video SDK to your project:
```bash
npm install agora-rtc-sdk-ng
```
## Implement Video Calling [#implement-video-calling-3]
This section guides you through the implementation of basic real-time audio and video interaction in your app.
The following figure illustrates the essential steps:
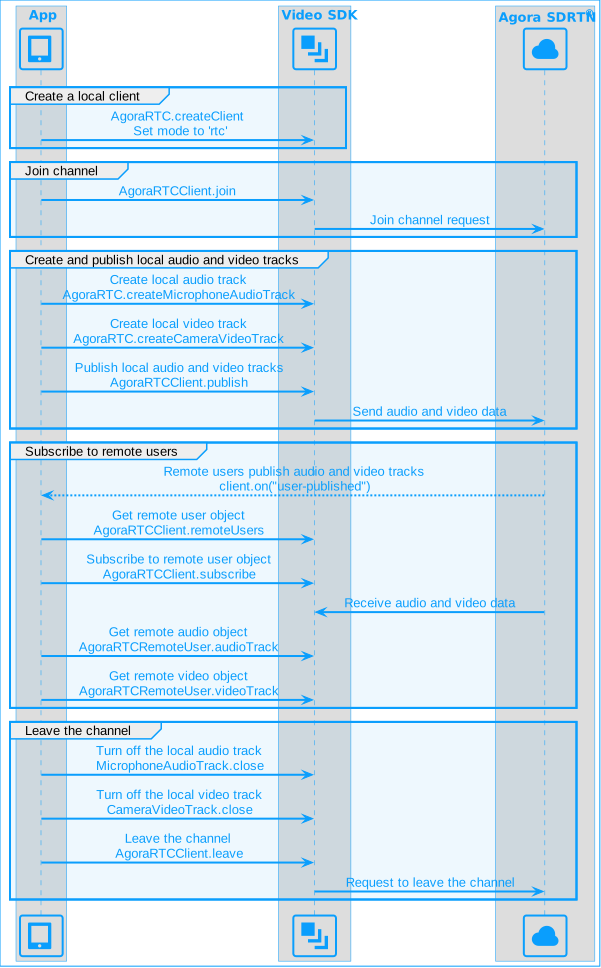
This guide includes [complete sample code](#complete-sample-code) that demonstrates implementing basic real-time interaction. To understand the core API calls in the sample code, review the following implementation steps.
### Import the `AgoraRTC` SDK [#import-the-agorartc-sdk]
```js
import AgoraRTC from "agora-rtc-sdk-ng";
```
### Initialize an instance of `AgoraRTCClient` [#initialize-an-instance-of-agorartcclient]
Call [`createClient`](https://api-ref.agora.io/en/video-sdk/web/4.x/interfaces/iagorartc.html#createclient) to initialize an `AgoraRTCClient` object.
Set the [Channel mode](#channel-modes) and [Video encoding format](#video-encoding-formats) based on your use case.
For Video Calling Set `mode` to `rtc`.
```javascript
// RTC client instance
let client = null;
// Initialize the AgoraRTC client
function initializeClient() {
client = AgoraRTC.createClient({ mode: "rtc", codec: "vp8" });
setupEventListeners();
}
```
### Join a channel [#join-a-channel-3]
To join a channel, call `join` with the following parameters:
* **App ID**: The [App ID](/en/realtime-media/video/manage-agora-account#get-the-app-id) for your project.
* **Channel name**: The name of the channel to join. Clients that pass the same channel name join the same channel. If a channel with the specified name does not exist, it is created when the first user joins.
* **Authentication token**: A dynamic key that authenticates a user when the client joins a channel. In a production environment, you obtain a token from a [token server](/en/realtime-media/video/build/authenticate-users/deploy-token-server) in your security infrastructure. For the purpose of this guide [Generate a temporary token](/en/realtime-media/video/manage-agora-account#generate-temporary-tokens).
* **User ID**: A 32-bit signed integer that identifies a user in the channel. You can specify a unique user ID for each user yourself. If you set the user ID to `0` when joining a channel, the SDK generates a random number for the user ID.
```javascript
// Join a channel and publish local media
async function joinChannel() {
await client.join(appId, channel, token, uid);
await createLocalMediaTracks();
displayLocalVideo();
publishLocalTracks();
}
```
### Create local media tracks [#create-local-media-tracks]
To set up the necessary local media tracks:
* Call `createMicrophoneAudioTrack` to create a local audio track.
* Call `createCameraVideoTrack` to create a local Video track.
```javascript
// Declare variables for local tracks
let localAudioTrack = null;
let localVideoTrack = null;
// Create local audio and video tracks
async function createLocalMediaTracks() {
localAudioTrack = await AgoraRTC.createMicrophoneAudioTrack();
localVideoTrack = await AgoraRTC.createCameraVideoTrack();
}
```
### Publish local media tracks [#publish-local-media-tracks]
To make the created audio and video tracks available for other users in the channel, use the `publish` method.
```javascript
async function publishLocalTracks() {
await client.publish([localAudioTrack, localVideoTrack]);
}
```
See [Local audio and video tracks](#local-audio-and-video-tracks) to learn more about local tracks.
### Set up event listeners [#set-up-event-listeners]
Use the `on` method to register event listeners for SDK events. The SDK triggers the `user-published` event when a user publishes an audio track in the channel. Similarly, it triggers the `user-unpublished` event when a user leaves the channel, goes offline, or unpublishes a media track.
```javascript
// Handle client events
function setupEventListeners() {
// Declare event handler for "user-published"
client.on("user-published", async (user, mediaType) => {
// Subscribe to media streams
await client.subscribe(user, mediaType);
if (mediaType === "video") {
// Specify the ID of the DOM element or pass a DOM object.
user.videoTrack.play("");
}
if (mediaType === "audio") {
user.audioTrack.play();
}
});
// Handle the "user-unpublished" event to unsubscribe from the user's media tracks
client.on("user-unpublished", async (user) => {
const remotePlayerContainer = document.getElementById(user.uid);
remotePlayerContainer && remotePlayerContainer.remove();
});
}
```
* After successfully unsubscribing, the SDK releases the corresponding `RemoteTrack` object. This automatically removes the video playback element and stops audio playback.
* If a remote user actively stops publishing, the local user receives the `user-unpublished` callback. Upon receiving this callback, the SDK automatically releases the corresponding `RemoteTrack` object, so you do not need to call `unsubscribe` again.
* The `unsubscribe` method is asynchronous and should be used with `Promise` or `async/await`.
To ensure that you receive all Video SDK events, set up event listeners before joining a channel.
For more information about other `AgoraRTCClient` events, refer to the [API reference](https://api-ref.agora.io/en/video-sdk/web/4.x/interfaces/iagorartcclient.html#event_channel_media_relay_event).
### Display the local video [#display-the-local-video-3]
To play the local video, use the `play` method of the local video track. Pass an element ID or a DOM element from your UI where you want to render the video.
```javascript
// Display local video
function displayLocalVideo() {
const localPlayerContainer = document.createElement("div");
localPlayerContainer.id = uid;
localPlayerContainer.textContent = `Local user ${uid}`;
localPlayerContainer.style.width = "640px";
localPlayerContainer.style.height = "480px";
document.body.append(localPlayerContainer);
localVideoTrack.play(localPlayerContainer);
}
```
### Display remote video [#display-remote-video-3]
To display the remote video, call the `play` method of the remote user's `videoTrack` and pass in either the element ID or a DOM element from your UI where you want to render the video.
```js
// Display remote user's video
function displayRemoteVideo(user) {
const remotePlayerContainer = document.createElement("div");
remotePlayerContainer.id = user.uid.toString();
remotePlayerContainer.textContent = `Remote user ${user.uid}`;
remotePlayerContainer.style.width = "640px";
remotePlayerContainer.style.height = "480px";
document.body.append(remotePlayerContainer);
user.videoTrack.play(remotePlayerContainer);
}
```
### Leave the channel [#leave-the-channel]
To exit the channel, close local audio and video tracks and call `leave`.
```javascript
// Leave the channel and clean up
async function leaveChannel() {
// Stop the local media tracks to release the microphone and camera resources
if (localAudioTrack) {
localAudioTrack.close();
localAudioTrack = null;
}
if (localVideoTrack) {
localVideoTrack.close();
localVideoTrack = null;
}
// Leave the channel
await client.leave();
}
```
### Complete sample code [#complete-sample-code-3]
A complete code sample demonstrating the basic process of real-time interaction is provided here for your reference. To use the sample, copy the following code to the JavaScript file in the project's `src` folder.
```javascript
import AgoraRTC from "agora-rtc-sdk-ng";
// RTC client instance
let client = null;
// Declare variables for the local tracks
let localAudioTrack = null;
let localVideoTrack = null;
// Connection parameters
let appId = "<-- Insert app ID -->";
let channel = "<-- Insert channel name -->";
let token = "<-- Insert token -->";
let uid = 0; // User ID
// Initialize the AgoraRTC client
function initializeClient() {
client = AgoraRTC.createClient({ mode: "rtc", codec: "vp8" });
setupEventListeners();
}
// Handle client events
function setupEventListeners() {
client.on("user-published", async (user, mediaType) => {
await client.subscribe(user, mediaType);
console.log("subscribe success");
if (mediaType === "video") {
displayRemoteVideo(user);
}
if (mediaType === "audio") {
user.audioTrack.play();
}
});
client.on("user-unpublished", (user) => {
const remotePlayerContainer = document.getElementById(user.uid);
remotePlayerContainer && remotePlayerContainer.remove();
});
}
// Join a channel and publish local media
async function joinChannel() {
await client.join(appId, channel, token, uid);
await createLocalTracks();
await publishLocalTracks();
displayLocalVideo();
console.log("Publish success!");
}
// Create local audio and video tracks
async function createLocalTracks() {
localAudioTrack = await AgoraRTC.createMicrophoneAudioTrack();
localVideoTrack = await AgoraRTC.createCameraVideoTrack();
}
// Publish local audio and video tracks
async function publishLocalTracks() {
await client.publish([localAudioTrack, localVideoTrack]);
}
// Display local video
function displayLocalVideo() {
const localPlayerContainer = document.createElement("div");
localPlayerContainer.id = uid;
localPlayerContainer.textContent = `Local user ${uid}`;
localPlayerContainer.style.width = "640px";
localPlayerContainer.style.height = "480px";
document.body.append(localPlayerContainer);
localVideoTrack.play(localPlayerContainer);
}
// Display remote video
function displayRemoteVideo(user) {
const remoteVideoTrack = user.videoTrack;
const remotePlayerContainer = document.createElement("div");
remotePlayerContainer.id = user.uid.toString();
remotePlayerContainer.textContent = `Remote user ${user.uid}`;
remotePlayerContainer.style.width = "640px";
remotePlayerContainer.style.height = "480px";
document.body.append(remotePlayerContainer);
remoteVideoTrack.play(remotePlayerContainer);
}
// Leave the channel and clean up
async function leaveChannel() {
// Close local tracks
localAudioTrack.close();
localVideoTrack.close();
// Remove local video container
const localPlayerContainer = document.getElementById(uid);
localPlayerContainer && localPlayerContainer.remove();
// Remove all remote video containers
client.remoteUsers.forEach((user) => {
const playerContainer = document.getElementById(user.uid);
playerContainer && playerContainer.remove();
});
// Leave the channel
await client.leave();
}
// Set up button click handlers
function setupButtonHandlers() {
document.getElementById("join").onclick = joinChannel;
document.getElementById("leave").onclick = leaveChannel;
}
// Start the basic call
function startBasicCall() {
initializeClient();
window.onload = setupButtonHandlers;
}
startBasicCall();
```
### Create a user interface [#create-a-user-interface-3]
Open `index.html` in the project's root folder and replace the contents with the following code to implement a basic client user interface:
### Sample code to create the user interface [#sample-code-to-create-the-user-interface-3]
```html
Web SDK Video Quickstart
Web SDK Video Quickstart
```
## Test the sample code [#test-the-sample-code-3]
Take the following steps to run and test the sample code:
1. In your `.js` file, update the values for `appId`, and `token` with values from Agora Console. Use the same `channel` name you used to generate the token.
2. To start the development server, use the following command:
```shell
npm run dev
```
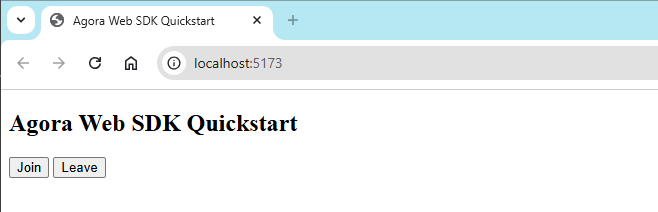
3. Open your browser and navigate to the URL displayed in your terminal, for example, `http://localhost:5173`.
You see the following page:
4. On a second device, repeat the previous steps to install and launch the client. Alternatively, use the [Web demo](https://webdemo.agora.io/basicVideoCall/index.html) or clone the [sample project on Github](https://github.com/AgoraIO/API-Examples-Web) to join the same channel and test the following use-cases:
1. Click **Join** to join the channel.
2. Enter the same app ID, channel name, and temporary token.
Information
* Run the web app on a local server (localhost) for testing purposes only. When deploying to a production environment, use the HTTPS protocol.
* Due to browser security policies that restrict HTTP addresses to 127.0.0.1, the Agora Web SDK only supports HTTPS protocol and `http://localhost` (`http://127.0.0.1`). Please do not use the HTTP protocol to access your project, except for `http://localhost` (`http://127.0.0.1`).
## Reference [#reference-3]
This section contains content that completes the information on this page, or points you to documentation that explains other aspects of this product.
* If a firewall is deployed in your network environment, refer to [Connect with Cloud Proxy](/en/realtime-media/video/build/manage-connection-and-quality/cloud-proxy) to use Agora services normally.
### Next steps [#next-steps-3]
After implementing the quickstart sample, read the following documents to learn more:
* To ensure communication security in a test or production environment, best practice is to obtain and use a token from an authentication server. For details, see [Secure authentication with tokens](/en/realtime-media/video/build/authenticate-users/authentication-workflow).
### Sample project [#sample-project-3]
* [Build a NextJS Video Call App](https://www.agora.io/en/blog/build-a-next-js-video-call-app/)
* Agora provides open source sample projects on [GitHub](https://github.com/AgoraIO/API-Examples-Web) for your reference. Download or view the [basicVideoCall](https://github.com/AgoraIO/API-Examples-Web/tree/main/src/example/basic/basicVideoCall) project for a more detailed example.
### API reference [#api-reference-3]
* [`AgoraRTC.createClient`](https://api-ref.agora.io/en/video-sdk/web/4.x/interfaces/iagorartc.html#createclient)
* [`IAgoraRTCRemoteUser`](https://api-ref.agora.io/en/video-sdk/web/4.x/interfaces/iagorartcremoteuser.html)
* [`play`](https://api-ref.agora.io/en/video-sdk/web/4.x/interfaces/iremoteaudiotrack.html#play)
* [`join`](https://api-ref.agora.io/en/video-sdk/web/4.x/interfaces/iagorartcclient.html#join)
* [`createMicrophoneAudioTrack`](https://api-ref.agora.io/en/video-sdk/web/4.x/interfaces/iagorartc.html#createmicrophoneaudiotrack)
* [`createCameraVideoTrack`](https://api-ref.agora.io/en/video-sdk/web/4.x/interfaces/iagorartc.html#createcameravideotrack)
* [`publish`](https://api-ref.agora.io/en/video-sdk/web/4.x/interfaces/iagorartcclient.html#publish)
* [AgoraRTCClient events](https://api-ref.agora.io/en/video-sdk/web/4.x/interfaces/iagorartcclient.html#event_channel_media_relay_event)
### Channel modes [#channel-modes]
The Video SDK supports the following channel modes:
* `rtc`: Communication use-case
* `live`: Live broadcast use-case
#### Communication use-case [#communication-use-case]
It is suitable for use-cases where all users in the channel need to communicate with each other and the total number of users is not too large, such as multi-person conferences and online chats.
#### Live broadcast use-case [#live-broadcast-use-case]
It is suitable for use-cases where there are few publishers but many subscribers. In this use-case, the SDK defines two user roles: audience (default) and host. Hosts can send and receive audio and video, but audience cannot send and may only receive audio and video. You can specify user roles by setting the parameters `createClient` of role, or you can call `setClientRole` to dynamically modify user roles.
### Video encoding formats [#video-encoding-formats]
You can set the `codec` parameter in the `createClient` method to the following video encoding formats:
* `vp8` (VP8)
* `h264` (H.264)
* `vp9` (VP9)
This setting only affects the video encoding format of the host. For the audience, as long as their device and browser support the decoding of this format, the subscription can be completed normally.
Support for these formats may vary across browsers and devices. The following table lists the `codec` formats supported by different browsers for reference:
| Browser | VP8 | H.264 | VP9 |
| :----------------- | --- | -------------------- | ----------------------- |
| Desktop Chrome 58+ | ✔ | ✔ | ✔ |
| Firefox 56+ | ✔ | ✔ | ✔(Requires Firefox 69+) |
| Safari 12.1+ | ✔ | ✔ | ✔(Requires Safari 16+) |
| Safari \< 12.1 | ✘ | ✔ | ✘ |
| AndroidChrome 58+ | ✔ | No clear information | ✔(Requires Chrome 68+) |
* H.264 support on Firefox depends on the `OpenH264` video codec plug-in from Cisco Systems, Inc.
* For Chrome, support for H.264 on Android devices varies based on device hardware compatibility with hardware codecs mandated by Chrome.
### Local audio and video tracks [#local-audio-and-video-tracks]
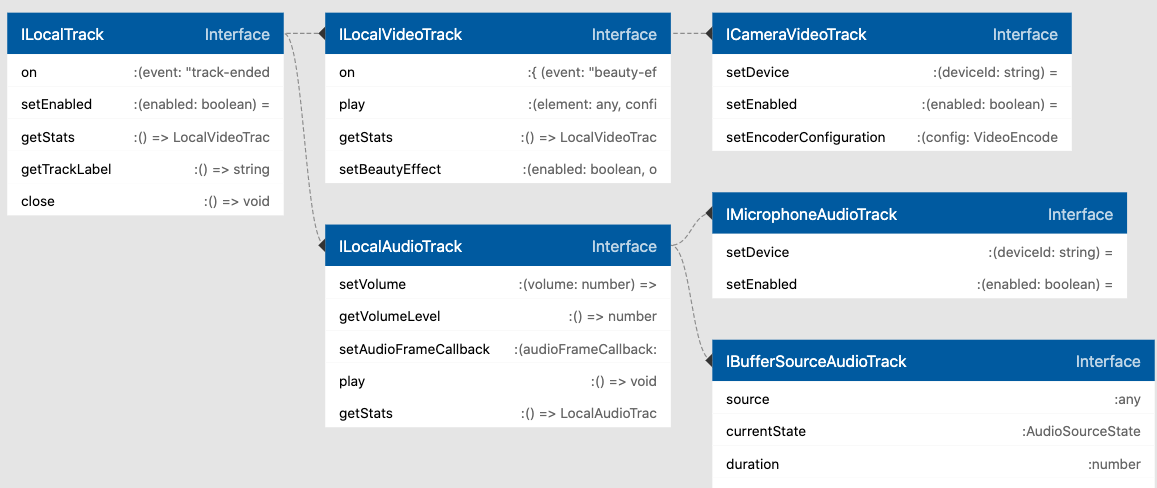
The SDK uses a hierarchy where all local track objects derive from the `LocalTrack` base class. This class defines the common behavior for all local tracks. Specific track types, such as `LocalAudioTrack` and `LocalVideoTrack` inherit from `LocalTrack` and extend its functionality.
To publish a local track, you call the `publish` method of the client with the `LocalTrack` object as an input parameter. This approach makes publishing a track independent of how you create your local track.
There are two main types of local tracks: `LocalAudioTrack` and `LocalVideoTrack` for publishing audio and video, respectively. Each type of `LocalTrack` comes with its own set of tools. For example, `LocalAudioTrack` lets you control the volume, while `LocalVideoTrack` has functions for customizing video.
The SDK includes more specific classes based on `LocalAudioTrack` and `LocalVideoTrack`. For example, the `CameraVideoTrack`, is a type of `LocalVideoTrack` that you can use to publish video from your camera. It comes with extra features for controlling the camera and adjusting video quality.
The following diagram shows the relationship between the `LocalTrack` classes:
### Other integration methods [#other-integration-methods]
When you use `npm` to install the Web SDK, you can enable tree shaking to reduce the size of the app after integration. For details, see [Using tree shaking](/en/realtime-media/video/build/optimize-and-operate/app-size-optimization#use-tree-shaking).
In addition to using `npm` to install the Web SDK, you can also use the following methods:
* In the project HTML file, add the following tag to obtain the SDK from CDN:
```html
```
* Download the Video SDK package locally, save the `.js` files in the SDK package to the project directory, and then add the following tag to the project HTML file:
```html
```
Visit the [Download](/en/api-reference/sdks?platform=web) page to obtain the link for the latest SDK version.
### Frequently asked questions [#frequently-asked-questions-3]
**Why do I get a `digital envelope routines::unsupported` error when running the quickstart project locally?**
This issue arises in projects configured with `webpack` for local execution due to changes in Node.js 16 and above. The modifications in Node.js, particularly its dependency on OpenSSL (detailed in the [node issue](https://github.com/nodejs/node/issues/29817)), impact the local development environment dependencies of the project. Refer to the [webpack issue](https://github.com/webpack/webpack/issues/14532) for details.
Use one of the following solutions to resolve the issue:
* Run the following command to set a temporary environment variable (Recommended):
```shell
export NODE_OPTIONS=--openssl-legacy-provider
```
* Temporarily switch to a lower version of Node.js.
### See also [#see-also-3]
* [SDK error codes](/en/realtime-media/video/reference/error-codes)