# Quickstart (/en/realtime-media/video/get-started-sdk/ios)
> For AI agents: see the complete documentation index at [llms.txt](/llms.txt).
This page provides a step-by-step guide on how to create a basic Video Calling app using the Agora Video SDK.
## Understand the tech [#understand-the-tech-1]
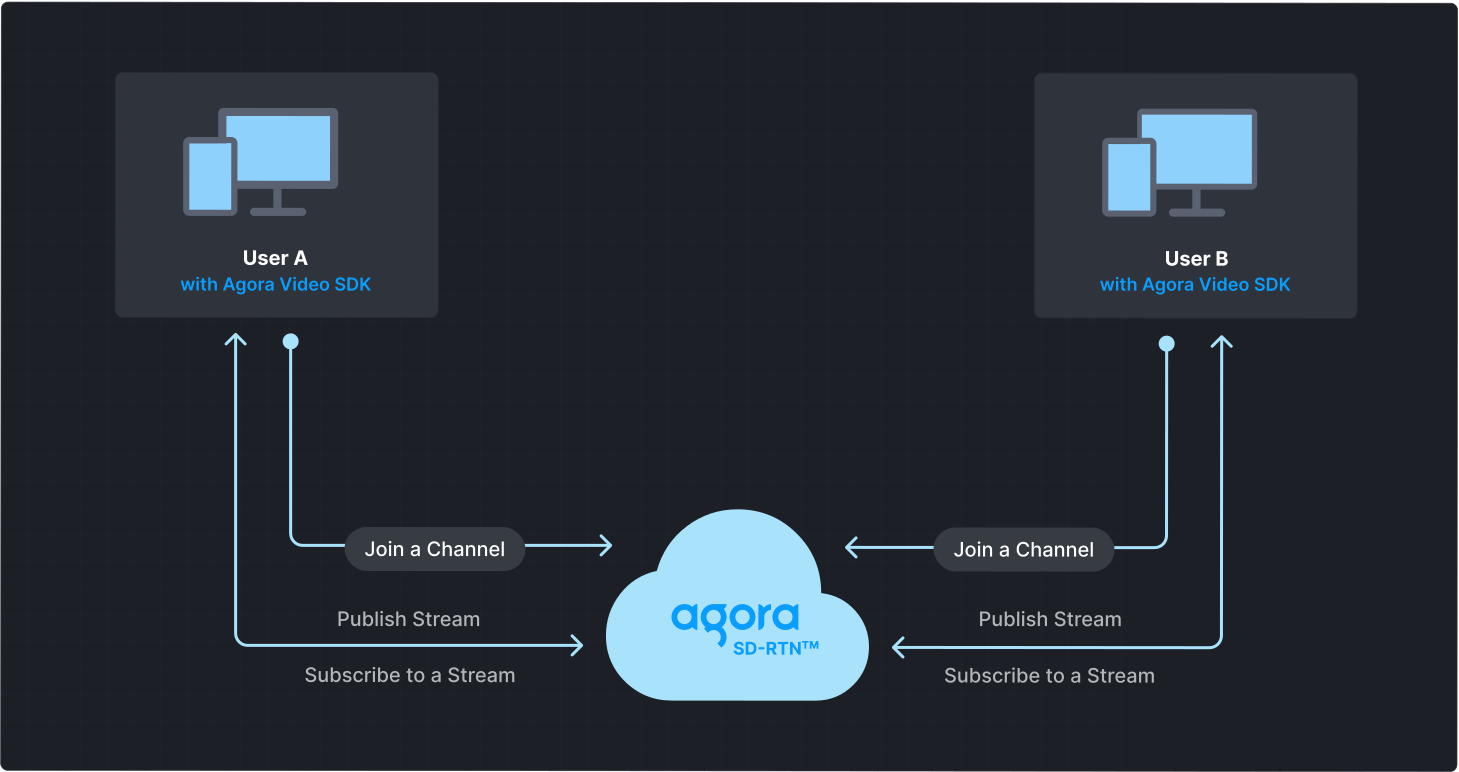
To start a Video Calling session, implement the following steps in your app:
* **Initialize the engine**: Before calling other APIs, create and initialize an engine instance.
* **Join a channel**: Call methods to create and join a channel.
* **Send and receive audio and video**: All users can publish streams to the channel and subscribe to audio and video streams published by other users in the channel.
## Prerequisites [#prerequisites-1]
* A camera and a microphone.
* A valid Agora account and project. See [Agora account management](/en/realtime-media/video/manage-agora-account) for details.
* Xcode 13.0 or higher.
* An Apple developer account.
* If you use CocoaPods to integrate the SDK, make sure [CocoaPods is installed](https://guides.cocoapods.org/using/getting-started.html#getting-started).
* Two devices running iOS 14.0 or higher.
## Set up your project [#set-up-your-project-1]
Create a new project
Add to an existing project
Follow these steps to create a project in Xcode:
1. Refer to [Create a project](https://help.apple.com/xcode/mac/current/#/dev07db0e578). Under **Application**, select **App**. Use **Storyboard** for the user interface and choose **Swift** as the programming language.
Information
If you have not added the development team information, you see the **Add account...** button. Click the button and follow the on-screen prompts to log in to your Apple ID. Once login is complete, click **Next**, and choose your Apple account as the development team.
2. [Set up automatic signing](https://help.apple.com/xcode/mac/current/#/dev23aab79b4) for your project.
3. [Set the target devices](https://help.apple.com/xcode/mac/current/#/deve69552ee5) where your app will be deployed.
4. Create a user interface for your app. Refer to [Create a user interface](#create-a-user-interface) to create a bare-bones UI.
Follow these steps to add Video Calling to your Xcode project:
1. Open your project in Xcode.
2. [Set the target devices](https://help.apple.com/xcode/mac/current/#/deve69552ee5) where your app will be deployed.
3. Create a user interface for your app. Refer to [Create a user interface](#create-a-user-interface) to create a bare-bones UI.
### Install the SDK [#install-the-sdk-1]
Use one of the following methods to install the Video SDK.
Swift Package Manager
CocoaPods
Manual integration
1. In Xcode, go to **File** > **Add Package Dependencies**.
2. In the search bar, paste the following URL:
```text
https://github.com/AgoraIO/AgoraRtcEngine_iOS.git
```
3. Click **Add Package**, select the latest version, and click **Next**.
4. For basic Video Calling, select **RtcBasic**.
If needed, also select:
* **`SpatialAudio`** for spatial audio effects.
* **`VirtualBackground`** for virtual background.
5. Under **Add to Target**, select your project and click **Add Package**.
For more information, see [Apple's official documentation](https://help.apple.com/xcode/mac/current/#/devb83d64851).
1. Go to the project root directory in Terminal and run `pod init`. A text file named `Podfile` is generated in the project folder.
2. Open `Podfile` and modify the content as follows. Replace `Your App` with your target name.
```ruby
platform :ios, '9.0'
target 'Your App' do
# Replace x.y.z with the specific SDK version number, such as 4.4.0.
# Integrate the Full SDK
pod 'AgoraRtcEngine_iOS', 'x.y.z'
# To integrate the Lite SDK, use the following line instead
# pod 'AgoraLite_iOS', '4.4.0'
end
```
Get the latest version number from the [release notes](/en/realtime-media/video/reference/release-notes).
3. Run `pod install` in Terminal to install the Video SDK. After successful installation, Terminal shows **Pod installation complete!**.
4. After successful installation, a file with the suffix `.xcworkspace` is generated in the project folder. Open the file in Xcode for subsequent operations.
1. Download the latest version of the SDK from [SDKs download](/en/api-reference/sdks?platform=ios) and extract the contents.
2. Copy the files in the `libs` folder of the SDK package to your project directory.
3. Open Xcode and [add the corresponding dynamic library](https://help.apple.com/xcode/mac/current/#/dev51a648b07). Make sure the **Embed** property of the added dynamic library is set to **Embed & Sign**.
Information
Agora SDK uses `libc++` (LLVM) by default. If you need to use `libstdc++` (GNU), contact `support@agora.io`. The library provided by the SDK is a FAT image that includes simulator and device builds.
Note
The [privacy updates for App Store submissions](https://developer.apple.com/news/?id=r1henawx) released by Apple require developers to declare approved reasons for using a set of APIs in their app's privacy manifest. Agora provides a [`PrivacyInfo.xcprivacy`](https://download.agora.io/sdk/release/PrivacyInfo.xcprivacy) file that you can include in your project.
## Implement Video Calling [#implement-video-calling-1]
This section guides you through the implementation of basic real-time audio and video interaction in your app.
The following figure illustrates the essential steps:
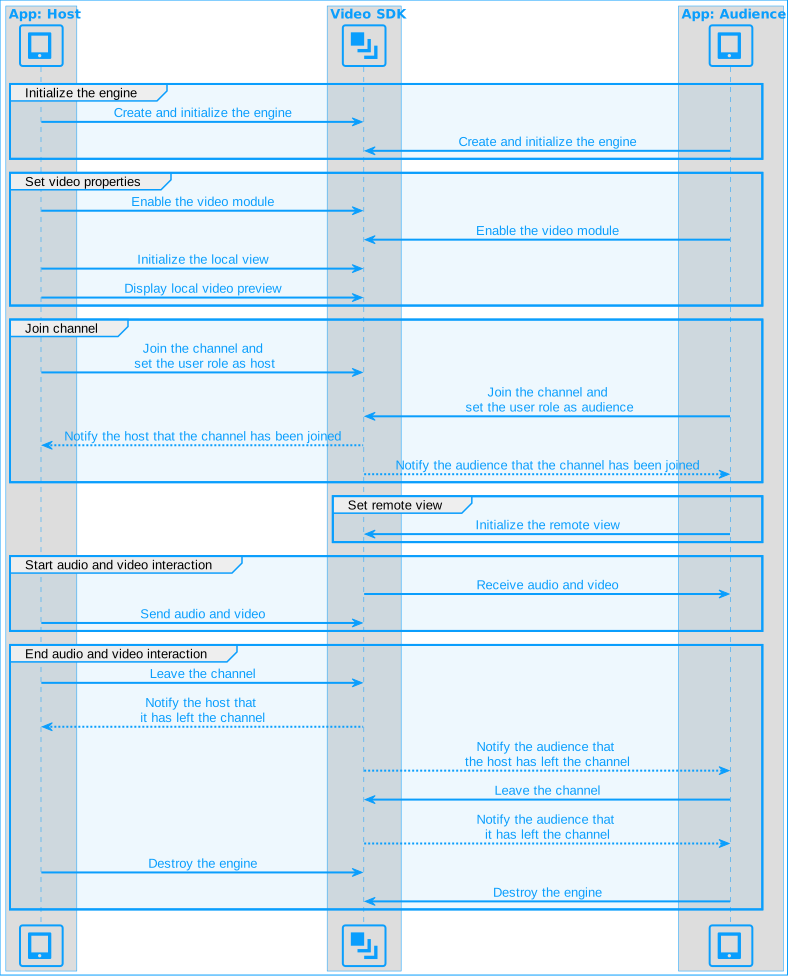
This guide includes [complete sample code](#complete-sample-code) that demonstrates implementing basic real-time interaction. To understand the core API calls in the sample code, review the following implementation steps.
### Import Agora framework [#import-agora-framework]
Add the following import to your swift file:
```swift
import UIKit
import AgoraRtcKit
```
### Initialize the engine [#initialize-the-engine-1]
Call `sharedEngine(withAppId:delegate:)` to create and initialize an `AgoraRtcEngineKit` instance. Provide your [App ID](/en/realtime-media/video/manage-agora-account#get-the-app-id) and an `AgoraRtcEngineDelegate` implementation to [handle SDK events](#subscribe-to-video-sdk-events).
```swift
var agoraKit: AgoraRtcEngineKit!
let appId = "YOUR_AGORA_APP_ID"
// Initialize the Agora engine
func initializeAgoraVideoSDK() {
agoraKit = AgoraRtcEngineKit.sharedEngine(withAppId: appId, delegate: self)
}
```
### Join a channel [#join-a-channel-1]
To join a channel, call `joinChannel` with the following parameters:
* **Channel name**: The name of the channel to join. Clients that pass the same channel name join the same channel. If a channel with the specified name does not exist, it is created when the first user joins.
* **Authentication token**: A dynamic key that authenticates a user when the client joins a channel. In a production environment, you obtain a token from a [token server](/en/realtime-media/video/build/authenticate-users/deploy-token-server) in your security infrastructure. For the purpose of this guide [Generate a temporary token](/en/realtime-media/video/manage-agora-account#generate-temporary-tokens).
* **User ID**: A 32-bit signed integer that identifies a user in the channel. You can specify a unique user ID for each user yourself. If you set the user ID to `0` when joining a channel, the SDK generates a random number for the user ID and returns the value in the `didJoinChannel` callback.
* **Channel media options**: Configure `AgoraRtcChannelMediaOptions` to define publishing and subscription settings, optimize performance for your specific use-case, and set optional parameters.
For Video Calling, set the `channelProfile` to `.communication` and the `clientRoleType` to `.broadcaster`.
```swift
let channelName = "demo" // Replace with your actual channel name
let token = "" // Replace with your token
// Join the channel with specified options
func joinChannel() {
let options = AgoraRtcChannelMediaOptions()
// In video calling, set the channel use-case to communication
options.channelProfile = .communication
// Set the user role as broadcaster (default is audience)
options.clientRoleType = .broadcaster
// Publish audio captured by microphone
options.publishMicrophoneTrack = true
// Publish video captured by camera
options.publishCameraTrack = true
// Auto subscribe to all audio streams
options.autoSubscribeAudio = true
// Auto subscribe to all video streams
options.autoSubscribeVideo = true
// Use a temporary Token to join the channel
agoraKit.joinChannel(
byToken: token,
channelId: channelName,
uid: 0,
mediaOptions: options
)
}
```
### Subscribe to Video SDK events [#subscribe-to-video-sdk-events-1]
The Video SDK provides a delegate for handling channel events. To use it, conform to the `AgoraRtcEngineDelegate` protocol in your class and implement the event methods you want to handle. The following code implements the `didJoinChannel`, `didOfflineOfUid`, and `didJoinedOfUid` callbacks:
To ensure that you receive all Video SDK events, set the engine event handler before joining a channel.
```swift
// Extension for handling Agora SDK callbacks
extension ViewController: AgoraRtcEngineDelegate {
// Triggered when the local user successfully joins a channel
func rtcEngine(_ engine: AgoraRtcEngineKit, didJoinChannel channel: String, withUid uid: UInt, elapsed: Int) {
print("Successfully joined channel: \(channel) with UID: \(uid)")
}
// Triggered when a remote user joins the channel
func rtcEngine(_ engine: AgoraRtcEngineKit, didJoinedOfUid uid: UInt, elapsed: Int) {
setupRemoteVideo(uid: uid, view: remoteView)
}
// Triggered when a remote user leaves the channel
func rtcEngine(_ engine: AgoraRtcEngineKit, didOfflineOfUid uid: UInt, reason: AgoraUserOfflineReason) {
setupRemoteVideo(uid: uid, view: nil)
}
}
```
To learn about the other SDK events, see [`AgoraRtcEngineDelegate`](https://api-ref.agora.io/en/video-sdk/ios/4.x/documentation/agorartckit/agorartcenginedelegate).
### Enable the video module [#enable-the-video-module-1]
Follow the steps below to set up the video module.
1. To enable the video module, call `enableVideo`.
2. To enable local video preview, call `startPreview`.
```swift
// Enable video functionality (audio is enabled by default)
agoraKit.enableVideo()
// Enable local video preview
agoraKit.startPreview()
```
### Display the local video [#display-the-local-video-1]
Call `setupLocalVideo` to initialize the local view and set the local video display properties.
```swift
// Configures and starts displaying the local video feed
func setupLocalVideo() {
let videoCanvas = AgoraRtcVideoCanvas()
videoCanvas.view = localView
videoCanvas.uid = 0 // UID 0 is assigned to the local user
videoCanvas.renderMode = .hidden
agoraKit.setupLocalVideo(videoCanvas)
}
```
### Display remote video [#display-remote-video-1]
To initialize the remote user view, call `setupRemoteVideo` and set the local display properties for the remote user. Use the `didJoinedOfUid` callback to get the UID of the remote user.
```swift
func setupRemoteVideo(uid: UInt, view: UIView?) {
let videoCanvas = AgoraRtcVideoCanvas()
videoCanvas.uid = uid
videoCanvas.view = view // Assign view for joining, set to nil for leaving
videoCanvas.renderMode = .hidden
agoraKit.setupRemoteVideo(videoCanvas)
}
```
### Handle permissions [#handle-permissions-1]
To access the camera and microphone on Video Calling devices, add the required permissions for real-time interaction. Open the `info.plist` file from the project navigation bar, [edit the property list](https://help.apple.com/xcode/mac/current/#/dev3f399a2a6), to add the required permissions. These permissions are optional. However, if you do not add these permissions, you will not be able to use the corresponding devices.
| Key | Type | Value |
| :------------------------------------- | :----- | :------------------------------------------------------------------------------------------------------ |
| Privacy - Microphone Usage Description | String | For the purpose of using the microphone. For example, for a call or live interactive streaming session. |
| Privacy - Camera Usage Description | String | For the purpose of using the camera. For example, for a call or live interactive streaming session. |
* If your project depends on third-party plugins or libraries, such as a third-party camera library, and the signature of the plug-in or library is inconsistent with the signature of the project, check the **Hardened Runtime** settings. Specifically, review and potentially disable **Runtime Exceptions** and **Library Validation** in the project configuration.
* For further information, refer to [Preparing your app for distribution](https://developer.apple.com/documentation/xcode/preparing_your_app_for_distribution).
### Start and close the app [#start-and-close-the-app-1]
When the user launches the app, it joins the channel and starts Video Calling. When the user closes the app, it leaves the channel and ends Video Calling.
1. To start Video Calling, call the following methods:
```swift
// Initialize the Agora engine
initializeAgoraVideoSDK()
// Start the local video preview
setupLocalVideo()
// Join an Agora channel
joinChannel()
```
2. To leave the channel and release SDK resources when the app is closed, call the following methods:
```swift
// Stop local video preview
agoraKit.stopPreview()
// Leave the channel and release session-related resources
agoraKit.leaveChannel(nil)
// Release all resources used by the Agora SDK
AgoraRtcEngineKit.destroy()
```
caution
After destroying the engine, you can no longer use SDK methods and callbacks. To use the real-time interaction functions again, create a new engine. See [Initialize the engine](#initialize-the-engine) for details.
### Complete sample code [#complete-sample-code-1]
A complete code sample demonstrating the basic process of real-time interaction is provided for your reference. Copy the following code into your `ViewController.swift` file:
```swift
import UIKit
import AgoraRtcKit
class ViewController: UIViewController {
let appId = "" // Replace with your actual App ID
let channelName = "demo" // Replace with your actual channel name
let token = "" // Replace with your token
// UI view for displaying the local video stream
var localView: UIView!
// UI view for displaying the remote video stream
var remoteView: UIView!
// Instance of the Agora RTC engine
var agoraKit: AgoraRtcEngineKit!
override func viewDidLoad() {
super.viewDidLoad()
// Initialize the Agora engine
initializeAgoraVideoSDK()
// Set up the user interface
setupUI()
// Start the local video preview
setupLocalVideo()
// Join an Agora channel
joinChannel()
}
// Clean up resources when the view controller is deallocated
deinit {
agoraKit.stopPreview()
agoraKit.leaveChannel(nil)
AgoraRtcEngineKit.destroy()
}
// Initializes the Video SDK instance
func initializeAgoraVideoSDK() {
// Create an instance of AgoraRtcEngineKit and set the delegate
agoraKit = AgoraRtcEngineKit.sharedEngine(withAppId: appId, delegate: self)
}
// Sets up the UI layout for local and remote video views
func setupUI() {
// Create the local video view covering the full screen
localView = UIView(frame: UIScreen.main.bounds)
// Create the remote video view positioned in the top-right corner
remoteView = UIView(frame: CGRect(x: self.view.bounds.width - 135, y: 50, width: 135, height: 240))
// Add video views to the main view
self.view.addSubview(localView)
self.view.addSubview(remoteView)
}
// Configures and starts displaying the local video feed
func setupLocalVideo() {
// Enable video functionality (audio is enabled by default)
agoraKit.enableVideo()
let videoCanvas = AgoraRtcVideoCanvas()
videoCanvas.view = localView
videoCanvas.uid = 0 // UID 0 is assigned to the local user
videoCanvas.renderMode = .hidden
agoraKit.setupLocalVideo(videoCanvas)
agoraKit.startPreview()
}
// Join the channel with specified options
func joinChannel() {
let options = AgoraRtcChannelMediaOptions()
// In video calling, set the channel use-case to communication
options.channelProfile = .communication
// Set the user role as broadcaster (default is audience)
options.clientRoleType = .broadcaster
// Publish audio captured by microphone
options.publishMicrophoneTrack = true
// Publish video captured by camera
options.publishCameraTrack = true
// Auto subscribe to all audio streams
options.autoSubscribeAudio = true
// Auto subscribe to all video streams
options.autoSubscribeVideo = true
// If you set uid=0, the engine generates a uid internally; on success, it triggers didJoinChannel callback
// Join the channel with a temporary token
agoraKit.joinChannel(
byToken: token,
channelId: channelName,
uid: 0,
mediaOptions: options
)
}
func setupRemoteVideo(uid: UInt, view: UIView?) {
let videoCanvas = AgoraRtcVideoCanvas()
videoCanvas.uid = uid
videoCanvas.view = view // Assign view for joining, set to nil for leaving
videoCanvas.renderMode = .hidden
agoraKit.setupRemoteVideo(videoCanvas)
}
}
// Extension for handling Agora SDK callbacks
extension ViewController: AgoraRtcEngineDelegate {
// Triggered when the local user successfully joins a channel
func rtcEngine(_ engine: AgoraRtcEngineKit, didJoinChannel channel: String, withUid uid: UInt, elapsed: Int) {
print("Successfully joined channel: \\(channel) with UID: \\(uid)")
}
// Triggered when a remote user joins the channel
func rtcEngine(_ engine: AgoraRtcEngineKit, didJoinedOfUid uid: UInt, elapsed: Int) {
setupRemoteVideo(uid: uid, view: remoteView)
}
// Triggered when a remote user leaves the channel
func rtcEngine(_ engine: AgoraRtcEngineKit, didOfflineOfUid uid: UInt, reason: AgoraUserOfflineReason) {
setupRemoteVideo(uid: uid, view: nil)
}
}
```
### Create a user interface [#create-a-user-interface-1]
To connect the sample code to your existing UI, ensure that your `ViewController.swift` file includes the `UIView`s used to [Display the local video](#display-the-local-video) and [Display remote video](#display-remote-video).
Alternatively, use the following sample code to generate a basic user interface. To use this interface, replace the contents of the `ViewController.swift` file with the following code:
### Sample code to create the user interface [#sample-code-to-create-the-user-interface-1]
```swift
// ViewController.swift
import UIKit
class ViewController: UIViewController {
// UI view for displaying the local video stream
var localView: UIView!
// UI view for displaying the remote video stream
var remoteView: UIView!
override func viewDidLoad() {
super.viewDidLoad()
// Set up the user interface
setupUI()
}
// Sets up the UI layout for local and remote video views
func setupUI() {
// Create the local video view covering the full screen
localView = UIView(frame: UIScreen.main.bounds)
// Create the remote video view positioned in the top-right corner
remoteView = UIView(frame: CGRect(x: self.view.bounds.width - 135, y: 50, width: 135, height: 240))
// Add video views to the main view
self.view.addSubview(localView)
self.view.addSubview(remoteView)
}
}
```
## Test the sample code [#test-the-sample-code-1]
Take the following steps to test the sample code:
1. In your code update the `appId` and `token`, with the app ID and temporary token you obtained from Agora Console. Use the same `channelName` you filled in when generating the temporary token.
2. Connect your iOS device to your computer.
3. Click **Build** to run your project and wait a few seconds for the app installation to complete.
4. Allow the app to access the device's microphone and camera.
5. If an untrusted developer prompt pops up on the device, click **Cancel** to close the prompt, then open **Settings > General > VPN and Device Management** on the iOS device, and choose to trust the developer in the **Developer APP**.
6. On a second Video Calling device, repeat the previous steps to install and launch the client. Alternatively, use the [Web demo](https://webdemo.agora.io/basicVideoCall/index.html) to join the same channel and test the following use-cases:
* If users on both devices join the channel as hosts, they can see and hear each other.
* If one user joins as host and the other as audience, the host can see themselves in the local video window; the audience can see the host in the remote video window and hear the host.
## Reference [#reference-1]
This section contains content that completes the information on this page, or points you to documentation that explains other aspects of this product.
* If a firewall is deployed in your network environment, refer to [Connect with Cloud Proxy](/en/realtime-media/video/build/manage-connection-and-quality/cloud-proxy) to use Agora services normally.
### Next steps [#next-steps-1]
After implementing the quickstart sample, read the following documents to learn more:
* To ensure communication security in a test or production environment, best practice is to obtain and use a token from an authentication server. For details, see [Secure authentication with tokens](/en/realtime-media/video/build/authenticate-users/authentication-workflow).
### Sample project [#sample-project-1]
Agora provides an open source sample project on [GitHub](https://github.com/AgoraIO-Community/Agora-RTC-QuickStart/tree/main/iOS/Agora-RTC-QuickStart-iOS) for your reference. Download it or view the source code for a more detailed example.
### Add a privacy manifest file [#add-a-privacy-manifest-file]
The Agora Video SDK for Video Calling provides the `PrivacyInfo.xcprivacy` file that contains the required reasons for the APIs used by the SDK. To add the privacy manifest to your app in Xcode, follow these steps:
1. Create a privacy manifest in your app project:
1. Choose **File > New File**.
2. Scroll down to the **Resource** section and select **App Privacy File** type.
3. Click **Next**.
4. Check your app in the **Targets** list.
5. Click **Create**.
The default file name is `PrivacyInfo.xcprivacy`, which is also the required file name for bundled privacy manifests.
2. Add the items in the SDK `PrivacyInfo.xcprivacy` file to your app `PrivacyInfo.xcprivacy` file using the following source code:
```xml
NSPrivacyTracking
NSPrivacyCollectedDataTypes
NSPrivacyAccessedAPITypes
NSPrivacyAccessedAPIType
NSPrivacyAccessedAPICategorySystemBootTime
NSPrivacyAccessedAPITypeReasons
35F9.1
NSPrivacyAccessedAPIType
NSPrivacyAccessedAPICategoryFileTimestamp
NSPrivacyAccessedAPITypeReasons
DDA9.1
NSPrivacyAccessedAPIType
NSPrivacyAccessedAPICategoryDiskSpace
NSPrivacyAccessedAPITypeReasons
E174.1
```
### API reference [#api-reference-1]
* [`sharedEngine`](https://api-ref.agora.io/en/video-sdk/ios/4.x/documentation/agorartckit/agorartcenginekit/sharedengine\(withappid\:delegate:\))
* [`joinChannel`](https://api-ref.agora.io/en/video-sdk/ios/4.x/documentation/agorartckit/agorartcenginekit/joinchannel\(bytoken\:channelid\:uid\:mediaoptions\:joinsuccess:\))
* [`enableVideo`](https://api-ref.agora.io/en/video-sdk/ios/4.x/documentation/agorartckit/agorartcenginekit/enablevideo\(\))
* [`startPreview`](https://api-ref.agora.io/en/video-sdk/ios/4.x/documentation/agorartckit/agorartcenginekit/startpreview\(\))
* [`leaveChannel`](https://api-ref.agora.io/en/video-sdk/ios/4.x/documentation/agorartckit/agorartcenginekit/leavechannel\(_:\))
* [`enableMultiCamera`](https://api-ref.agora.io/en/video-sdk/ios/4.x/documentation/agorartckit/agorartcenginekit/enablemulticamera\(_\:config:\))
* [`AgoraRtcEngineDelegate`](https://api-ref.agora.io/en/video-sdk/ios/4.x/documentation/agorartckit/agorartcenginedelegate)
### Frequently asked questions [#frequently-asked-questions-1]
* [How can I fix black screen issues?](/en/api-reference/faq/quality/video_blank#black-screen-on-the-local-side)
* [Why can't I turn on the camera?](/en/api-reference/faq/quality/video_camera)
* [How can I listen for audience joining or leaving a channel?](/en/api-reference/faq/integration/audience_event)
* [How can I solve channel-related issues?](/en/api-reference/faq/integration/channel)
* [How can I set the log file?](/en/api-reference/faq/integration/set_log_file)
* [How can I troubleshoot the issue of no sound?](/en/api-reference/faq/quality/audio_noaudio)
* [How can I add a privacy manifest to my iOS app?](/en/api-reference/faq/other/ios_privacy_manifest)
### See also [#see-also-1]
* [SDK error codes](/en/realtime-media/video/reference/error-codes)
* [Connection status management](/en/realtime-media/video/build/manage-connection-and-quality/connection-status-management)