# Voice-only quickstart (/en/realtime-media/rtc/voice-quickstart/web)
> For AI agents: see the complete documentation index at [llms.txt](/llms.txt).
This Web quickstart shows you how to create a basic Voice Calling app using the Agora RTC SDK. Switch to the [Android](/en/realtime-media/rtc/voice-quickstart/android) or [iOS](/en/realtime-media/rtc/voice-quickstart/ios) quickstart, or choose another platform from the selector.
* [RTC SDK API examples](https://github.com/AgoraIO/API-Examples-Web): Sample projects for the Agora RTC Web SDK 4.x, covering basic, advanced examples for Vue and React.
## Understand the tech
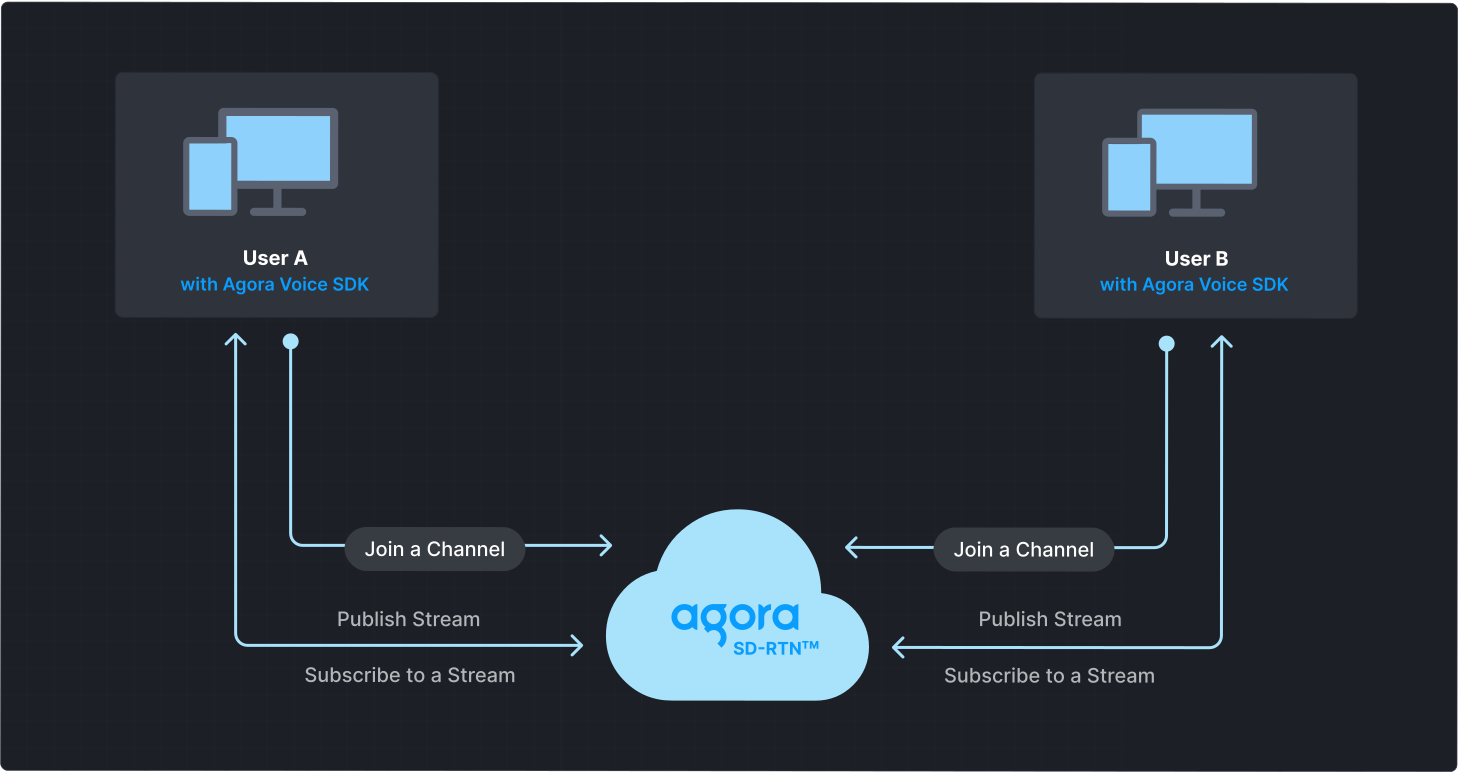
To start a Voice Calling session, implement the following steps in your app:
* **Initialize the Agora Engine**: Before calling other APIs, create and initialize an Agora Engine instance.
* **Join a channel**: Call methods to create and join a channel.
* **Send and receive audio**: All users can publish streams to the channel and subscribe to audio streams published by other users in the channel.
## Prerequisites
* A [supported browser](reference/supported-platforms.md).
Agora strongly recommends using the latest stable version of Google Chrome.
* [Node.js and npm](https://docs.npmjs.com/downloading-and-installing-node-js-and-npm)
* A microphone
* A valid Agora account and project. Please refer to [Agora account management](manage-agora-account.md) for details.
## Set up your project
This section shows you how to set up your Web project and install the Agora RTC SDK.
Create a new project
Add to an existing project
To initialize a new Vite project, take the following steps:
1. Open a terminal and run the following command:
```bash
npm create vite@latest agora_web_quickstart -- --template vanilla
```
This creates a new folder named `agora_web_quickstart` and initializes a Vite project inside it using the `vanilla` JavaScript template.
2. Navigate to the newly created folder. Download and set up dependencies for your project:
```bash
cd agora_web_quickstart
npm install
```
3. Create a user interface for your project. The UI consists of buttons to join and leave a channel. Refer to [Create a user interface](#create-a-user-interface) to get a bare bones html layout.
To add Voice Calling to your existing project, take the following steps:
1. Create a JavaScript file in your project's `src` folder to add `AgoraRTCClient` code that implements specific application logic.
2. Add an HTML file to your project to create a user interface. The UI consists of buttons to join and leave a channel. Refer to [Create a user interface](#create-a-user-interface) to get a bare bones HTML layout.
3. Include the JavaScript file in your HTML file.
```html
```
### Install the SDK
Add the RTC SDK to your project:
```bash
npm install agora-rtc-sdk-ng
```
## Implement Voice Calling
This section guides you through the implementation of basic real-time audio interaction in your app.
The following figure illustrates the essential steps:

This guide includes [complete sample code](#complete-sample-code) that demonstrates implementing basic real-time interaction. To understand the core API calls in the sample code, review the following implementation steps.
### Import the `AgoraRTC` SDK
```js
import AgoraRTC from "agora-rtc-sdk-ng";
```
### Initialize an instance of `AgoraRTCClient`
Call [`createClient`](https://api-ref.agora.io/en/video-sdk/web/4.x/interfaces/iagorartc.html#createclient) to initialize an `AgoraRTCClient` object. Set the [Channel mode](#channel-modes) based on your use case.
For Voice Calling Set `mode` to `rtc`.
```javascript
// RTC client instance
let client = null;
// Initialize the AgoraRTC client
function initializeClient() {
client = AgoraRTC.createClient({ mode: "rtc", codec: "vp8" });
setupEventListeners();
}
```
### Join a channel
To join a channel, call `join` with the following parameters:
* **App ID**: The [App ID](manage-agora-account.md) for your project.
* **Channel name**: The name of the channel to join. Clients that pass the same channel name join the same channel. If a channel with the specified name does not exist, it is created when the first user joins.
* **Authentication token**: A dynamic key that authenticates a user when the client joins a channel. In a production environment, you obtain a token from a [token server](build/authenticate-users/deploy-token-server.mdx) in your security infrastructure. For the purpose of this guide [Generate a temporary token](manage-agora-account.md).
* **User ID**: A 32-bit signed integer that identifies a user in the channel. You can specify a unique user ID for each user yourself. If you set the user ID to `0` when joining a channel, the SDK generates a random number for the user ID.
```javascript
// Join the channel and publish local audio
async function joinChannel() {
await client.join(appId, channel, token, uid);
await createMicrophoneAudioTrack();
await publishMicrophoneAudioTrack();
}
```
### Create a local audio track
Use `createMicrophoneAudioTrack` to create a local audio track.
```javascript
let localAudioTrack;
async function createMicrophoneAudioTrack() {
// Create a local audio track
localAudioTrack = await AgoraRTC.createMicrophoneAudioTrack();
}
```
### Publish local media tracks
To make the created audio tracks available for other users in the channel, use the `publish` method.
```javascript
async function publishMicrophoneAudioTrack() {
await client.publish([localAudioTrack]);
}
```
See [Local audio tracks](#local-audio-tracks) to learn more about local tracks.
### Set up event listeners
Use the `on` method to register event listeners for SDK events. The SDK triggers the `user-published` event when a user publishes an audio track in the channel. Similarly, it triggers the `user-unpublished` event when a user leaves the channel, goes offline, or unpublishes a media track.
```javascript
// Handle client events
function setupEventListeners() {
// Set up event listeners for remote tracks
client.on("user-published", async (user, mediaType) => {
// Subscribe to the remote user when the SDK triggers the "user-published" event
await client.subscribe(user, mediaType);
// If the remote user publishes an audio track
if (mediaType === "audio") {
// Get the RemoteAudioTrack object in the AgoraRTCRemoteUser object
const remoteAudioTrack = user.audioTrack;
// Play the remote audio track
remoteAudioTrack.play();
}
});
// Handle the "user-unpublished" event to unsubscribe from the user's media tracks
client.on("user-unpublished", async (user) => {
// Remote user unpublished
});
}
```
To ensure that you receive all RTC SDK events, set up event listeners before joining a channel.
For more information about other `AgoraRTCClient` events, refer to the [API reference](https://api-ref.agora.io/en/video-sdk/web/4.x/interfaces/iagorartcclient.html#event_channel_media_relay_event).
### Leave the channel
To exit the channel, close the local audio track and call the `leave` method.
```javascript
// Leave the channel and clean up
async function leaveChannel() {
// Stop the local audio track and release the microphone
if (localAudioTrack) {
localAudioTrack.close(); // Stop local audio
localAudioTrack = null; // Clean up the track reference
}
// Leave the channel
await client.leave();
}
```
### Complete sample code
A complete code sample demonstrating the basic process of real-time interaction is provided here for your reference. To use the sample, copy the following code to the JavaScript file in the project's `src` folder.
```js
import AgoraRTC from "agora-rtc-sdk-ng";
// RTC client instance
let client = null;
// Local audio track
let localAudioTrack = null;
// Connection parameters
let appId = "<-- Insert app ID -->";
let channel = "<-- Insert channel name -->";
let token = "<-- Insert token -->";
let uid = 0; // User ID
// Initialize the AgoraRTC client
function initializeClient() {
client = AgoraRTC.createClient({ mode: "rtc", codec: "vp8" });
setupEventListeners();
}
// Handle client events
function setupEventListeners() {
// Set up event listeners for remote tracks
client.on("user-published", async (user, mediaType) => {
// Subscribe to the remote user when the SDK triggers the "user-published" event
await client.subscribe(user, mediaType);
console.log("subscribe success");
// If the remote user publishes an audio track.
if (mediaType === "audio") {
// Get the RemoteAudioTrack object in the AgoraRTCRemoteUser object.
const remoteAudioTrack = user.audioTrack;
// Play the remote audio track.
remoteAudioTrack.play();
}
});
// Listen for the "user-unpublished" event
client.on("user-unpublished", async (user) => {
// Remote user unpublished
});
}
// Create a local audio track
async function createLocalAudioTrack() {
localAudioTrack = await AgoraRTC.createMicrophoneAudioTrack();
}
// Join the channel and publish local audio
async function joinChannel() {
await client.join(appId, channel, token, uid);
await createLocalAudioTrack();
await publishLocalAudio();
console.log("Publish success!");
}
// Publish local audio track
async function publishLocalAudio() {
await client.publish([localAudioTrack]);
}
// Leave the channel and clean up
async function leaveChannel() {
localAudioTrack.close(); // Stop local audio
await client.leave(); // Leave the channel
console.log("Left the channel.");
}
// Set up button click handlers
function setupButtonHandlers() {
document.getElementById("join").onclick = joinChannel;
document.getElementById("leave").onclick = leaveChannel;
}
// Start the basic call process
function startBasicCall() {
initializeClient();
window.onload = setupButtonHandlers;
}
startBasicCall();
```
### Create a user interface
Open `index.html` in the project's root folder and replace the contents with the following code to implement a basic client user interface:
**Sample code to create the user interface**
```html
Agora Web SDK Quickstart
Agora Web SDK Quickstart
```
## Test the sample code
Take the following steps to run and test the sample code:
1. In your `.js` file, update the values for `appId`, and `token` with values from Agora Console. Use the same `channel` name you used to generate the token.
2. To start the development server, use the following command:
```bash
npm run dev
```
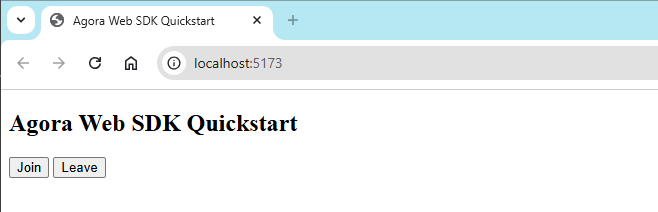
3. Open your browser and navigate to the URL displayed in your terminal, for example, `http://localhost:5173`.
You see the following page:
4. On a second device, repeat the previous steps to install and launch the app. Alternatively, use the [Web demo](https://webdemo.agora.io/basicVideoCall/index.html) or clone the [sample project on Github](https://github.com/AgoraIO/API-Examples-Web) to join the same channel and test the following use-cases:
1. Click **Join** to join the channel.
2. Enter the same app ID, channel name, and temporary token.
Once your friend joins the channel, you can hear each other.
* Run the web app on a local server (localhost) for testing purposes only. When deploying to a production environment, use the HTTPS protocol.
* Due to browser security policies that restrict HTTP addresses to 127.0.0.1, the Agora Web SDK only supports HTTPS protocol and `http://localhost` (`http://127.0.0.1`). Please do not use the HTTP protocol to access your project, except for `http://localhost` (`http://127.0.0.1`).
## Reference
This section contains content that completes the information on this page, or points you to documentation that explains other aspects to this product.
* If a firewall is deployed in your network environment, refer to [Connect with Cloud Proxy](build/manage-connection-and-quality/cloud-proxy.mdx) to use Agora services normally.
### Next steps
After implementing the quickstart sample, read the following documents to learn more:
* To ensure communication security in a test or production environment, best practice is to obtain and use a token from an authentication server. For details, see [Secure authentication with tokens](build/authenticate-users/authentication-workflow.mdx).
### Sample project
Agora provides open source sample projects on [GitHub](https://github.com/AgoraIO/API-Examples-Web) for your reference. Download or view the [basicVoiceCall](https://github.com/AgoraIO/API-Examples-Web/tree/main/src/example/basic/basicVoiceCall) project for a more detailed example.
### API reference
* [`AgoraRTC.createClient`](https://api-ref.agora.io/en/video-sdk/web/4.x/interfaces/iagorartc.html#createclient)
* [`IAgoraRTCRemoteUser`](https://api-ref.agora.io/en/video-sdk/web/4.x/interfaces/iagorartcremoteuser.html)
* [`play`](https://api-ref.agora.io/en/video-sdk/web/4.x/interfaces/iremoteaudiotrack.html#play)
* [`join`](https://api-ref.agora.io/en/video-sdk/web/4.x/interfaces/iagorartcclient.html#join)
* [`createMicrophoneAudioTrack`](https://api-ref.agora.io/en/video-sdk/web/4.x/interfaces/iagorartc.html#createmicrophoneaudiotrack)
* [`publish`](https://api-ref.agora.io/en/video-sdk/web/4.x/interfaces/iagorartcclient.html#publish)
* [AgoraRTCClient events](https://api-ref.agora.io/en/video-sdk/web/4.x/interfaces/iagorartcclient.html#event_channel_media_relay_event)
### Channel modes
The RTC SDK supports the following channel modes:
* `rtc`: Communication use-case
* `live`: Live broadcast use-case
#### Communication use-case
It is suitable for use-cases where all users in the channel need to communicate with each other and the total number of users is not too large, such as multi-person conferences and online chats.
#### Live broadcast use-case
It is suitable for use-cases where there are few publishers but many subscribers. In this use-case, the SDK defines two user roles: audience (default) and host. Hosts can send and receive audio, but audience cannot send and may only receive audio. You can specify user roles by setting the parameters `createClient` of role, or you can call `setClientRole` to dynamically modify user roles.
### Local audio tracks
The SDK uses a hierarchy where all local track objects derive from the `LocalTrack` base class. This class defines the common behavior for all local tracks. Specific track types, such as `LocalAudioTrack` inherit from `LocalTrack` and extend its functionality.
To publish a local track, you call the `publish` method of the client with the `LocalTrack` object as an input parameter. This approach makes publishing a track independent of how you create your local track.
Each type of `LocalTrack` comes with its own set of tools. For example, `LocalAudioTrack` lets you control the volume.
The SDK includes more specific classes based on `LocalAudioTrack`. For example, the `MicrophoneAudioTrack`, is a type of `LocalAudioTrack` that you can use to publish audio from your microphone. It comes with extra features for controlling the microphone and adjusting audio quality.
### Other integration methods
When you use `npm` to install the Web SDK, you can enable tree shaking to reduce the size of the app after integration. For details, see [Using tree shaking](build/optimize-and-operate/app-size-optimization.mdx).
In addition to using `npm` to install the Web SDK, you can also use the following methods:
* In the project HTML file, add the following tag to obtain the SDK from CDN:
```html
```
* Download the RTC SDK package locally, save the `.js` files in the SDK package to the project directory, and then add the following tag to the project HTML file:
```html
```
Visit the [Download](/en/api-reference/sdks?product=video\&platform=web) page to obtain the link for the latest SDK version.
### Frequently asked questions
**Why do I get a `digital envelope routines::unsupported` error when running the quickstart project locally?**
This issue arises in projects configured with `webpack` for local execution due to changes in Node.js 16 and above. The modifications in Node.js, particularly its dependency on OpenSSL (detailed in the [node issue](https://github.com/nodejs/node/issues/29817)), impact the local development environment dependencies of the project. Refer to the [webpack issue](https://github.com/webpack/webpack/issues/14532) for details.
Use one of the following solutions to resolve the issue:
* Run the following command to set a temporary environment variable (Recommended):
```bash
export NODE_OPTIONS=--openssl-legacy-provider
```
* Temporarily switch to a lower version of Node.js.
### See also
* [Error codes](reference/error-codes.mdx)
* [Connection status management](build/manage-connection-and-quality/connection-status-management.mdx)