# Voice-only quickstart (/en/realtime-media/rtc/voice-quickstart/unity)
> For AI agents: see the complete documentation index at [llms.txt](/llms.txt).
This Unity quickstart shows you how to create a basic Voice Calling app using the Agora RTC SDK.
## Understand the tech
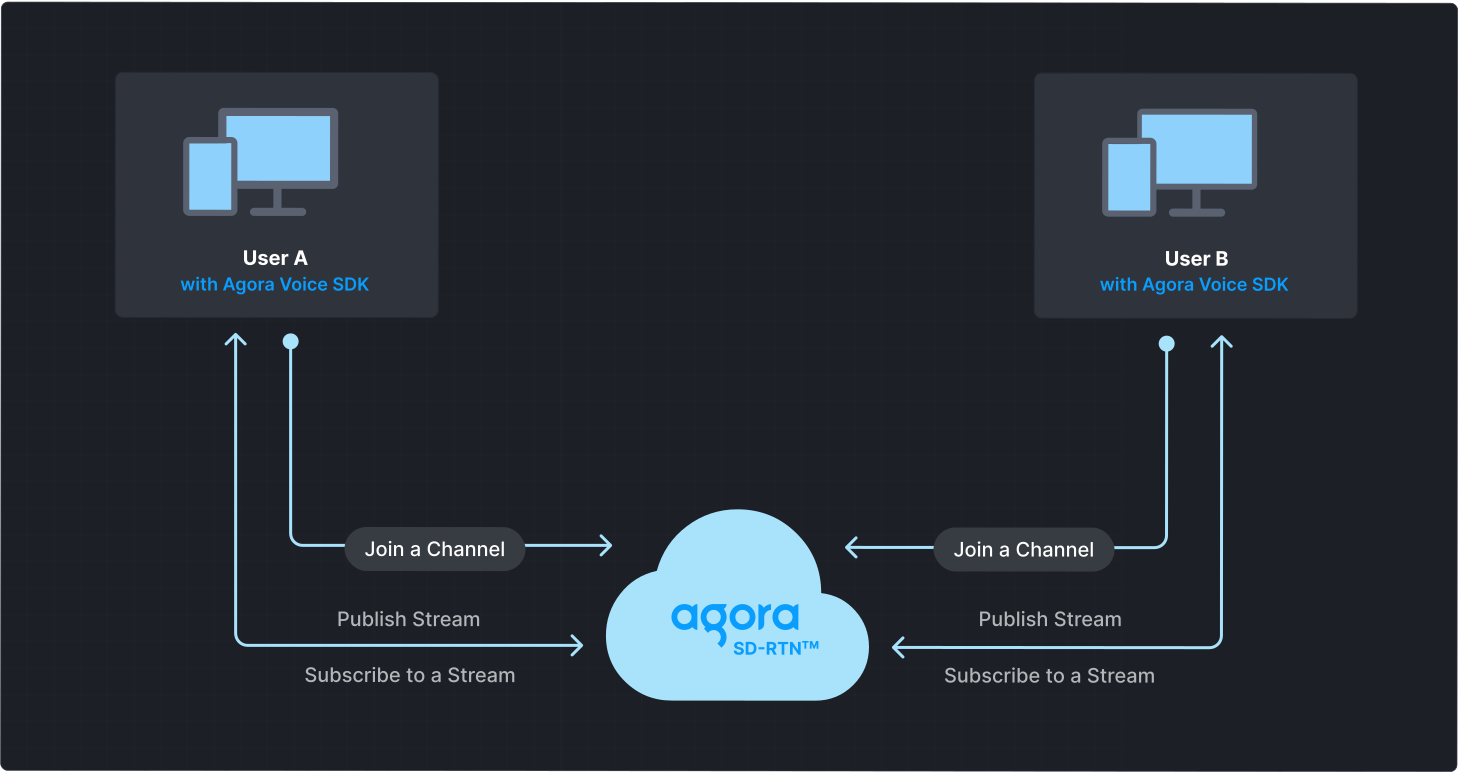
To start a Voice Calling session, implement the following steps in your app:
* **Initialize the Agora Engine**: Before calling other APIs, create and initialize an Agora Engine instance.
* **Join a channel**: Call methods to create and join a channel.
* **Send and receive audio**: All users can publish streams to the channel and subscribe to audio streams published by other users in the channel.
## Prerequisites
* [Unity Hub](https://unity.com/download) and [Unity Editor](https://unity.com/releases/editor/archive) 2018.4.0 or higher
* A suitable operating system and compiler for your development platform:
| Development platform | Operating system version | Compiler version |
| :------------------- | :----------------------- | :------------------------------------ |
| Android | Android 4.1 or later | Android Studio 4.1 or later |
| iOS | iOS 10.15 or later | Xcode 9.0 or later |
| macOS | macOS 10.15 or later | Xcode 9.0 or later |
| Windows | Windows 7 or later | Microsoft Visual Studio 2017 or later |
* A microphone
* A valid Agora account and project. Please refer to [Agora account management](manage-agora-account.md) for details.
## Set up your project
This section shows you how to set up your Unity project and install the Agora RTC SDK.
Create a new project
Add to an existing project
Refer to the following steps or the [Official Unity documentation](https://docs.unity3d.com/hub/manual/AddProject.html#add-projects) to create a Unity project.
1. Open Unity and click **New**.
2. Enter the following details:
* **Project name** : The name of the project.
* **Location** : Project storage path.
* **Template** : The project type. Select **3D**.
3. Click **Create project**.
To open your existing project:
1. In the **Projects** window, click the **Open** button in the top-right corner.
2. Browse your file manager and select the folder of the project you want to open.
3. Confirm your selection to add the project to the **Projects** window and open it in the Unity Editor.
### Install the SDK
1. Go to the [Download SDKs](/en/api-reference/sdks?product=video\&platform=unity) page and download the latest version of the Unity SDK.
2. In Unity Editor, navigate to **Assets** > **Import Package** > **Custom Package**, and select the unzipped SDK.
All plugins are selected by default. Deselect any plugins you don't need, then click **Import**.
## Implement Voice Calling
This section guides you through the implementation of basic real-time audio interaction in your game.
The following figure illustrates the essential steps:
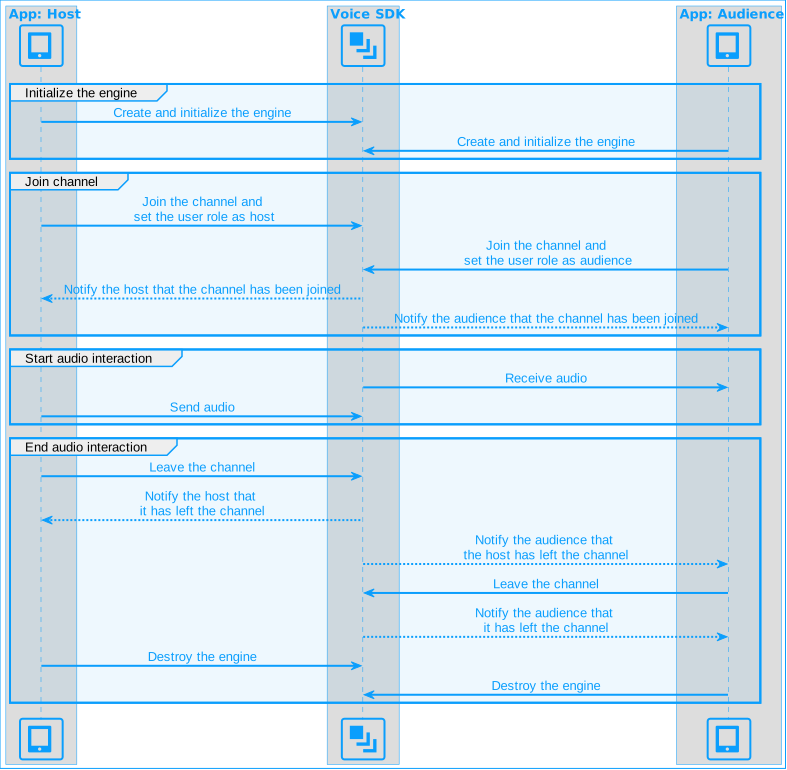
This guide includes [complete sample code](#complete-sample-code) that demonstrates implementing basic real-time interaction. To understand the core API calls in the sample code, review the following implementation steps.
Before proceeding, create and set up a script to implement Voice Calling and bind the script to the canvas.
**Steps to set up a script**
1. Create a new script and import the UI library.
1. In the **Project** tab, navigate to **Assets > Agora-Unity-RTC-SDK > Code > Rtc**, right-click and select **Create > C# Script**. A new file named `NewBehaviourScript.cs` appears in your Assets.
2. Rename the file to `JoinChannel.cs` and open it.
3. Import the Unity namespaces to access UI components by adding the following code at the top of the file:
```csharp
using UnityEngine;
using UnityEngine.UI;
```
2. Bind the script to the canvas.
In `Assets/Agora-Unity-RTC-SDK/Code/Rtc` , select the `JoinChannel.cs` file, and drag it to the Canvas. In the **Inspector** panel, ensure that the file is bound to the Canvas.
### Import Agora classes
Import the `Agora.Rtc` namespace, which contains various classes and interfaces required to implement real-time audio and video functions.
```csharp
using Agora.Rtc;
```
### Initialize the engine
For real-time communication, create an `IRtcEngine` instance using `RtcEngine.CreateAgoraRtcEngine()`. Then, configure it using `Initialize(context)` with an `RtcEngineContext`, specifying the application context, App ID, and channel profile. In your `JoinChannel.cs` file, add the following code:
```csharp
internal IRtcEngine RtcEngine;
// Fill in your app ID
private string _appID= "";
private void SetupVideoSDKEngine()
{
// Create an IRtcEngine instance
RtcEngine = Agora.Rtc.RtcEngine.CreateAgoraRtcEngine();
RtcEngineContext context = new RtcEngineContext();
context.appId = _appID;
context.channelProfile = CHANNEL_PROFILE_TYPE.CHANNEL_PROFILE_COMMUNICATION;
context.audioScenario = AUDIO_SCENARIO_TYPE.AUDIO_SCENARIO_DEFAULT;
// Initialize the instance
RtcEngine.Initialize(context);
}
```
### Join a channel
To join a channel, call `JoinChannel` with the following parameters:
* **Channel name**: The name of the channel to join. Clients that pass the same channel name join the same channel. If a channel with the specified name does not exist, it is created when the first user joins.
* **Authentication token**: A dynamic key that authenticates a user when the client joins a channel. In a production environment, you obtain a token from a [token server](build/authenticate-users/deploy-token-server.mdx) in your security infrastructure. For the purpose of this guide [Generate a temporary token](manage-agora-account.md).
* **User ID**: A 32-bit signed integer that identifies a user in the channel. You can specify a unique user ID for each user yourself. If you set the user ID to `0` when joining a channel, the SDK generates a random number for the user ID and returns the value in the `OnJoinChannelSuccess` callback.
* **Channel media options**: Configure `ChannelMediaOptions` to define publishing and subscription settings, optimize performance for your specific use-case, and set optional parameters.
For Voice Calling, set the `channelProfile` to `CHANNEL_PROFILE_COMMUNICATION` and the `clientRoleType` to `CLIENT_ROLE_BROADCASTER`.
```csharp
// Fill in your channel name
private string _channelName = "";
// Fill in a temporary token
private string _token = "";
public void Join()
{
Debug.Log("Joining _channelName");
// Enable the audio module
RtcEngine.EnableAudio();
// Set channel media options
ChannelMediaOptions options = new ChannelMediaOptions();
// Publish the audio stream captured by the microphone
options.publishMicrophoneTrack.SetValue(true);
// Automatically subscribe to all audio streams
options.autoSubscribeAudio.SetValue(true);
// Set the channel profile to live broadcast
options.channelProfile.SetValue(CHANNEL_PROFILE_TYPE.CHANNEL_PROFILE_COMMUNICATION);
// Set the user role to broadcaster
options.clientRoleType.SetValue(CLIENT_ROLE_TYPE.CLIENT_ROLE_BROADCASTER);
// Join the channel
RtcEngine.JoinChannel(_token, _channelName, 0, options);
}
```
### Subscribe to RTC SDK events
Create an instance of the `UserEventHandler` class and set it as the engine event handler. Override the callbacks based on your use-case.
```csharp
// Implement your own callback class by inheriting the IRtcEngineEventHandler interface class
internal class UserEventHandler : IRtcEngineEventHandler
{
private readonly JoinChannelAudio _audioSample;
internal UserEventHandler(JoinChannelAudio audioSample)
{
_audioSample = audioSample;
}
// Triggered when the local user successfully joins a channel
public override void OnJoinChannelSuccess(RtcConnection connection, int elapsed)
{
Debug.Log("OnJoinChannelSuccess _channelName");
}
// Triggered when a remote user successfully joins a channel
public override void OnUserJoined(RtcConnection connection, uint uid, int elapsed)
{
Debug.Log("Remote user joined");
}
// Triggered when a remote user leaves the current channel
public override void OnUserOffline(RtcConnection connection, uint uid, USER_OFFLINE_REASON_TYPE reason) {
}
}
```
Create an instance of the user callback class and call `InitEventHandler` to register the event handler.
```csharp
private void InitEventHandler()
{
UserEventHandler handler = new UserEventHandler(this);
RtcEngine.InitEventHandler(handler);
}
```
To ensure that you receive all RTC SDK events, register the event handler before joining a channel.
### Leave the channel
Call `LeaveChannel` to leave the current channel and `DisableAudio` to turn off the audio module.
```csharp
public void Leave() {
Debug.Log("Leaving " + _channelName);
// Leave the channel
RtcEngine.LeaveChannel();
// Disable the audio module
RtcEngine.DisableAudio();
}
```
### Handle permissions
To access the microphone, add device permissions to your project according to your target platform.
**Android**
Since version 2018.3, Unity does not actively obtain device permissions from the user. Call `CheckPermission` to check for and obtain the necessary permissions.
1. Include the `UnityEngine.Android` namespace, which contains Android-specific classes for interacting with Android devices from Unity:
```csharp
#if (UNITY_2018_3_OR_NEWER && UNITY_ANDROID)
using UnityEngine.Android;
#endif
```
2. Create a list of permissions to be obtained.
```csharp
#if (UNITY_2018_3_OR_NEWER && UNITY_ANDROID)
private ArrayList permissionList = new ArrayList() { Permission.Microphone };
#endif
```
3. Check if the required permissions have been granted. If not, prompt the user to grant the necessary permissions.
```csharp
private void CheckPermissions() {
#if (UNITY_2018_3_OR_NEWER && UNITY_ANDROID)
foreach (string permission in permissionList) {
if (!Permission.HasUserAuthorizedPermission(permission)) {
Permission.RequestUserPermission(permission);
}
}
#endif
}
```
**iOS and macOS**
For iOS and macOS platforms, the RTC SDK includes a post-build script named `BL_BuildPostProcess.cs`. When you build and export your Unity project as an iOS project, this script automatically inserts camera and microphone permission entries into the `Info.plist` file, eliminating the need for manual updates.
### Start and stop your game
1. When the game starts, ensure that device permissions have been granted.
```csharp
void Update() {
CheckPermissions();
}
```
2. To start Voice Calling, initialize the engine and set up the event handler.
```csharp
void Start() {
SetupAudioSDKEngine();
InitEventHandler();
}
```
3. To clean up all session-related resources when a user exits the game, call the `Dispose` method of the `IRtcEngine`.
```csharp
void OnApplicationQuit() {
if (RtcEngine != null) {
Leave();
// Destroy IRtcEngine
RtcEngine.Dispose();
RtcEngine = null;
}
}
```
After calling `Dispose`, you can no longer use any methods or callbacks of the SDK. To use Voice Calling features again, create a new engine instance.
### Complete sample code
A complete code sample demonstrating the basic process of real-time interaction is provided for your reference. To quickly implement the basic functions of real-time Video Calling, copy the following sample code into your project:
**Sample code to implement voice calling in your game**
```csharp
using System.Collections;
using System.Collections.Generic;
using UnityEngine;
using UnityEngine.UI;
using Agora.Rtc;
using Agora_RTC_Plugin.API_Example.Examples.Basic.JoinChannelAudio;
#if (UNITY_2018_3_OR_NEWER && UNITY_ANDROID)
using UnityEngine.Android;
#endif
public class JoinChannelAudio : MonoBehaviour
{
// Fill in your app ID
private string _appID = "";
// Fill in your channel name
private string _channelName = "";
// Fill in a temporary token
private string _token = "";
internal IRtcEngine RtcEngine;
#if (UNITY_2018_3_OR_NEWER && UNITY_ANDROID)
private ArrayList permissionList = new ArrayList() { Permission.Microphone };
#endif
// Start is called before the first frame update
void Start()
{
SetupAudioSDKEngine();
InitEventHandler();
SetupUI();
}
// Update is called once per frame
void Update()
{
CheckPermissions();
}
void OnApplicationQuit()
{
if (RtcEngine != null)
{
Leave();
// Destroy IRtcEngine
RtcEngine.Dispose();
RtcEngine = null;
}
}
private void CheckPermissions()
{
#if (UNITY_2018_3_OR_NEWER && UNITY_ANDROID)
foreach (string permission in permissionList) {
if (!Permission.HasUserAuthorizedPermission(permission)) {
Permission.RequestUserPermission(permission);
}
}
#endif
}
private void SetupUI()
{
GameObject go = GameObject.Find("Leave");
go.GetComponent
### Create a user interface
Follow these steps to set up a basic UI for your project or to integrate essential UI elements into your existing interface. A basic UI consists of the following components:
* A button to join the channel.
* A button to leave the channel.
**Create a basic UI**
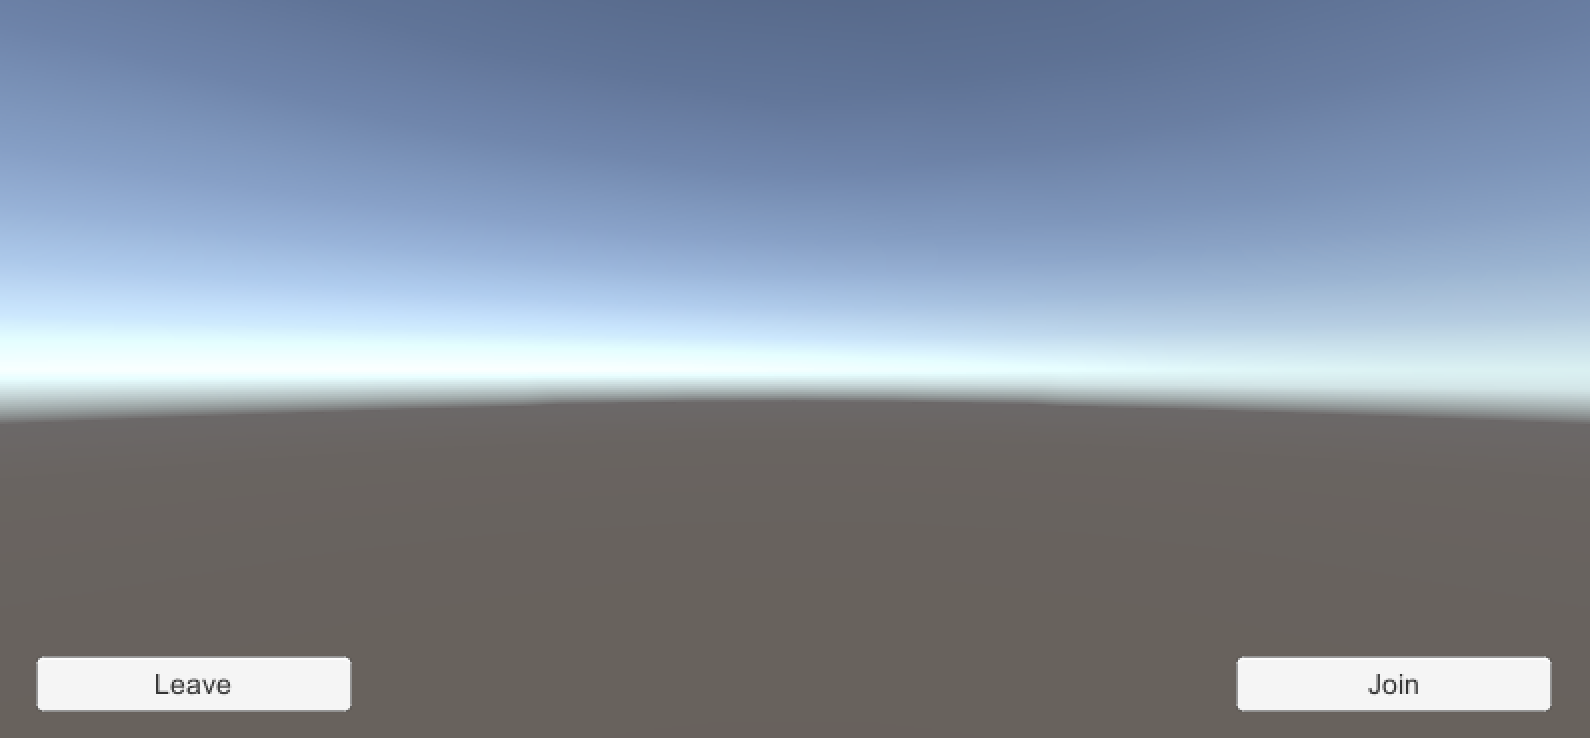
1. Create buttons to join and leave channel
1. In your Unity project, right-click the **Sample Scene** and select **Game Object > UI > Button**. You see a button on the scene canvas.
2. In the **Inspector** panel, rename the button to `Join` and adjust the position coordinates as needed. For example:
* **Pos X**:`-329`
* **Pos Y**: `-172`
1. Select the **Text** control of the **Join** button , and change the text to `Join` in the **Inspector** panel.
2. Repeat the steps to create a **Leave** button, using the following positions:
* **Pos X**:`329`
* **Pos Y**: `-172`
At this point your UI looks similar to the following:
## Test the sample code
Take the following steps to test the sample code:
1. Obtain a temporary token from Agora Console.
2. In `JoinChannel.cs`, update `_appID`, `_channelName`, and `_token` with the app ID, channel name, and temporary token for your project.
3. In Unity Editor, click **Play** to run your project.
4. Click **Join** to join a channel.
5. Invite a friend to run the demo game on a second device. Use the same `_appID_`, `_token`, and `_channelName` to join. Alternatively, use the [Web demo](https://webdemo.agora.io/basicVideoCall/index.html) to join the same channel.
After your friend joins successfully, you can hear each other.
## Reference
This section contains content that completes the information on this page, or points you to documentation that explains other aspects to this product.
* If a firewall is deployed in your network environment, refer to [Connect with Cloud Proxy](build/manage-connection-and-quality/cloud-proxy.mdx) to use Agora services normally.
### Next steps
After implementing the quickstart sample, read the following documents to learn more:
* To ensure communication security in a test or production environment, best practice is to obtain and use a token from an authentication server. For details, see [Secure authentication with tokens](build/authenticate-users/authentication-workflow.mdx).
### Sample project
Agora provides open source sample projects on [GitHub](https://github.com/AgoraIO-Extensions/Agora-Unity-Quickstart/tree/main/API-Example-Unity/Assets/API-Example/Examples) for your reference. Download or view the [JoinChannelAudio](https://github.com/AgoraIO-Extensions/Agora-Unity-Quickstart/tree/main/API-Example-Unity/Assets/API-Example/Examples/Basic/JoinChannelAudio) project for a more detailed example.
### API reference
* [`JoinChannel`](https://api-ref.agora.io/en/video-sdk/unity/4.x/API/class_irtcengine.html#api_irtcengine_joinchannel)
* [`CreateAgoraRtcEngine`](https://api-ref.agora.io/en/video-sdk/unity/4.x/API/class_irtcengine.html#api_createagorartcengine)
* [`InitEventHandler`](https://api-ref.agora.io/en/video-sdk/unity/4.x/API/class_irtcengine.html#api_irtcengine_addhandler)
* [`SetClientRole`](https://api-ref.agora.io/en/video-sdk/unity/4.x/API/class_irtcengine.html#api_irtcengine_setclientrole)
* [`LeaveChannel`](https://api-ref.agora.io/en/video-sdk/unity/4.x/API/class_irtcengine.html#api_irtcengine_leavechannel)
### Frequently asked questions
* [How can I listen for audience joining or leaving a channel?](/en/api-reference/faq/integration/audience_event)
* [How can I solve channel-related issues?](/en/api-reference/faq/integration/channel)
### See also
* [Error codes](reference/error-codes.mdx)
* [Connection status management](build/manage-connection-and-quality/connection-status-management.mdx)