# Quickstart (/en/realtime-media/interactive-live-streaming/quickstart/javascript)
> For AI agents: see the complete documentation index at [llms.txt](/llms.txt).
This page provides a step-by-step guide on how to create a basic Interactive Live Streaming app using the Agora Video SDK.
## Understand the tech [#understand-the-tech-8]
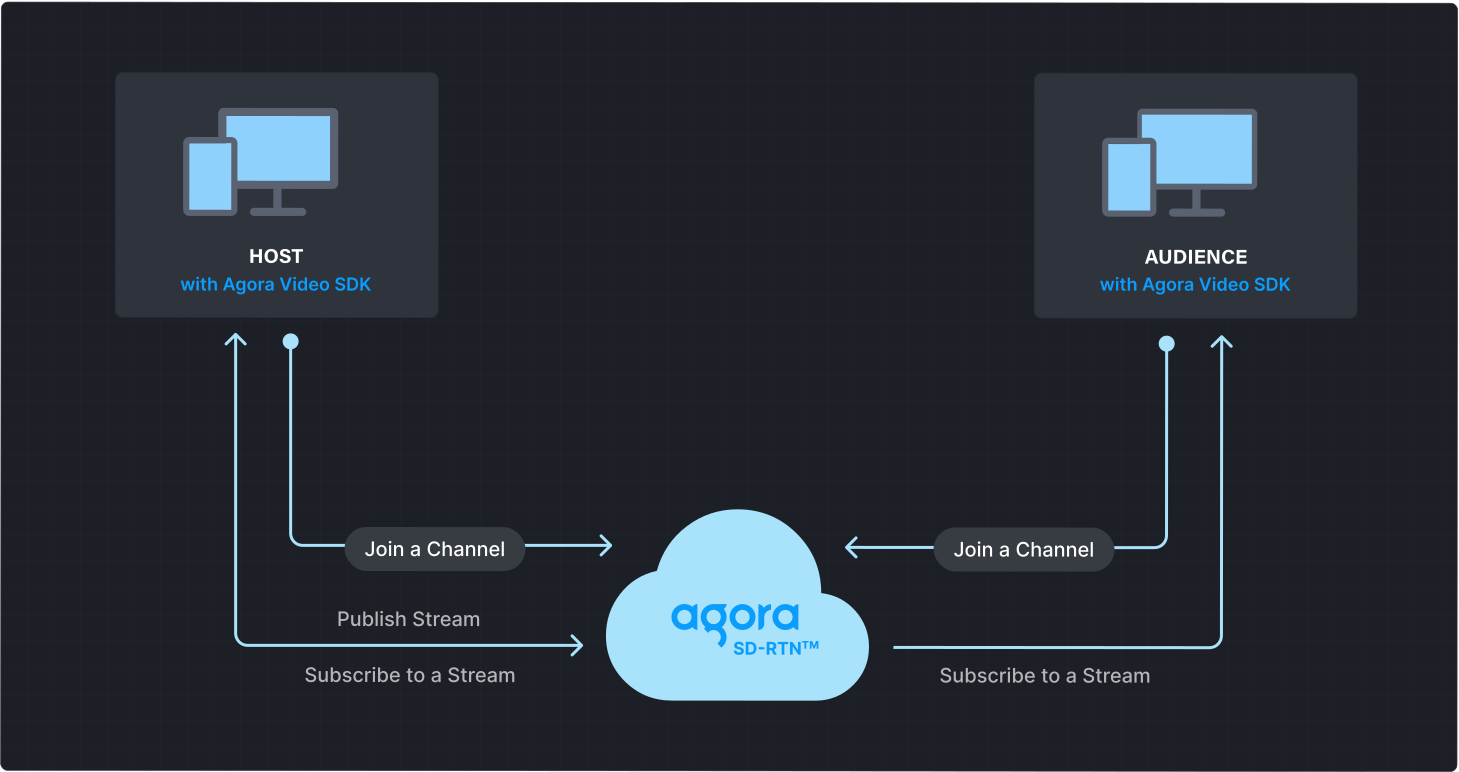
To start a Interactive Live Streaming session, implement the following steps in your app:
* **Initialize the Agora Engine**: Before calling other APIs, create and initialize an Agora Engine instance.
* **Join a channel**: Call methods to create and join a channel.
* **Join as a host**: A live streaming event has one or more hosts. A host publishes audio and video to the channel. Hosts can also subscribe to streams from other hosts.
* **Join as audience**: Audience members can only subscribe to streams published by hosts.
* **Send and receive audio and video**: Hosts publish streams to the channel. Audience members subscribe to audio and video streams published by hosts.
React SDK and Web SDK relationship
The React SDK is built on Web SDK 4.x and includes its APIs. For example, `useLocalMicrophoneTrack` calls the Web SDK `createMicrophoneAudioTrack` method.
Use the React SDK for basic real-time audio and video features. For advanced or complex scenarios, use the Web SDK. When a feature requires the Web SDK, the React SDK documentation links to the relevant Web SDK API pages.
## Prerequisites [#prerequisites-8]
* A [supported browser](/en/realtime-media/interactive-live-streaming/reference/supported-platforms).
* A JavaScript package manager such as [npm](https://www.npmjs.com/package/npm).
* A camera and a microphone
* A valid Agora account and project. Please refer to [Agora account management](manage-agora-account.md) for details.
## Set up your project [#set-up-your-project-8]
This section shows you how to set up your ReactJS project and install the Agora Video SDK.
### Create a project [#create-a-project-1]
To create a new ReactJS project with the necessary dependencies:
1. Ensure that you have installed [Node.js LTS](https://nodejs.org/en) and `npm`.
2. Open a terminal and execute:
```bash
npm create vite@latest agora-sdk-quickstart -- --template react-ts
```
This creates a new project folder named `agora-sdk-quickstart`. Open the folder in your preferred IDE.
### Install the SDK [#install-the-sdk-8]
Use one of the following methods to install the project dependencies:
**NPM**
Navigate to the project folder and run the following command to install the Video SDK:
```bash
npm i agora-rtc-react
```
**CDN**
To integrate React JS dependencies and the Agora SDK using CDN, add the following code to your HTML file:
```html
```
## Implement Interactive Live Streaming [#implement-interactive-live-streaming-8]
This section guides you through the implementation of basic real-time audio and video interaction in your app.
This guide includes [complete sample code](#complete-sample-code) that demonstrates implementing basic real-time interaction. To understand the core API calls in the sample code, review the following implementation steps.
### Import Agora hooks and components [#import-agora-hooks-and-components]
To use Video SDK in your component, include the following imports:
```tsx
import {
LocalUser, // Plays the microphone audio track and the camera video track
RemoteUser, // Plays the remote user audio and video tracks
useIsConnected, // Returns whether the SDK is connected to Agora's server
useJoin, // Automatically join and leave a channel on mount and unmount
useLocalMicrophoneTrack, // Create a local microphone audio track
useLocalCameraTrack, // Create a local camera video track
usePublish, // Publish the local tracks
useRemoteUsers, // Retrieve the list of remote users
} from "agora-rtc-react";
import AgoraRTC, { AgoraRTCProvider } from "agora-rtc-react";
import { useState } from "react";
import AgoraRTC, { AgoraRTCProvider } from "agora-rtc-react";
```
### Initialize the client [#initialize-the-client]
Use the `createClient` method provided by the SDK to create a client object for the `` component. Wrap the `` component with `` to enable state management and access operation-related hooks.
For Interactive Live Streaming, set the `mode` property of `ClientConfig` to `"live"` and the `role` to `"host"` or `"audience"`.
```tsx
export InteractiveLiveStreaming = () => {
const client = AgoraRTC.createClient({ mode: "live", codec: "vp8" });
return(
);
}
```
### Join a channel [#join-a-channel-8]
To join a channel, use the `useJoin` hook. You can specify the following `joinOptions`:
* **App ID**: [`appid`](manage-agora-account.md) identifies the project you created in Agora Console.
* **Channel name**: The name of the `channel` to join. Clients that pass the same channel name join the same channel. If a channel with the specified name does not exist, it is created when the first user joins.
* **Authentication token**: A `token` is a dynamic key that authenticates a user when the client joins a channel. In a production environment, you obtain a token from a [token server](build/authenticate-users/deploy-token-server.mdx) in your security infrastructure. For the purpose of this guide [Generate a temporary token](manage-agora-account.md).
* **User ID**: `uid` is a 32-bit signed integer that identifies a user in the channel. You can specify a unique user ID for each user yourself. If you do not set a user ID or set it to `0` when joining a channel, the SDK generates a random number for the user ID and returns the value.
Add the following to `Basics`:
```tsx
const [appId, setAppId] = useState("<-- Insert App ID -->");
const [channel, setChannel] = useState("<-- Insert Channel Name -->");
const [token, setToken] = useState("<-- Insert Token -->");
const [calling, setCalling] = useState(false);
useJoin({appid: appId, channel: channel, token: token ? token : null}, calling);
```
### Create local audio and video tracks [#create-local-audio-and-video-tracks]
To create local audio and video tracks, use the `useLocalMicrophoneTrack` and `useLocalCameraTrack` hooks. Add the following to `Basics`:
```tsx
const { localMicrophoneTrack } = useLocalMicrophoneTrack(micOn);
const { localCameraTrack } = useLocalCameraTrack(cameraOn);
```
### Publish tracks in the channel [#publish-tracks-in-the-channel]
After joining a channel, publish the local audio and video tracks using the `usePublish` hook. Add the following to `Basics`:
```tsx
const [micOn, setMic] = useState(true);
const [cameraOn, setCamera] = useState(true);
const { localMicrophoneTrack } = useLocalMicrophoneTrack(micOn);
const { localCameraTrack } = useLocalCameraTrack(cameraOn);
usePublish([localMicrophoneTrack, localCameraTrack]);
```
### Display the local video [#display-the-local-video-8]
To display the local video, use the `LocalUser` hook, which provides properties to manage local audio and video tracks. Assign the local video track to `videoTrack` and the audio track to `audioTrack`. Use the `micOn` and `cameraOn` parameters to toggle audio and video. Include the following code in the markup of your `Basics` component:
```tsx
```
### Display remote video [#display-remote-video-8]
To manage and display the list of remote users connected to a channel, use the `useRemoteUsers` hook. To show each user's video, pass the user object to the `RemoteUser` component along with the required properties. Follow these steps to implement the logic:
1. **Retrieve the list of remote users**
Use the `useRemoteUsers` hook to get the current list of remote users:
```tsx
const remoteUsers = useRemoteUsers();
```
2. **Render the remoteUser component**
Loop through the `remoteUsers` list and nest the `RemoteUser` component where you want to display each user's video. Include the following code in the markup of your `Basics` component:
```tsx
{remoteUsers.map((user) => (
{user.uid}
))}
```
### Leave the channel [#leave-the-channel-3]
To leave a channel, destroy the component, close the browser window, or refresh the browser tab. The `useJoin` hook automatically handles the destruction of the React component.
### Complete sample code [#complete-sample-code-8]
A complete code sample demonstrating the basic process of real-time interaction is provided for your reference. To use the complete sample, add the following to your `src/App.tsx` file.
```tsx
import {
LocalUser,
RemoteUser,
useIsConnected,
useJoin,
useLocalMicrophoneTrack,
useLocalCameraTrack,
usePublish,
useRemoteUsers,
} from "agora-rtc-react";
import { useState } from "react";
import AgoraRTC, { AgoraRTCProvider } from "agora-rtc-react";
const client = AgoraRTC.createClient({ mode: "live", codec: "vp8" });
return(
);
}
const Basics = () => {
const [calling, setCalling] = useState(false);
const isConnected = useIsConnected(); // Store the user's connection status
const [appId, setAppId] = useState("<-- Insert App ID -->");
const [channel, setChannel] = useState("<-- Insert Channel Name -->");
const [token, setToken] = useState("<-- Insert Token -->");
const [micOn, setMic] = useState(true);
const [cameraOn, setCamera] = useState(true);
const { localMicrophoneTrack } = useLocalMicrophoneTrack(micOn);
const { localCameraTrack } = useLocalCameraTrack(cameraOn);
useJoin({appid: appId, channel: channel, token: token ? token : null}, calling);
usePublish([localMicrophoneTrack, localCameraTrack]);
const remoteUsers = useRemoteUsers();
return (
<>
)}
);
};
export default InteractiveLiveStreaming;
```
## Test the sample code [#test-the-sample-code-8]
Use [CodeSandbox](https://codesandbox.io/), to swiftly run the complete demo code and experience the React Video SDK functionality in just a few simple steps.
To run the demo code in `CodeSandbox`:
1. Fill in the app ID and the temporary token you obtained from Agora Console. Use the same channel name you used to generate the token.
2. Click the **Join Channel** button. You see yourself in the video.
3. Ask a friend to open the same demo link in their browser and join the channel using the same app ID, channel name, and temporary token as yours. After successfully joining the channel, you can see and hear each other.
4. Click the microphone and camera buttons at the bottom to switch on, or turn off the corresponding devices.
5. Click the hang-up button to end the call.
To experiment and learn more, modify the code directly in the editor on the left, and preview the runtime effect on the right.
If `CodeSandbox` access is slow, try adjusting your network configuration.
## Reference [#reference-8]
This section contains content that completes the information on this page, or points you to documentation that explains other aspects to this product.
* If a firewall is deployed in your network environment, refer to [Connect with Cloud Proxy](build/optimize-quality-and-connection/cloud-proxy.mdx) to use Agora services normally.
### Next steps [#next-steps-8]
After implementing the quickstart sample, read the following documents to learn more:
* To ensure communication security in a test or production environment, best practice is to obtain and use a token from an authentication server. For details, see [Secure authentication with tokens](build/authenticate-users/use-tokens.mdx).
### Sample project [#sample-project-8]
Agora provides an open source [sample project on GitHub](https://github.com/AgoraIO-Extensions/agora-rtc-react) for your reference. The project demonstrates the use of each component and hook provided by the React SDK, as well as some advanced functions.
### API reference [#api-reference-8]
* [`LocalUser`](https://api-ref.agora.io/en/video-sdk/reactjs/2.x/functions/LocalUser.html)
* [`RemoteUser`](https://api-ref.agora.io/en/video-sdk/reactjs/2.x/functions/RemoteUser.html)
* [`useIsConnected()`](https://api-ref.agora.io/en/video-sdk/reactjs/2.x/functions/useIsConnected.html)
* [`useJoin()`](https://api-ref.agora.io/en/video-sdk/reactjs/2.x/functions/useJoin.html)
* [`useLocalMicrophoneTrack()`](https://api-ref.agora.io/en/video-sdk/reactjs/2.x/functions/useLocalMicrophoneTrack.html)
* [`usePublish()`](https://api-ref.agora.io/en/video-sdk/reactjs/2.x/functions/usePublish.html)
* [`useRemoteUsers()`](https://api-ref.agora.io/en/video-sdk/reactjs/2.x/functions/useRemoteUsers.html)
### See also [#see-also-8]
* [Error codes](/en/realtime-media/video/reference/error-codes)