# SDK quickstart (/en/realtime-media/im/get-started-sdk/windows)
> For AI agents: see the complete documentation index at [llms.txt](/llms.txt).
Instant messaging enhances user engagement by enabling users to connect and form a community within the app. Increased engagement can lead to increased user satisfaction and loyalty to your app. An instant messaging feature can also provide real-time support to users, allowing them to get help and answers to their questions quickly. The Chat SDK enables you to embed real-time messaging in any app, on any device, anywhere.
This page guides you through implementing peer-to-peer messaging into your app using the Chat SDK.
## Understand the tech [#understand-the-tech]
The following figure shows the workflow of sending and receiving peer-to-peer messages using Chat SDK.
Chat SDK workflow
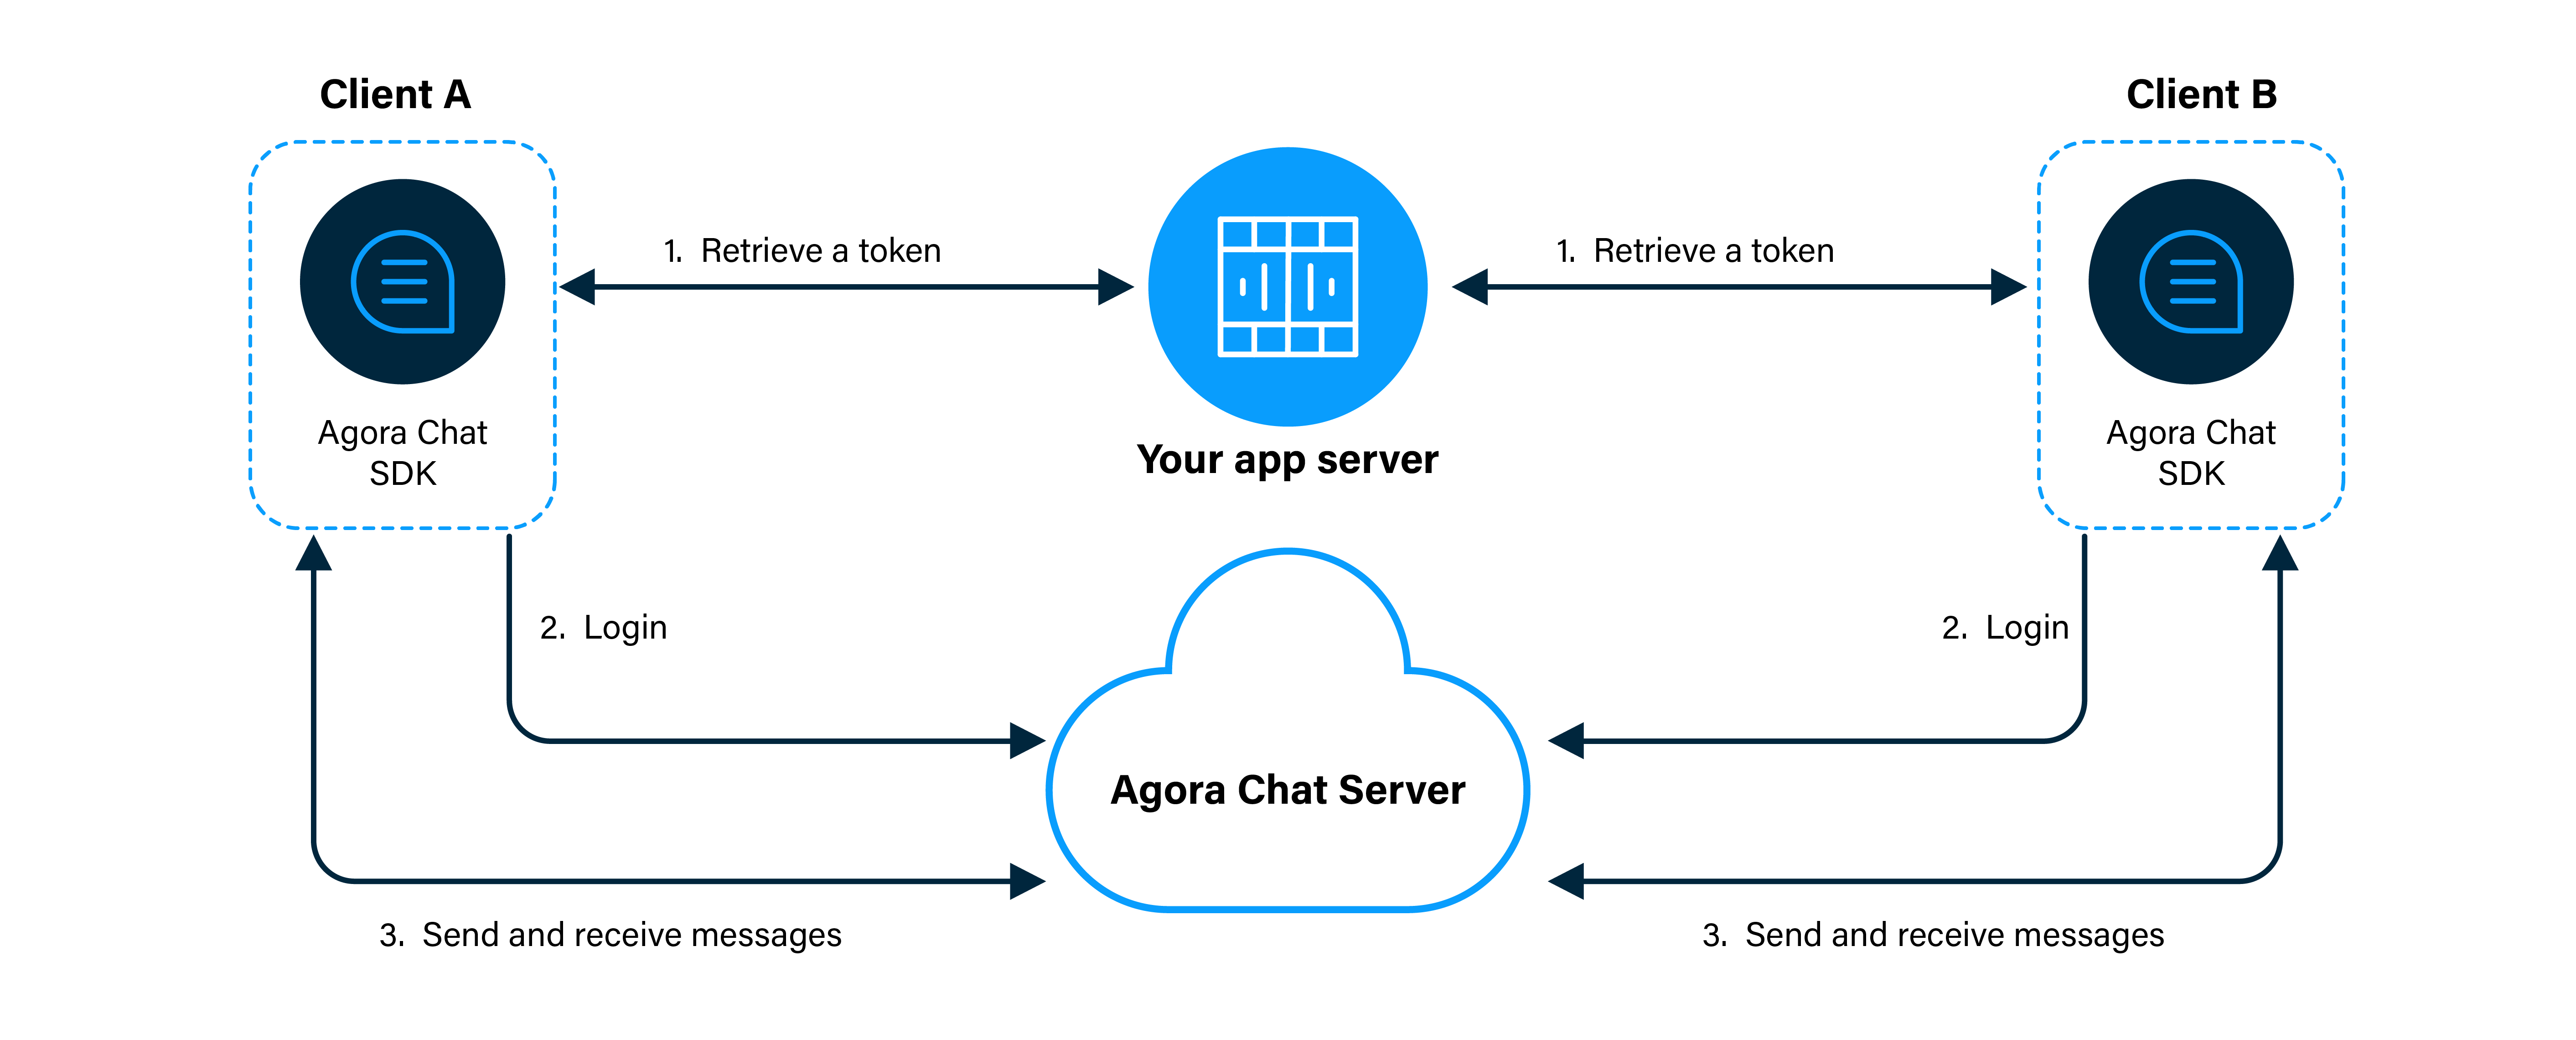
1. Clients retrieve an authentication token from your app server.
2. Users log in to Chat using the App ID, their user ID, and token.
3. Clients send and receive messages through Chat as follows:
1. Client A sends a message to Client B. The message is sent to the Agora Chat server.
2. The server delivers the message to Client B. When Client B receives a message, the SDK triggers an event.
3. Client B listens for the event to read and display the message.
## Prerequisites [#prerequisites]
In order to follow the procedure on this page, you must have:
* A valid [Agora account](/en/realtime-media/im/get-started/manage-agora-account#create-an-agora-account).
* An [Agora project](/en/realtime-media/im/get-started/manage-agora-account#create-an-agora-project) for which you have [enabled Chat](./enable#enable-).
* The [App ID](./enable#get-chat-project-information) for the project.
* Internet access.
Ensure that no firewall is blocking your network communication.
* A device running Windows 7 or higher.
* Visual Studio IDE 2019 or later
* .NET Framework 4.5.2 or later
## Project setup [#project-setup]
This section shows how to integrate Chat SDK into your project.
1. Create a Windows project
1. Open **Visual Studio** and [Create a C# WPF app](https://learn.microsoft.com/en-us/dotnet/desktop/wpf/get-started/create-app-visual-studio?view=netdesktop-7.0#create-a-wpf-app) named `AgoraWindowsChat`.
2. Set the **Active solution configuration** as **Debug** and **Active solution platform** as **x64**.
2. Integrate the Chat SDK
1. [Download](/en/api-reference/sdks?product=chat\&platform=windows) the Chat SDK NuGet package.
2. In Solution Explorer, right-click `` and select **Manage NuGet Packages...**.
3. On the `NuGet: ` page, select the **Gear** icon at the top right.
4. In **Options**,
1. Click **+** at the top right, then select the new package source.
2. Set **Name**, then set **Source** to the parent directory of the Nuget package resides.
3. Click **OK**.
5. Go back to the `NuGet: ` page, open the **Package source** drop-down list at the top right, then
select the package you just added.
6. In **Browse** on the `NuGet: ` page, select **agora\_chat\_sdk**, then click **Install**.
If you don't see **agora\_chat\_sdk**, refresh the page.
7. In **Preview Changes**, click **OK**
You have installed Chat SDK.
## Implement peer-to-peer messaging [#implement-peer-to-peer-messaging]
This section shows how to use the Chat SDK to implement peer-to-peer messaging in your app, step by step.
### Create the UI [#create-the-ui-3]
In your project, create a simple UI that consists of the following elements:
* A `Button` to **Join** or **Leave** Agora Chat.
* A `TextBox` box to specify the recipient user ID.
* A `TextBox` box to enter a text message.
* A `Button` to send the text message.
* A scrollable layout to display sent and received messages.
To add the UI framework to your device project, In Solution Explorer, open `` **>** `MainWindow.xaml`, then replace the file contents with the following:
```xml
```
### Handle the system logic [#handle-the-system-logic-4]
This section shows you how to add Chat SDK headers and setup logging. To do this:
1. **Import the Agora namespaces**
In the Solution Explorer, select `` > `MainWindow.xaml`, and double-click it to open the `MainWindow.xaml.cs` file. Add the following lines to the namespaces list in the file:
```c#
using AgoraChat;
using AgoraChat.MessageBody;
```
2. **Log events and show status updates to your users**
In the `MainWindow` class, add the following helper method:
```c#
private void showLog(string log)
{
// Show a message box
Dip?.Invoke(() =>
{
MessageBox.Show(log);
});
// Write log
Console.WriteLine(log);
}
```
### Send and receive messages [#send-and-receive-messages-4]
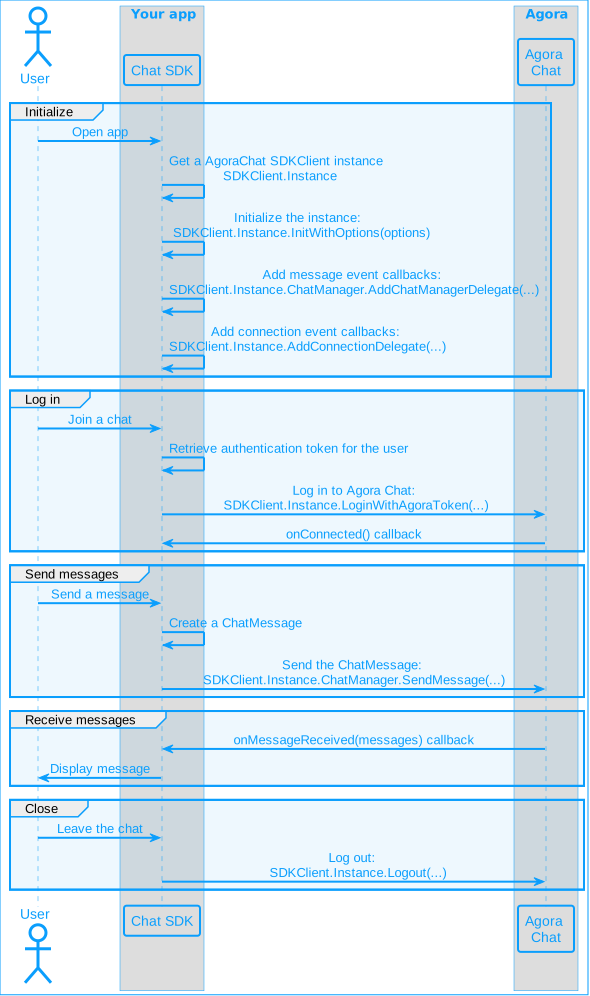
When a user opens the app, you instantiate and initialize a `SDKClient`. When the user clicks the **Join** button, the app logs in to Agora Chat. When a user types a message in the text box and then presses Send, the typed message is sent to another registered user. When the app receives a message from Agora Chat, the message is displayed in the message list. This simple workflow enables you to rapidly build a Chat client with basic functionality.
The following figure shows the API call sequence for implementing this workflow.
API call sequence
To implement this workflow in your app, take the following steps:
1. **Declare connection variables**
In the `MainWindow` class, add the following declarations:
```c#
private readonly string userId = "";
private string token = "";
private readonly string app_id = "";
private bool isJoined = false;
// Update the UI from callbacks on a separate thread
private readonly System.Windows.Threading.Dispatcher? Dip = null;
```
2. **Set up Chat when the app starts**
When the app starts, you create an instance of `SDKClient` and set up delegates to handle connection and Chat events.
To do this, replace the `MainWindow()` constructor in the `MainWindow` class with the following:
```c#
public MainWindow()
{
// Initialize the thread dispatcher
Dip = System.Windows.Threading.Dispatcher.CurrentDispatcher;
// Initialize Chat SDK client
setupChatClient();
// Add connection and chat delegates to handle callbacks
SDKClient.Instance.AddConnectionDelegate(this);
SDKClient.Instance.ChatManager.AddChatManagerDelegate(this);
// Execute the CloseWindow method when the app closes
Closed += CloseWindow;
}
```
3. **Initialize the `SDKClient`**
To implement peer-to-peer messaging, you use Chat SDK to initialize a `SDKClient` instance. In the `MainWindow` class, add the following method:
```c#
private void setupChatClient()
{
var options = Options.InitOptionsWithAppId(app_id);
options.UsingHttpsOnly = true;
// Initialize the chat SDKClient
SDKClient.Instance.InitWithOptions(options);
}
```
4. **Log in to Agora Chat**
When a user clicks **Join**, your app logs in to Agora Chat. When they click **Leave**, the app logs out. To implement this logic, add the following method after `showLog()` in the `MainWindow` class:
```c#
private void JoinLeave_Click(object sender, RoutedEventArgs e)
{
Button button = (Button)this.FindName("btnJoinLeave");
if (isJoined)
{
SDKClient.Instance.Logout(true, callback: new CallBack(
onSuccess: () =>
{
showLog("Sign out from Agora Chat succeed");
Dip?.Invoke(() =>
{
button.Content = "Join";
});
isJoined = false;
},
onError: (code, desc) =>
{
showLog(desc);
}
));
}
else
{
// Log in to the Chat service with userId and Agora token.
SDKClient.Instance.LoginWithToken(userId, token, callback: new CallBack(
onSuccess: () =>
{
showLog("Sign in to Agora Chat succeed");
isJoined = false;
Dip?.Invoke(() =>
{
button.Content = "Leave";
});
},
onError: (code, desc) =>
{
if (code == 200)
{ // Already joined
isJoined = true;
Dip?.Invoke(() =>
{
button.Content = "Leave";
});
}
else
{
showLog(desc);
}
}
));
}
}
```
5. **Send a message**
When a user types a message and presses the Send button, the app sends the message to the recipient. To do this, add the following method to the `MainWindow` class, after `JoinLeave_Click()`:
```c#
private void MessageSend_Click(object sender, RoutedEventArgs e)
{
if (eReciepientUserId.Text.Equals("") || eMessage.Text.Equals(""))
{
showLog("Enter a recipient name and a message");
return;
}
//Send Message
Message msg = Message.CreateTextSendMessage(eReciepientUserId.Text, eMessage.Text);
SDKClient.Instance.ChatManager.SendMessage(ref msg, new CallBack(
onSuccess: () =>
{
// The success callback uses the System.Windows.Threading.Dispatcher to update UI elements
Dip?.Invoke(() =>
{
TextBody? txtBody = msg.Body as TextBody;
if (txtBody != null)
{
displayMessage(txtBody.Text, true);
}
eMessage.Text = "";
});
},
onError: (code, desc) =>
{
showLog(desc);
}
));
}
```
6. **Set up callbacks for handling Chat events**
To set up callbacks for handling connection and Chat events, you implement the `IConnectionDelegate` and `IChatManagerDelegate` interfaces in the `MainWindow` class. Update the `MainWindow` class definition as follows:
```c#
public partial class MainWindow : Window, IConnectionDelegate, IChatManagerDelegate
```
7. **Handle connection events**
To implement all `IConnectionDelegate` callbacks, add the following code to the `MainWindow` class:
```c#
public void OnConnected()
{
showLog("SDK connected successfully.");
}
public void OnDisconnected()
{
showLog("SDK disconnected.");
}
public void OnLoggedOtherDevice(string deviceName, string info)
{
}
public void OnRemovedFromServer()
{
}
public void OnForbidByServer()
{
}
public void OnChangedIMPwd()
{
}
public void OnLoginTooManyDevice()
{
}
public void OnKickedByOtherDevice()
{
}
public void OnAuthFailed()
{
showLog("User authentication failed.");
}
public void OnTokenExpired()
{
showLog("The token has expired.");
}
public void OnTokenWillExpire()
{
showLog("The token is about to expire. Get a new token from the token server and renew the token.");
}
public void OnAppActiveNumberReachLimitation()
{
}
public void OnOfflineMessageSyncStart()
{
}
public void OnOfflineMessageSyncFinish()
{
}
```
8. **Handle Chat events**
To read and display received chat messages, you add code to the `OnMessagesReceived` callback of the `IChatManagerDelegate`. To implement all `IChatManagerDelegate` callbacks, add the following code to the `MainWindow` class:
```c#
public void OnMessagesReceived(List messages)
{
foreach (Message msg in messages)
{
Dip?.Invoke(() =>
{
TextBody? txtBody = msg.Body as TextBody;
if (txtBody != null)
{
displayMessage(txtBody.Text, false);
}
});
}
}
public void OnCmdMessagesReceived(List messages)
{
}
public void OnMessagesRead(List messages)
{
}
public void OnMessagesDelivered(List messages)
{
}
public void OnMessagesRecalled(List messages)
{
}
public void OnReadAckForGroupMessageUpdated()
{
}
public void OnGroupMessageRead(List list)
{
}
public void OnConversationsUpdate()
{
}
public void OnConversationRead(string from, string to)
{
}
public void MessageReactionDidChange(List list)
{
}
public void OnMessageContentChanged(Message msg, string operatorId, long operationTime)
{
}
public void OnMessagePinChanged(string messageId, string conversationId, bool isPinned, string operatorId, long operationTime)
{
}
```
9. **Display chat messages**
To display sent and received messages, add the following method to the `MainWindow` class:
```c#
private void displayMessage(string messageText, bool isSentMessage)
{
// Create a new TextBlock
TextBlock messageTextBlock = new TextBlock();
messageTextBlock.Text = messageText;
messageTextBlock.Padding = new Thickness(10);
// Set formatting
ScrollViewer? messageList = FindName("scrollMessagesView") as ScrollViewer;
if (messageList != null)
{
if (isSentMessage)
{
messageTextBlock.Background = new SolidColorBrush(Color.FromRgb(220, 248, 198));
messageTextBlock.HorizontalAlignment = HorizontalAlignment.Right;
messageTextBlock.Margin = new Thickness(100, 25, 15, 5);
}
else
{
messageTextBlock.Background = Brushes.White;
messageTextBlock.HorizontalAlignment = HorizontalAlignment.Left;
messageTextBlock.Margin = new Thickness(15, 25, 100, 5);
}
// Add the message TextBlock to the StackPanel inside the ScrollViewer
StackPanel? messageStackPanel = messageList.Content as StackPanel;
if (messageStackPanel != null)
{
messageStackPanel.Children.Add(messageTextBlock);
messageList.ScrollToEnd(); // Scroll to the bottom of the messages
}
}
}
```
10. **Clean up when the window is closed**
Add the following method to the `MainWindow` class:
```c#
private void CloseWindow(object sender, EventArgs e)
{
SDKClient.Instance.ChatManager.RemoveChatManagerDelegate(this);
SDKClient.Instance.DeleteConnectionDelegate(this);
}
```
## Test your implementation [#test-your-implementation]
To ensure that you have implemented Peer-to-Peer Messaging in your app:
1. Create an app instance for the first user:
1. [Register a user](./enable#register-a-user) in [Agora Console](https://console.agora.io/v2) and [Generate a user token](./enable#generate-a-user-token).
2. In the `MainWindow` class, update `userId`, `token`, and `appId` with values from Agora Console. To get your App ID, see [Get Chat project information](./enable#get-chat-project-information).
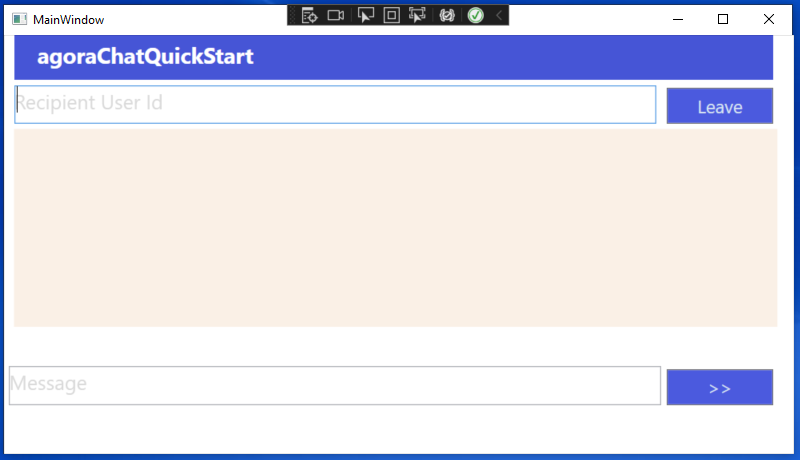
3. Click the **Start** button. You see the following interface:
2. Create an app instance for the second user:
1. Register a second user in Agora Console and generate a user token.
2. Build a second instance of your app after updating `userId` and `token` with values for the second user. Make sure you use the same `appId` as for the first user.
3. Click the **Start** button to launch the second instance.
3. On each instance, click **Join** to log in to Agora Chat.
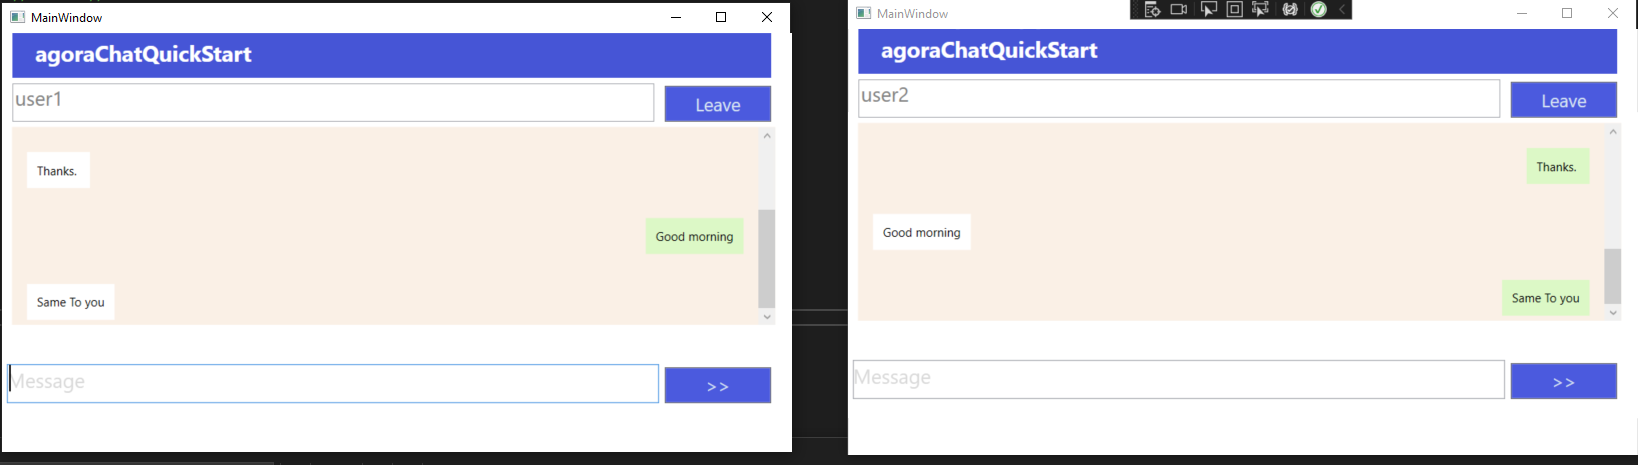
4. Edit the recipient name in each app instance to show the user ID of the user logged in to the other instance.
5. Type a message in the **Message** box of either instance and press **`>>`**. The message is sent and appears on the other app.
6. Press **Leave** to log out from Agora Chat.
## Reference [#reference]
This section contains content that completes the information in this page, or points you to documentation that explains other aspects to this product.
* For more code samples, see [Samples and demos](./downloads).
* Avoid blocked callbacks
Each callback of a Chat client instance is triggered from internal threads. To avoid blocking internal threads, Agora recommends that you execute your operations in other threads when callbacks are triggered.
### API reference [#api-reference-4]
* [`AgoraChat.SDKClient Class`](https://api-ref.agora.io/en/chat-sdk/windows/1.x/class_agora_chat_1_1_s_d_k_client.html)
* [`SDKClient.InitWithOptions()`](https://api-ref.agora.io/en/chat-sdk/windows/1.x/class_agora_chat_1_1_s_d_k_client.html#a77b332d22c4a2318a15ea127fa2f66dc)
* [`SDKClient.LoginWithAgoraToken()`](https://api-ref.agora.io/en/chat-sdk/windows/1.x/class_agora_chat_1_1_s_d_k_client.html#a66ed705ea3ab6e9af1c410393f297ac0)
* [`SDKClient.Logout()`](https://api-ref.agora.io/en/chat-sdk/windows/1.x/class_agora_chat_1_1_s_d_k_client.html#a98b67e590dbe9f6253449df9e82dd0c8)
* [`AgoraChat.Message Class`](https://api-ref.agora.io/en/chat-sdk/windows/1.x/class_agora_chat_1_1_message.html)
* [`CreateTextSendMessage()`](https://api-ref.agora.io/en/chat-sdk/windows/1.x/class_agora_chat_1_1_message.html#aa97fe7e237c0c2c7f2fd22a206985e2b)
* [`AgoraChat.ChatManager Class`](https://api-ref.agora.io/en/chat-sdk/windows/1.x/class_agora_chat_1_1_chat_manager.html)
* [`ChatManager.SendMessage()`](https://api-ref.agora.io/en/chat-sdk/windows/1.x/class_agora_chat_1_1_chat_manager.html#af9f598e16100bebd4b035d8335262e2b)
* [`AddChatManagerDelegate()`](https://api-ref.agora.io/en/chat-sdk/windows/1.x/class_agora_chat_1_1_chat_manager.html#ad82fe37433d576cbf96af1fe9ad381db)
* [`RemoveChatManagerDelegate()`](https://api-ref.agora.io/en/chat-sdk/windows/1.x/class_agora_chat_1_1_chat_manager.html#af04896f0b9f6569bbd37d044ec7771bc)
* [`AddConnectionDelegate()`](https://api-ref.agora.io/en/chat-sdk/windows/1.x/class_agora_chat_1_1_s_d_k_client.html#a7156cf061b2ac478ebaabb7776c18079)
* [`DeleteConnectionDelegate()`](https://api-ref.agora.io/en/chat-sdk/windows/1.x/class_agora_chat_1_1_s_d_k_client.html#a5dbada1cc1567eb62784bdbae935517a)
### Next steps [#next-steps]
In a production environment, best practice is to deploy your own token server. Users retrieve a token from the token server to log in to Chat. To see how to implement a server that generates and serves tokens on request, see [Secure authentication with tokens](../develop/authentication).