# Classroom SDK & Proctor SDK (/en/realtime-media/flexible-classroom/build/integrate-the-sdks/integrate-flexible-classroom/web)
> For AI agents: see the complete documentation index at [llms.txt](/llms.txt).
This page introduces how to add Flexible Classroom into your app.
## Web [#web]
The cloud classroom scene is included in `FcrUIScene`. If you need to integrate the cloud classroom scene UI, please refer to [FcrUIScene SDK](/en/realtime-media/flexible-classroom/build/integrate-the-sdks/integrate-flexible-classroom-fcr).
## Understand the tech [#understand-the-tech-2]
The following figure shows the overall technical architecture of Flexible Classroom:
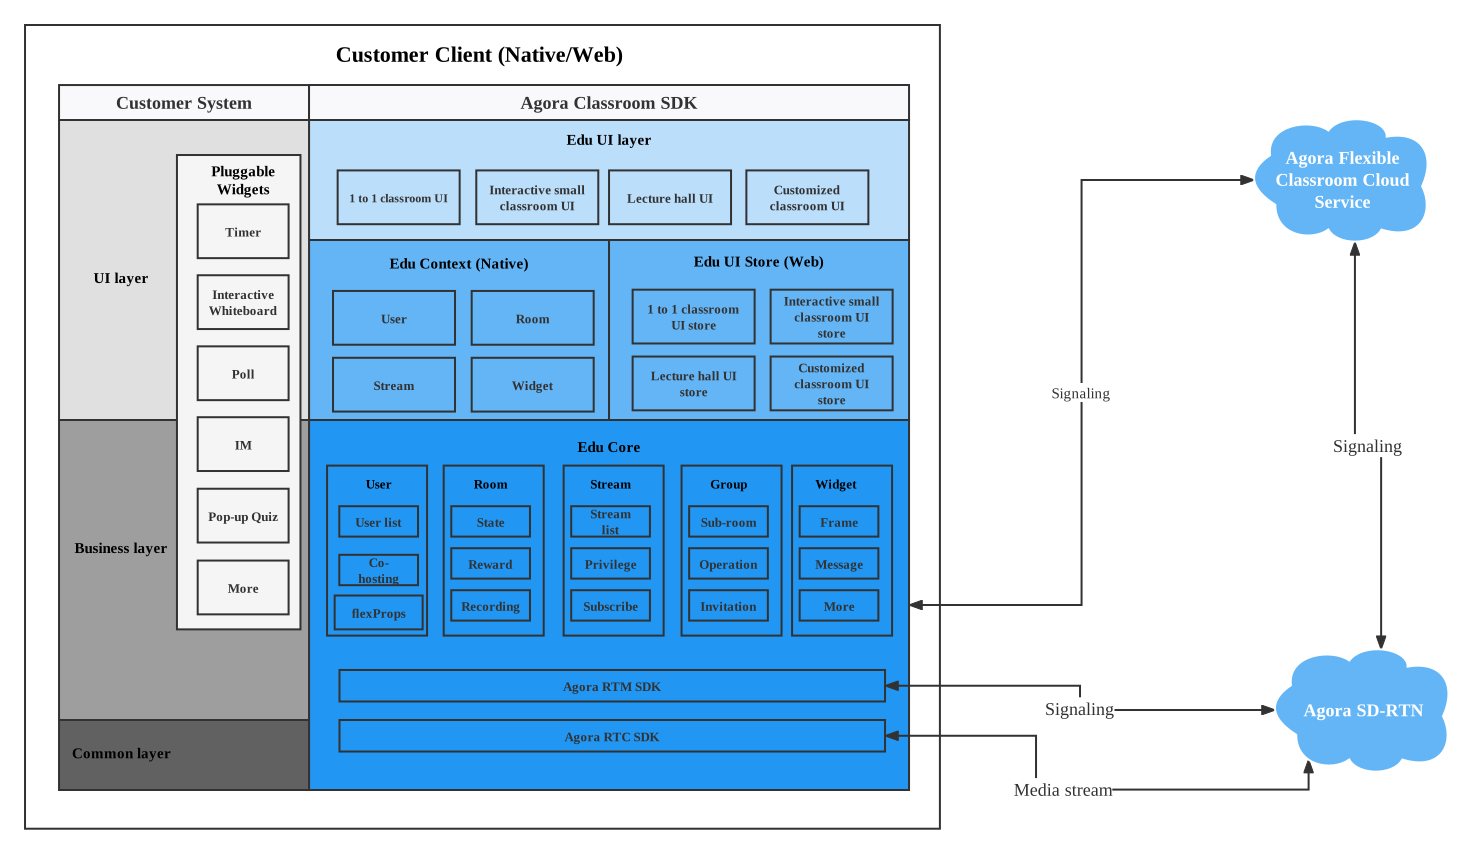
The source code of Flexible Classroom contains the following packages:
* `agora-classroom-sdk`: The Agora Classroom SDK, which contains the following modules:
* `/lib/externals`: Stores video-related extensions such as beautifying and noise reduction.
* `/src/infra/api`: SDK interface.
* `/src/infra/configs`: Default color and theme configuration.
* `/src/infra/stores`: The UI stores implement the business logic for the UI components.
* `/src/infra/capabilities`:
* `/containers`: This folder contains all the business components. A business component is implemented by combining the UI components with the UI stores.
* `/scenarios`: This folder contains the code for arranging the layout of business components in different scenarios.
* `/src/ui-kit`: Common UI components.
* `agora-demo-app`: The Agora Classroom SDK demo app, supports Web, H5, Electron and other platforms, supports online classroom, online invigilation function, and provides code samples for online classroom before, during, and after class.
* `agora-plugin-gallery`: An independent plug-in library for Agora Classroom SDK, which inherits the `AgoraWidgetBase` class and implements the `AgoraWidgetLifecycle` interface. It includes plug-ins such as interactive whiteboard, IM chat, answering machine, voting machine, and timer.
* `agora-proctor-sdk`: The Agora Classroom invigilation scene SDK, including the following modules:
* `/src/infra/stores`: The UI stores implement the business logic for the UI components.
* `/src/infra/capabilities`:
* `/components`: Common UI components.
* `/containers`: This folder contains all the business components. A business component is implemented by combining the UI components with the UI stores.
* `/scenarios`: This folder contains the code for arranging the layout of business components in different scenarios.
* `agora-common-libs`: General tool class library, including ThemeProvider, I18nProvider, and other global general tools
* `agora-edu-core`: Provides upstream API calls and downstream data structure encapsulation for education and proctoring scenarios in smart classrooms.
* `agora-rte-sdk`: Provides cross-end RTC adaptation capabilities as well as classroom event callbacks and data structure encapsulation.
## Integration methods [#integration-methods]
You can use multiple methods to integrate Flexible Classroom into your web project. Depending on whether you need to customize the classroom UI, you can choose different integration methods:
* If you are satisfied with the default UI of Flexible Classroom and do not want to change any of it, integrate the whole Flexible Classroom through [npm](https://www.npmjs.com/package/agora-classroom-sdk) or CDN.
* If you want to customize the classroom UI based on the default UI of Flexible Classroom, you need to integrate Flexible Classroom by downloading the [source code](https://github.com/AgoraIO-Community/flexible-classroom-desktop/tree/release/2.8.13) on GitHub.
## Integrated education scenario [#integrated-education-scenario]
### Use the default UI of Flexible Classroom [#use-the-default-ui-of-flexible-classroom]
If you are satisfied with the default UI of Flexible Classroom and do not want to change any of it, integrate the whole Flexible Classroom through npm or CDN.
#### Through npm [#through-npm]
1. To install the SDK, run the following command:
```bash
npm install agora-classroom-sdk agora-plugin-gallery
```
2. To import the `AgoraEduSDK` and plugin modules, add the following code in the JavaScript code in your project.
```javascript
import {AgoraEduSDK} from 'agora-classroom-sdk'
import {
AgoraSelector,
AgoraCountdown,
AgoraHXChatWidget,
FcrStreamMediaPlayerWidget,
AgoraPolling,
FcrWatermarkWidget,
FcrWebviewWidget,
FcrBoardWidget
} from 'agora-plugin-gallery/classroom'
```
3. To launch a classroom, call [AgoraEduSDK.config](/en/api-reference/api-ref/flexible-classroom/classroom-sdk) and [AgoraEduSDK.launch](/en/api-reference/api-ref/flexible-classroom/classroom-sdk) in the JavaScript code of the project.
Tip
Flexible Classroom's dependency `agora-electron-sdk` contains the native Node.js module. It is not recommended to use webpack and other construction tools for secondary compilation; otherwise, there may be an error that the Node.js module cannot be found. It is recommended to set these two libraries as external dependencies in the project configuration. For example: `externals: {'agora-electron-sdk': 'commonjs2 agora-electron-sdk'}`.
#### Through CDN [#through-cdn]
1. Add the following code to the HTML file in your project:
```html
```
2. To launch a classroom, call [AgoraEduSDK.config](/en/api-reference/api-ref/flexible-classroom/classroom-sdk) and [AgoraEduSDK.launch](/en/api-reference/api-ref/flexible-classroom/classroom-sdk) in the JavaScript code of the project.
#### Sample code [#sample-code]
```html
```
The sample code requires passing in `rtmToken`. You can refer to [Generate a Signaling token](/en/realtime-media/flexible-classroom/build/manage-agora-account#generate-temporary-tokens) to learn what a Signaling token is, how to get a temporary Signaling token for testing purposes, and how to generate a Signaling token from the server. The generated token passed in `userId` must be consistent with the `userUuid` parameters passed in the `launch` method; otherwise, the generated token will be invalid.
For details on the values of other parameters, see [LaunchOption](/en/api-reference/api-ref/flexible-classroom/classroom-sdk).
Calling `launch` returns `unmount`. When your App routing changes cause the unloading of a page, call `unmount` to disconnect the room and recycle resources.
### Customize the classroom UI [#customize-the-classroom-ui]
If you want to customize the classroom UI based on the default UI of Flexible Classroom, you need to integrate Flexible Classroom by downloading the source code on GitHub. Refer to the following steps:
Make sure you have [set up a development environment](/en/realtime-media/flexible-classroom/quickstart).
1. Clone the Flexible-Classroom-Desktop repository:
```bash
git clone https://github.com/AgoraIO-Community/flexible-classroom-desktop.git
```
2. [Checkout the latest release branch](https://github.com/AgoraIO-Community/flexible-classroom-desktop/tree/release/2.9.20).
1. Change directory to `flexible-classroom-desktop`
2. Switch the branch, run the following commands:
```bash
cd flexible-classroom-desktop
git checkout release/2.9.20
```
3. Modify the code according to your needs. See [Classroom and Proctor SDK UI customization guide](/en/realtime-media/flexible-classroom/build/customize-the-ui-and-plugins/customize-classroom) for details.
4. Debug your code.
After finishing the development, follow these steps to debug:
1. To install dependencies, run the following command:
```bash
yarn install:packages
```
2. To run the project in development mode, use the following command:
```bash
yarn dev:classroom
```
5. After finishing the development, package the SDK JS file with the following command:
1. To package the SDK code:
```bash
yarn pack:classroom:sdk
```
2. To package the SDK plug-ins:
```bash
yarn pack:classroom:plugin
```
Find the output in the `packages/agora-classroom-sdk/lib/edu_sdk.bundle.js` and `packages/agora-plugin-gallery/lib/edu_widget.bundle.js` respectively.
## Integrated proctoring scenario [#integrated-proctoring-scenario]
### Use the default UI of Flexible Classroom [#use-the-default-ui-of-flexible-classroom-1]
If you are satisfied with the default UI of Flexible Classroom and do not want to change any of it, integrate the whole Flexible Classroom through npm or CDN.
#### Through npm [#through-npm-1]
1. To install the SDK, run the following command:
```bash
npm install agora-proctor-sdk agora-plugin-gallery
```
2. To import the `AgoraEduSDK` and plugin modules, add the following code in the JavaScript code in your project:
```javascript
import { AgoraProctorSDK } from 'agora-proctor-sdk'
import {
FcrWebviewWidget
} from 'agora-plugin-gallery/proctor'
```
3. To launch a classroom, call [AgoraProctorSDK.config](/en/api-reference/api-ref/flexible-classroom/proctor-sdk) and [AgoraProctorSDK.launch](/en/api-reference/api-ref/flexible-classroom/proctor-sdk) in the JavaScript code of the project.
Tip
Flexible Classroom's dependency `agora-electron-sdk` contains the native Node.js module. It is not recommended to use webpack and other construction tools for secondary compilation; otherwise, there may be an error that the Node.js module cannot be found. It is recommended to set these two libraries as external dependencies in the project configuration. For example: `externals: {'agora-electron-sdk': 'commonjs2 agora-electron-sdk'}`.
#### Through CDN [#through-cdn-1]
1. Add the following code to the HTML file in your project:
```html
```
2. To launch a classroom, call [AgoraProctorSDK.config](/en/api-reference/api-ref/flexible-classroom/proctor-sdk) and [AgoraProctorSDK.launch](/en/api-reference/api-ref/flexible-classroom/proctor-sdk) in the JavaScript code of the project.
#### Sample code [#sample-code-1]
```html
```
Calling `launch` returns `unmount`. When your App routing changes cause the unloading of a page, call `unmount` to disconnect the room and recycle resources.
When being proctored online, students need to use the primary and secondary devices to access the exam. For example, the main device is a Web client used to collect students' videos and share their screens when they answer questions; the secondary device is an Android or iOS device used to capture students' bodies when they answer questions. The proctor observes students answering questions through videos from several points to prevent cheating. You need to fill in the `userUuid` on different devices. For example, for student A, pass it in the `AgoraProctorSDK.launch` parameter on the Web side, and then on the Android or iOS side. Flexible Classroom will identify them as student A's primary and secondary devices, merge their video streams, and render the merged video images in the teacher's proctoring video window.
The sample code requires passing in `rtmToken`. You can refer to [Generate a Signaling token](/en/realtime-media/flexible-classroom/build/manage-agora-account#generate-temporary-tokens) to learn what a Signaling token is, how to get a temporary Signaling token for testing purposes, and how to generate a Signaling token from the server. The generated token passed in `userId` must be consistent with the `launch` parameters passed in the `userUuid` method; otherwise, the generated token will be invalid.
For details on the values of other parameters, see [LaunchOption](/en/api-reference/api-ref/flexible-classroom/classroom-sdk).
### Customize the classroom UI [#customize-the-classroom-ui-1]
If you want to customize the classroom UI based on the default UI of Flexible Classroom, you need to integrate Flexible Classroom by downloading the source code on GitHub. Refer to the following steps:
Make sure you have [set up a development environment](/en/realtime-media/flexible-classroom/quickstart).
1. Clone the Flexible-Classroom-Desktop repository:
```bash
git clone https://github.com/AgoraIO-Community/flexible-classroom-desktop.git
```
2. [Checkout the latest release branch](https://github.com/AgoraIO-Community/flexible-classroom-desktop/tree/release/2.9.20).
1. Change directory to `flexible-classroom-desktop`
2. Switch the branch, run the following commands:
```bash
cd flexible-classroom-desktop
git checkout release/2.9.20
```
3. Modify the code according to your needs. See [Classroom and Proctor SDK](/en/realtime-media/flexible-classroom/build/customize-the-ui-and-plugins/customize-classroom) for details.
4. Debug your code.
After finishing the development, follow these steps to debug:
1. To install dependencies, run the following command:
```bash
yarn install:packages
```
2. To run the project in development mode, use the following command:
```bash
yarn dev:proctor
```
5. After finishing the development, package the SDK JS file with the following command:
1. To package the SDK code:
```bash
yarn pack:proctor:sdk
```
2. To package the SDK plug-ins:
```bash
yarn pack:proctor:plugin
```
Find the output in the `packages/agora-proctor-sdk/lib/proctor_sdk.bundle.js` and `packages/agora-plugin-gallery/lib/proctor_widget.bundle.js` respectively.
### Set exam link [#set-exam-link]
After the online exam starts, candidates will load the exam papers locally through the created Webview window. The link to the exam paper is set through the `examinationUrl` field in the room properties (`roomProperties`). You can set the exam paper link as follows:
* When creating a room: Call the create classroom properties interface of the RESTful API to create a class, and set the `examinationUrl` field in the request package body.
```javascripton
{
"roomName": "jasoncai61734",
"roomType": 4,
"roomProperties": {
"schedule": {
"startTime": 1655452800000,
"duration": 600,
"closeDelay": 0
},
// Set the exam paper link for this exam
"examinationUrl": "your examination url"
}
}
```
* After creating a room: Call the update classroom attribute interface of the RESTful API, and set the `examinationUrl` field in the request package body.
```javascripton
{
"properties": {
// Set the exam paper link for this exam
"examinationUrl": "your examination url"
},
"cause": {}
}
```
## Frequent issues [#frequent-issues]
### Installation of the `agora-electron-sdk` module fails [#installation-of-the-agora-electron-sdk-module-fails]
If you seem unable to install the `agora-electron-sdk` module under the Linux system, it is because the current operating system of the module does not support Linux. Take the following steps to solve the problem:
1. Modify the `package.json` configuration parameters: In the project's `agora_electron` root directory set `platform` as `win32`:
```javascripton
"agora_electron": {
"electron_version": "12.0.0",
"prebuilt": true,
"platform": "win32"
}
```
2. Install dependencies again.