# REST quickstart (/en/realtime-media/cloud-recording/rest-quickstart)
> For AI agents: see the complete documentation index at [llms.txt](/llms.txt).
Cloud Recording enables you to record and store real-time audio and video streams from channels. To implement Cloud Recording, you set up a self-hosted backend that interacts with Agora servers to manage recording tasks. This guide introduces the essential Cloud Recording RESTful APIs you use to manage the recording process.
The command-line examples in this guide are for demonstration purposes only. Do not use them directly in a production environment. Implement RESTful API requests through your application server or use Agora's [Go backend middleware](https://github.com/AgoraIO-Community/agora-go-backend-middleware). For details, see [Quickstart using middleware](/en/realtime-media/cloud-recording/middleware-quickstart)
## Understand the tech [#understand-the-tech]
The basic process of implementing Cloud Recording is as follows:
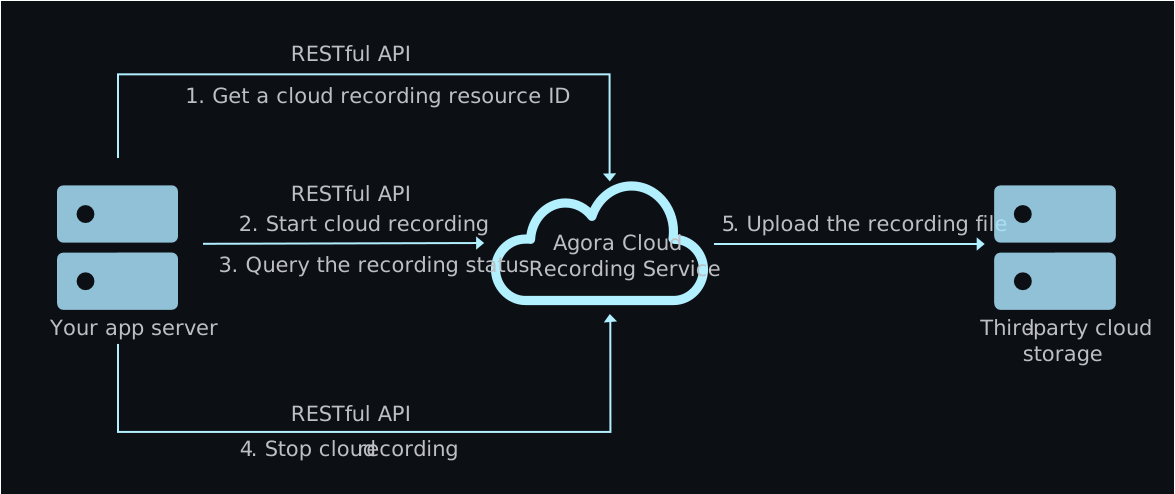
1. Get a resource ID
Before starting a cloud recording, call the [`acquire`](#acquire) method to obtain a cloud recording resource ID. After calling this method successfully, you get a resource ID in the response body.
2. Start cloud recording
Call the [`start`](#start) method to join the channel and start a cloud recording. After calling this method successfully, you get a recording ID from the response body to identify the current recording process.
3. Query the recording status
Call the [`query`](#query) method to check the recording status during the recording.
4. Stop cloud recording
Call the [`stop`](#stop) method to stop the cloud recording.
5. Upload the recording file
After the recording ends, the cloud recording service uploads the recording file to the [third-party cloud storage](/en/api-reference/api-ref/cloud-recording#storageconfig) you specify.
## Prerequisites [#prerequisites]
To implement Cloud Recording, ensure that you have:
* A valid Agora account and project. Obtain the following parameters from [Agora Console](https://console.agora.io/v2):
* The App ID and App certificate for your project. See [Get Started with Agora](../get-started/manage-agora-account#get-the-app-id)
* A valid temporary token
* Customer ID and Customer key for RESTful API. See [Authenticate REST calls](../reference/restful-authentication)
* Set up and enabled a supported third-party cloud storage service. Obtain the following parameters for your storage:
* Bucket name
* Access key
* Secret key
- [Alibaba Cloud](https://www.alibabacloud.com/product/object-storage-service)
- [Amazon S3](https://aws.amazon.com/s3/?nc1=h_ls)
- [Baidu AI Cloud](https://intl.cloud.baidu.com/product/bos.html)
- [Google Cloud](https://cloud.google.com/storage)
- [Huawei Cloud](https://www.huaweicloud.com/intl/en-us/product/obs)
- [Kingsoft Cloud](https://en.ksyun.com/nv/product/KS3)
- [Microsoft Azure](https://azure.microsoft.com/en-us/services/storage/blobs/)
- [Qiniu Cloud](https://www.qiniu.com/en/products/kodo)
- [Tencent Cloud](https://intl.cloud.tencent.com/product/cos)
* Enabled the Agora Cloud Recording service for your project.
1. Log in to [Agora Console](https://console.agora.io/v2), and click the **Project Management** icon on the left navigation panel.
2. On the **Project Management** page, find the project for which you want to enable the cloud recording service, and click the edit icon.
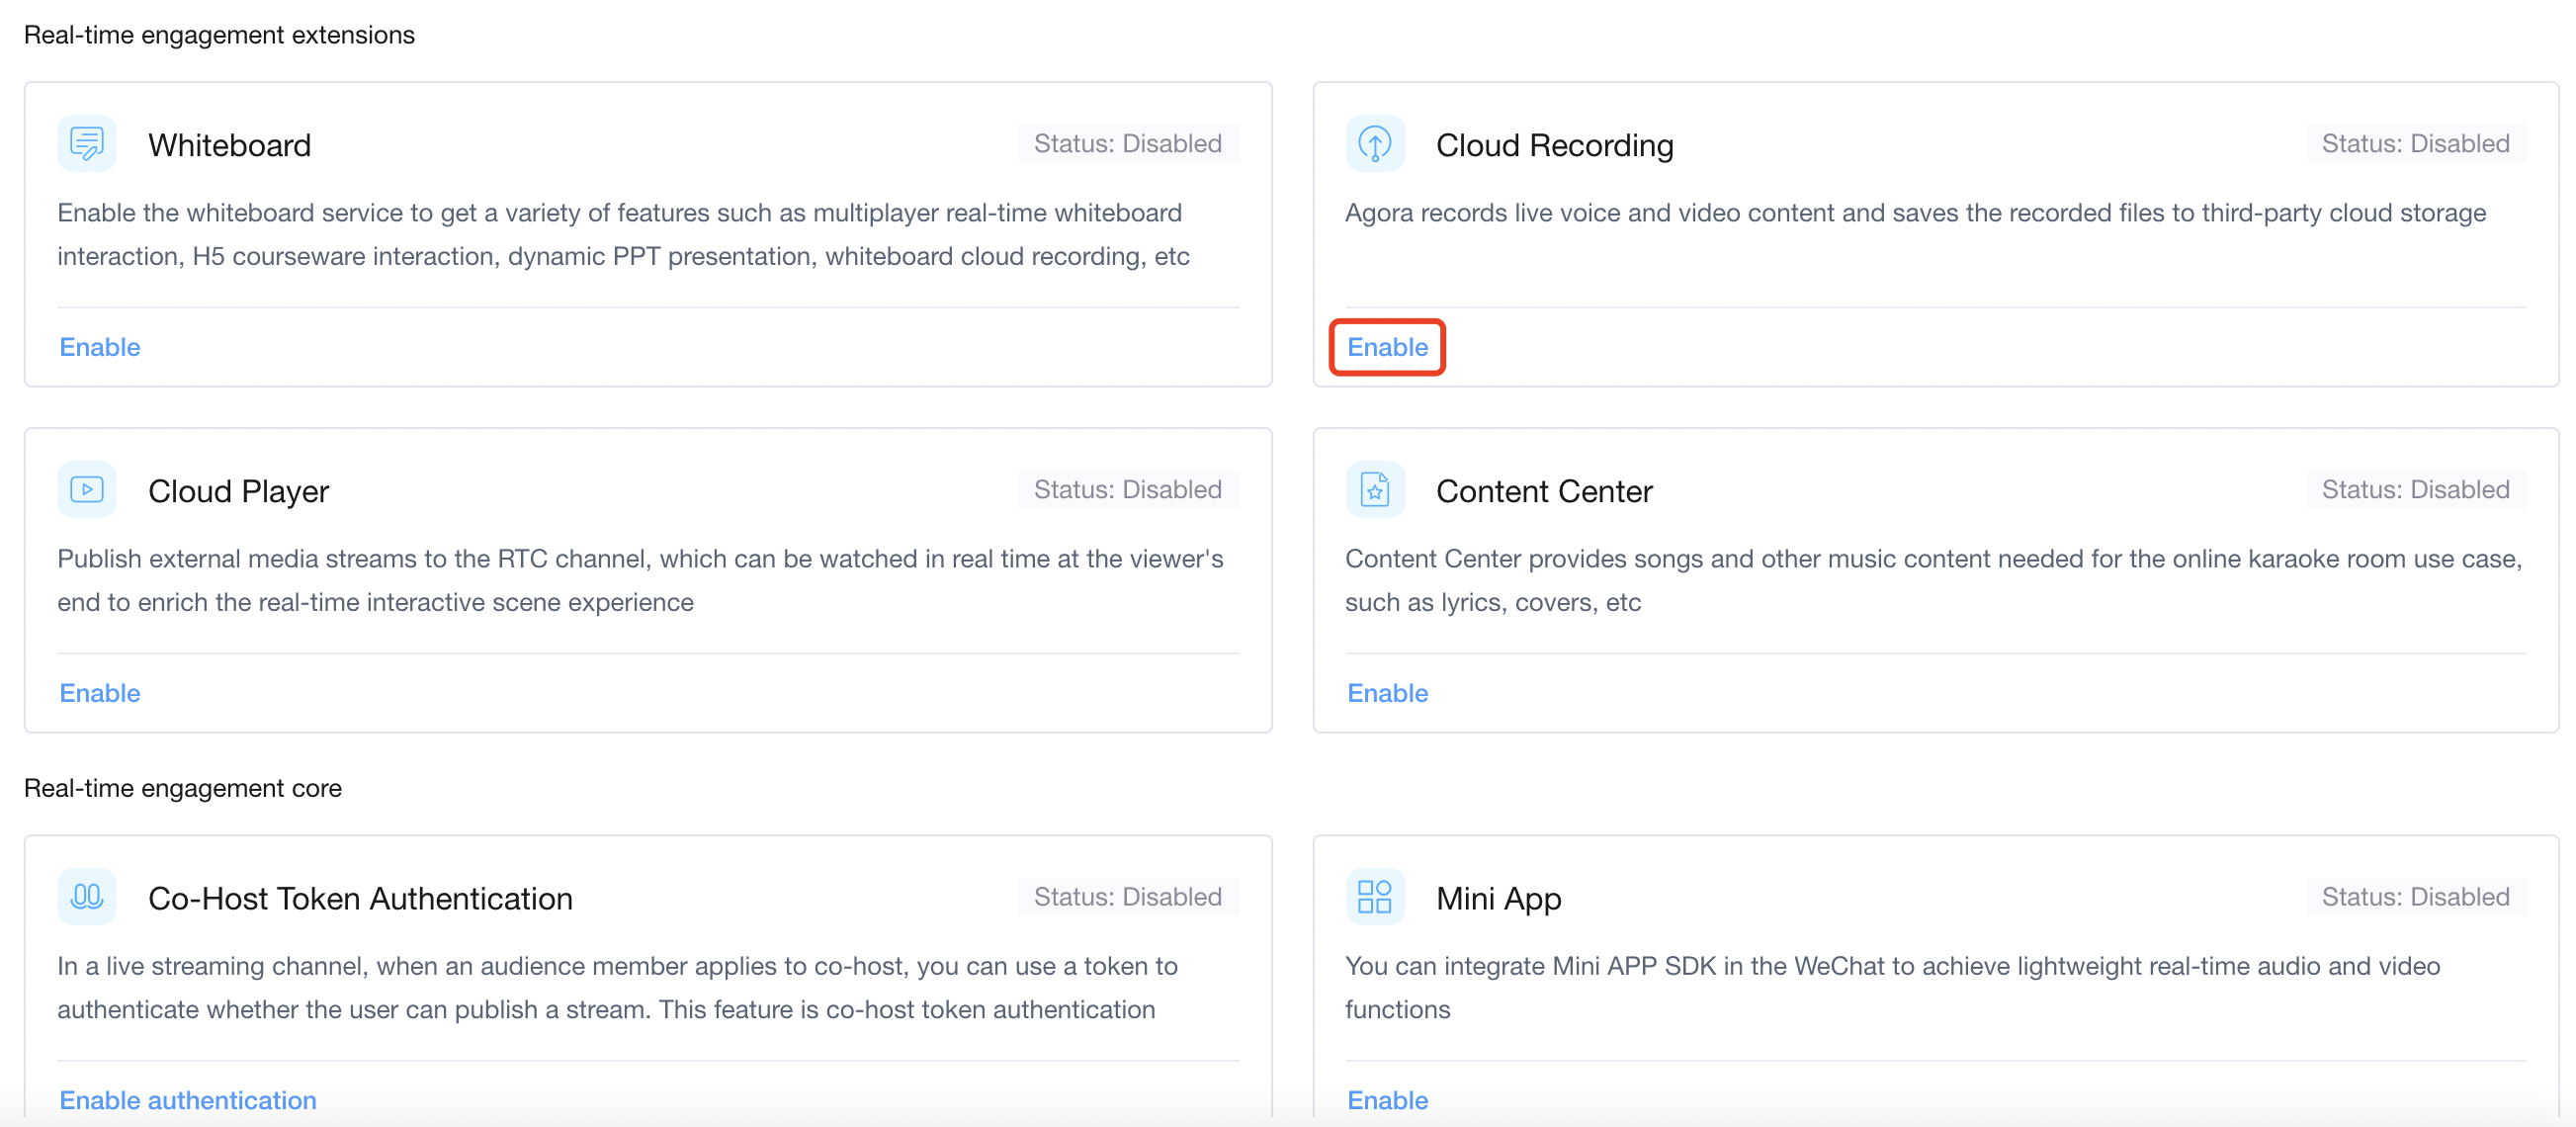
3. On the **Edit Project** page, find **Cloud Recording**, and click **Enable**.
On the following screen, click **Enable Cloud Recording**.
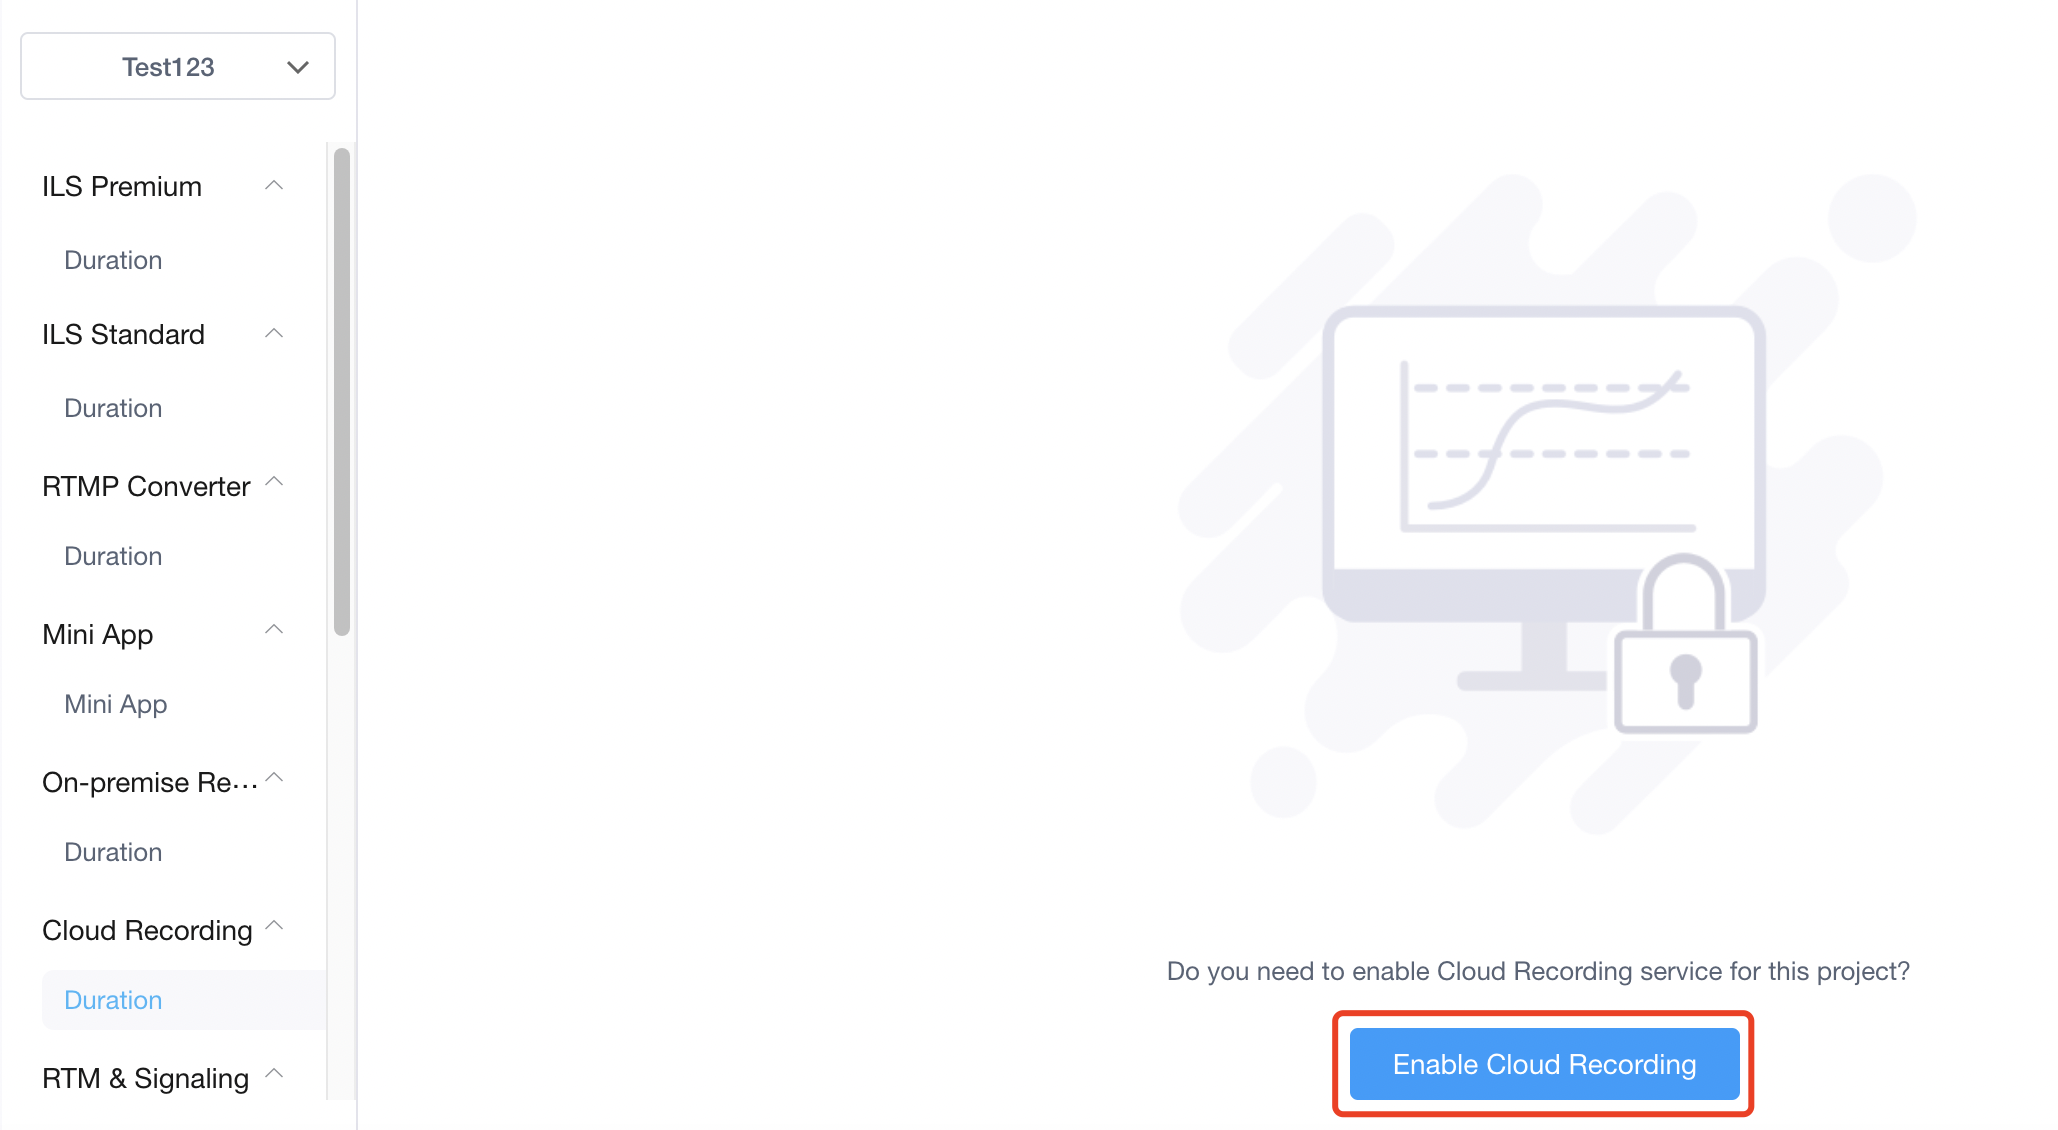
4. Click **Apply**.
Now, you can use Agora Cloud Recording and see the usage statistics in the **Usage** page.
* If your network has a firewall, follow the instructions in [Firewall Requirements](/en/realtime-media/cloud-recording/reference/firewall).
## Implement cloud recording [#implement-cloud-recording]
The following figure shows the API call sequence to start and manage cloud recording:
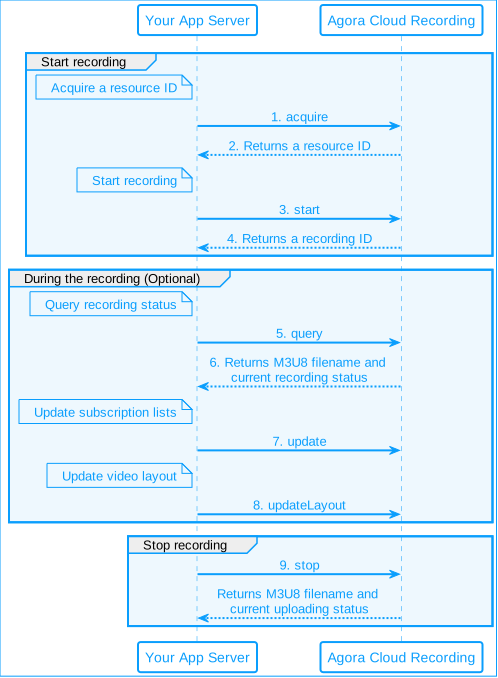
The following APIs are optional and can be called multiple times. However, they must be called during a recording session, that is, after recording starts and before it ends:
* [`query`](#query): Query the recording status
* [`update`](/en/api-reference/api-ref/cloud-recording#update): Update the subscription list
* [`updateLayout`](/en/api-reference/api-ref/cloud-recording#updatelayout): Update the video layout
### Use basic HTTP authentication [#use-basic-http-authentication]
The Cloud Recording RESTful APIs require basic HTTP authentication. You need to set the `Authorization` parameter in every HTTP request header. For details, see [Basic HTTP authentication](../reference/restful-authentication).
### Get a resource ID [#acquire]
Call the [`acquire`](/en/api-reference/api-ref/cloud-recording#acquire) method to request a resource ID for Cloud Recording.
After calling this method successfully, you receive a resource ID in the response body. The resource ID is valid for five minutes. Start recording with this resource ID within the validity period. One resource ID can only be used for a single recording session.
* The recording service is equivalent to a non-streaming client in the channel. The `uid` parameter in the request body is used to identify the recording service and cannot be the same as any existing user ID in the channel. For example, if there are two users already in the channel and their user IDs are 123 and 456, the `uid` cannot be `"123"` or `"456"`.
* Agora Cloud Recording does not support user IDs in string format (User Accounts). Ensure that every user in the channel has an integer user ID. The string content of the `uid` parameter must also be an integer.
#### Sample code [#sample-code]
For testing purposes, use the following command in the terminal to call the `acquire` method.
```bash
# Replace with the App ID of your Agora project
curl --location --request POST 'https://api.agora.io/v1/apps//cloud_recording/acquire' \
# Replace with the Base64-encoded credential in basic HTTP authentication
--header 'Authorization: Basic ' \
--header 'Content-Type: application/json' \
--data-raw '{
# Replace with the name of the channel you need to record
"cname": "",
# Replace with your user ID
"uid": "",
"clientRequest":{}
}'
```
### Start recording [#start]
Call the [`start`](/en/api-reference/api-ref/cloud-recording#start) method within five minutes of getting a resource ID to join a channel and start recording. You can choose either [individual recording](/en/realtime-media/cloud-recording/build/start-a-recording/individual-mode) or [composite recording](/en/realtime-media/cloud-recording/build/start-a-recording/composite-mode) as the recording mode.
If this method call succeeds, you receive a recording ID (sid) in the HTTP response body. This ID identifies the current recording.
After you obtain the recording ID `sid`, you can call the `query`, `updateLayout`, and `stop` methods before the time set (in hours) by `resourceExpiredHour` has passed.
#### Sample code [#sample-code-1]
For testing purposes, use the following command in the terminal to call the `start` method.
```bash
# Replace with the App ID of your Agora project
# Replace with the resource ID obtained through the acquire method
# Replace "" with "individual" for individual recording or "composite" for composite recording
curl --location --request POST 'https://api.agora.io/v1/apps//cloud_recording/resourceid//mode//start' \
# Replace with the Base64-encoded credential in basic HTTP authentication
--header 'Authorization: Basic ' \
--header 'Content-Type: application/json' \
--data-raw '{
# Replace with the name of the channel you need to record.
"cname": "",
# Replace with your user ID that identifies the recording service.
"uid": "",
"clientRequest": {
# Replace with the temporary token you obtain from the console.
"token": "",
# Set the storageConfig related parameters.
"storageConfig": {
"secretKey": "",
"vendor": 0,
"region": 0,
"bucket": "",
"accessKey": ""
},
# Set the recordingConfig related parameters.
"recordingConfig": {
# Which is consistent with the "channelType" of the Agora Video SDK.
"channelType": 0
}
}
}'
```
### Query recording status [#query]
During a recording session, can call the [`query`](/en/api-reference/api-ref/cloud-recording#query) method to query the recording status. You can call this API multiple times.
When you call this method successfully, you receive the current recording status and related information about the recording file in the response body. See [Best Practices in Integrating Cloud Recording](/en/realtime-media/cloud-recording/build/best-practices/integration-best-practices) for details about how to [Monitor service status during a recording](../best-practices/integration-best-practices#monitor-service-status-during-a-recording) and[ Obtain the M3U8 file name](../best-practices/integration-best-practices#obtain-the-m3u8-file-name).
#### Sample code [#sample-code-2]
For testing purposes, use the following command in the terminal to call the `query` method.
```bash
# Replace with the App ID of your Agora project
# Replace with the resource ID obtained through the acquire method
# Replace with the sid obtained through the start method
# Replace "" with "individual" for individual recording or "composite" for composite recording
curl --location --request GET 'https://api.agora.io/v1/apps//cloud_recording/resourceid//sid//mode//query' \
# Replace with the Base64-encoded credential in basic HTTP authentication
--header 'Authorization: Basic ' \
--header 'Content-Type: application/json'
```
### Stop recording [#stop]
Call the [`stop`](/en/api-reference/api-ref/cloud-recording#stop) API to end the recording session.
When you call this method successfully, you receive the status of the recording file upload and information about the recording file in the response body.
#### Sample code [#sample-code-3]
For testing purposes, use the following command in the terminal to call the `stop` method.
```bash
# Replace with the App ID of your Agora project
# Replace with the resource ID obtained through the acquire method
# Replace with the sid obtained through the start method
# Replace "" with "individual" for individual recording or "composite" for composite recording
curl --location --request POST
'https://api.agora.io/v1/apps//cloud_recording/resourceid//sid//mode//stop' \
--header 'Content-Type: application/json;charset=utf-8' \
# Replace with the Base64-encoded credential in basic HTTP authentication
--header 'Authorization: Basic ' \
--data-raw '{
# Replace with your user ID that identifies the recording service.
"uid": "",
# Replace with the name of the channel you are recording.
"cname": "",
"clientRequest":{
}
}'
```
Parameter settings
* If the `uid` parameter in the request body is the same as a user ID in the channel, or if you use a non-integer user ID, the recording fails. For details, see the notes on the `uid` parameter in the section [Get a cloud recording resource](#acquire).
* When the `start` request returns `200`, it only means that the RESTful API request is successful. To ensure that the recording has started successfully and continues normally, call `query` to check the recording status. Errors such as unreasonable `transcodingConfig` parameter settings, incorrect third-party cloud storage information, or incorrect token information cause the `query` method to return `404`. See [Why do I get a 404 error when I call query after successfully starting a cloud recording? ](../reference/common-errors#errors).
* Set the `maxIdleTime` parameter based on your business needs. Within the time range set by `maxIdleTime`, the recording continues and billing is generated even if the channel is idle.
## Reference [#reference]
This section contains content that completes the information on this page, or points you to documentation that explains other aspects to this product.
### Sample project [#sample-project]
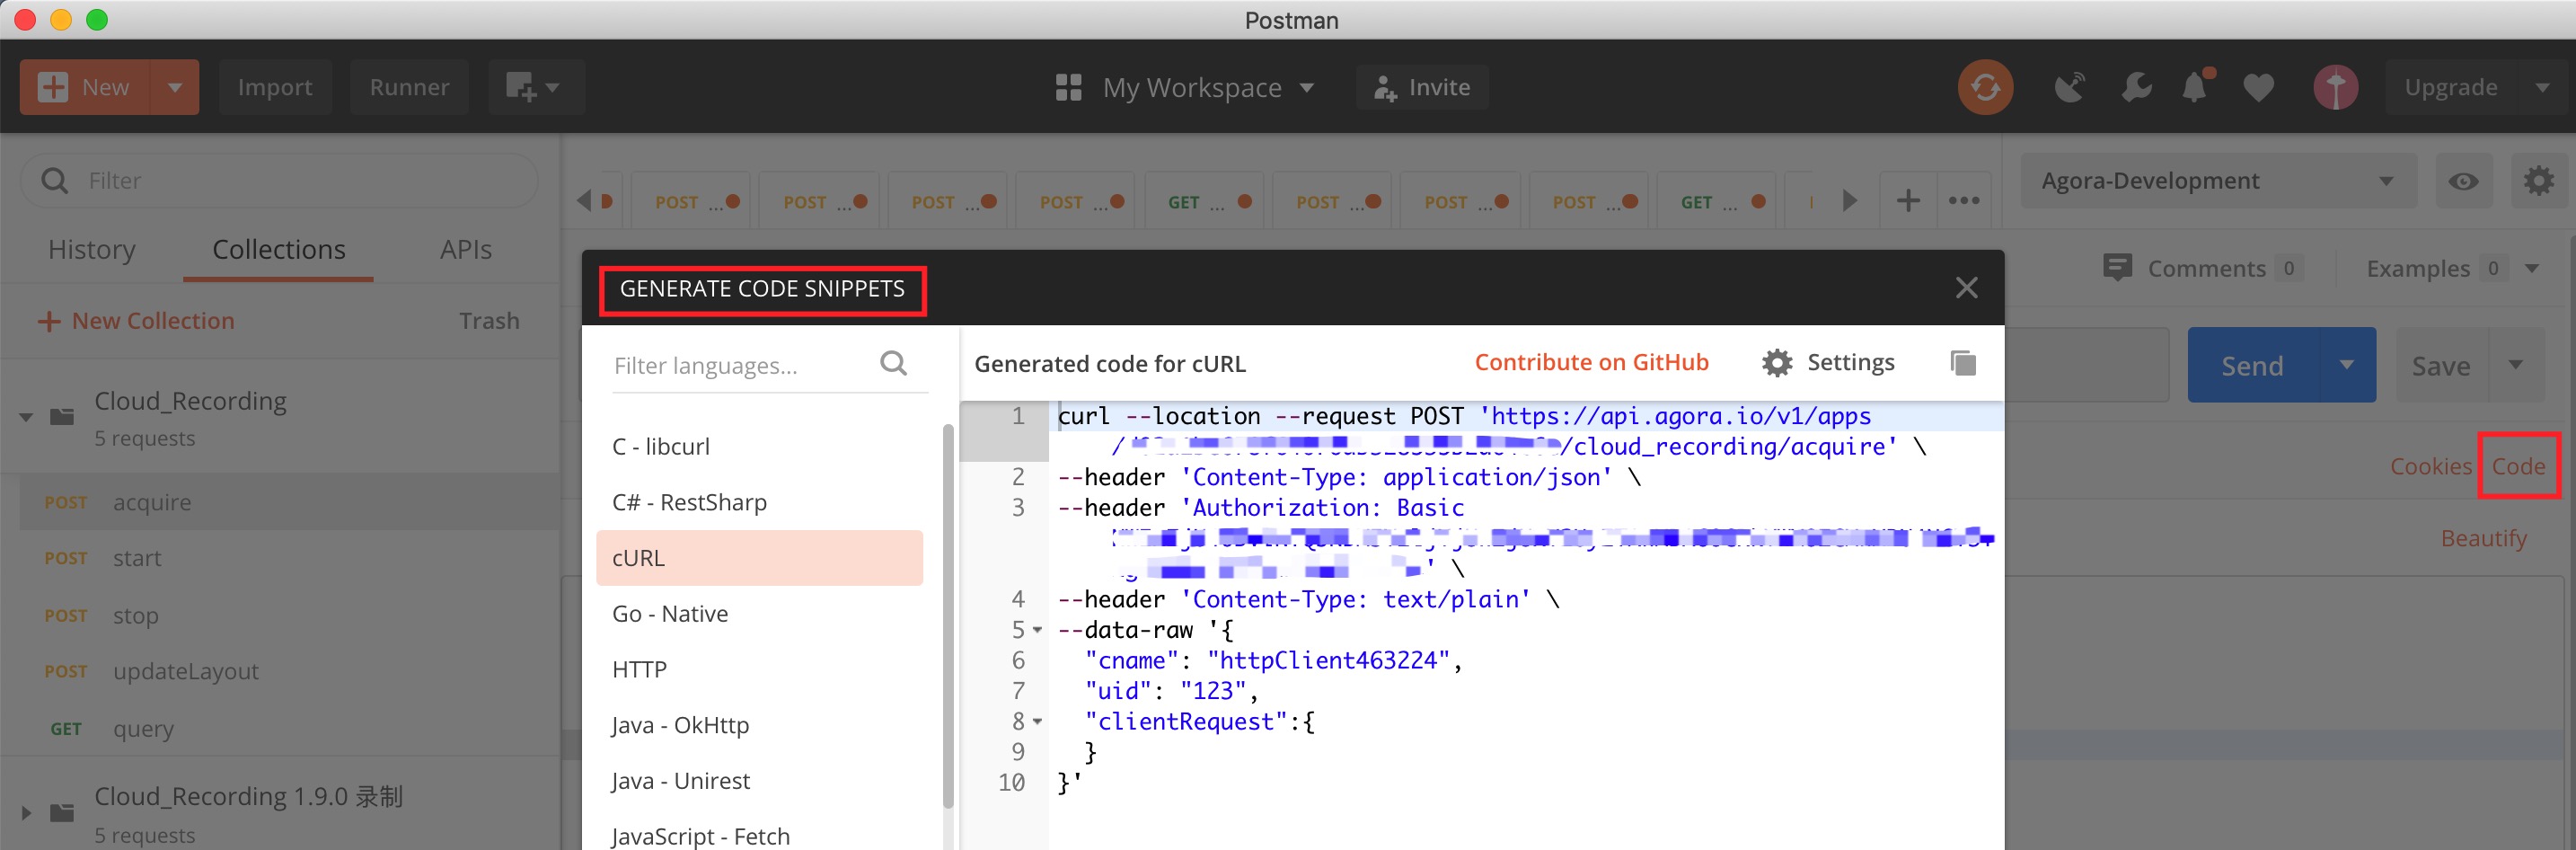
Agora provides a [Postman collection](https://documenter.getpostman.com/view/6319646/SVSLr9AM), which contains sample requests of RESTful API for a cloud recording. You can use the collection to quickly grasp the basic functionalities of the Cloud Recording RESTful APIs. You only need to import the collection to Postman and set your environment variables.
You can also use Postman to generate code snippets written in various programming languages. To do so, select a request, click **Code**, and select the desired language in **GENERATE CODE SNIPPETS**.
### See also [#see-also]
* To streamline the use of Agora RESTful APIs within your infrastructure, see
[Quickstart using middleware](/en/realtime-media/cloud-recording/middleware-quickstart). The community middleware project provides RESTful APIs for tasks such as token generation and cloud recording management.
* To update the subscription lists during the recording, call [`update`](/en/api-reference/api-ref/cloud-recording#update). You can call this method multiple times. See [Set up subscription lists](/en/realtime-media/cloud-recording/build/customize-the-recording/subscription) for details.
* To set or update the video layout during the recording, call the [`updateLayout`](/en/api-reference/api-ref/cloud-recording#updatelayout) method. See [Set Video Layout](/en/realtime-media/cloud-recording/build/customize-the-recording/layout) for details.
* [Common errors in cloud recording](/en/realtime-media/cloud-recording/reference/common-errors) lists common error codes and error messages in the response body.
* [Agora Cloud Recording RESTful API Callback Service](../reference/rest-api-overview) lists all the callback events of cloud recording.
* To learn more about the implementation steps and details of basic functions, you can refer to the following documents:
* [Individual recording](/en/realtime-media/cloud-recording/build/start-a-recording/individual-mode)
* [Composite recording](/en/realtime-media/cloud-recording/build/start-a-recording/composite-mode)
* [Web page recording](/en/realtime-media/cloud-recording/build/start-a-recording/webpage-mode)
* [Capture screenshots](/en/realtime-media/cloud-recording/build/start-a-recording/screen-capture)
## Next steps [#next-steps]
### Manage recorded files [#manage-recorded-files]
After the recording starts, the Agora server splits the recorded content into multiple TS/WebM files and keeps uploading them to the third-party cloud storage until the recording stops. You can refer to [Manage Recorded Files](/en/realtime-media/cloud-recording/build/process-recorded-files/manage-files) to learn about the naming rules, file sizes, and slicing rules of recording files.
### Token authentication [#token-authentication]
To ensure communication security, in a formal production environment, you need to generate tokens on your app server. See [Authenticate Your Users with Token](/en/realtime-media/cloud-recording/build/set-up-authentication/authentication-workflow).