# Agora console overview (/en/realtime-media/broadcast-streaming/reference/console-overview)
> For AI agents: see the complete documentation index at [llms.txt](/llms.txt).
[Agora Console](https://console.agora.io/v2) is the unified portal for you to configure, purchase, and manage Agora products and services. This page shows you how to use the new **beta** version of Agora Console to manage all aspects of your Agora account.
## Dashboard overview [#dashboard-overview]
After logging in to Agora Console, you see the overview dashboard. The dashboard displays a summary of important statistics and provides quick access to projects, billing, documentation, and code samples.
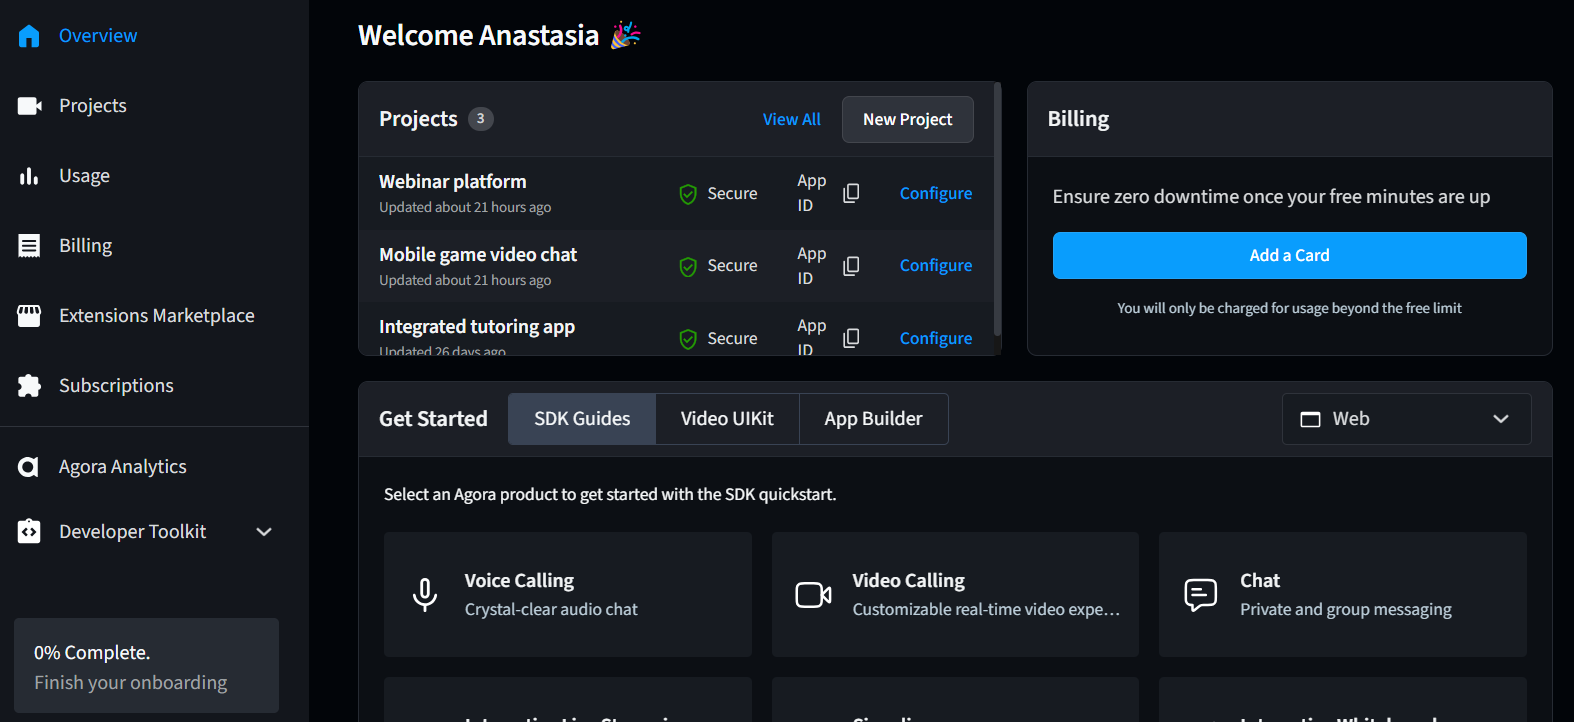
Agora Console provides access to the following:
* Create and manage projects
Create a project, and get the App ID and App Certificate to generate a temporary token. See [Create and manage projects](#create-and-manage-projects).
* Enable and configure features
Configure Chat, Signaling, Interactive Whiteboard, Cloud Recording, Media Push, Media Pull, Notifications, Flexible Classroom, Cloud proxy, and Co-Host Authentication.
* Check usage
Check the usage amount generated by each project or all of them. See [Check usage](#check-usage).
* Manage members and roles
Add members to your account, and add them to different teams with specified permissions. See [Manage members and roles](#manage-members).
* Manage billing
Add money to your account, view your transactions, and make withdrawal requests. See [Billing center](#billing-center).
* Submit a ticket
If you have any questions about Agora products, [submit a ticket](#submit-a-ticket).
* Generate Customer ID and Customer Secret
To use Agora RESTful APIs, you need a set of Customer ID and Customer Secret. See [Generate a customer ID and customer secret](#generate-a-customer-id-and-customer-secret).
* Agora Analytics
Track and analyze the usage and quality data of real-time communication products through highly visualized reports in order to spot issues and find root causes. For more information, see the [Agora Analytics overview](/en/realtime-media/agora-analytics/product-overview).
* Agora Extensions Marketplace
Gain access to extensions that rapidly add fun features to your app on top of Agora SDKs. For more information, see the [Extensions Marketplace overview](/en/realtime-media/marketplace).
## Manage profile [#manage-profile]
This section shows how to view and edit the profile of your Agora account.
### Open the profile page [#open-the-profile-page]
To open the **Profile** page, follow these steps:
1. Log in to [Agora Console](https://console.agora.io/v2).
2. Click your account name in the top right corner, and select your account name from the dropdown menu.
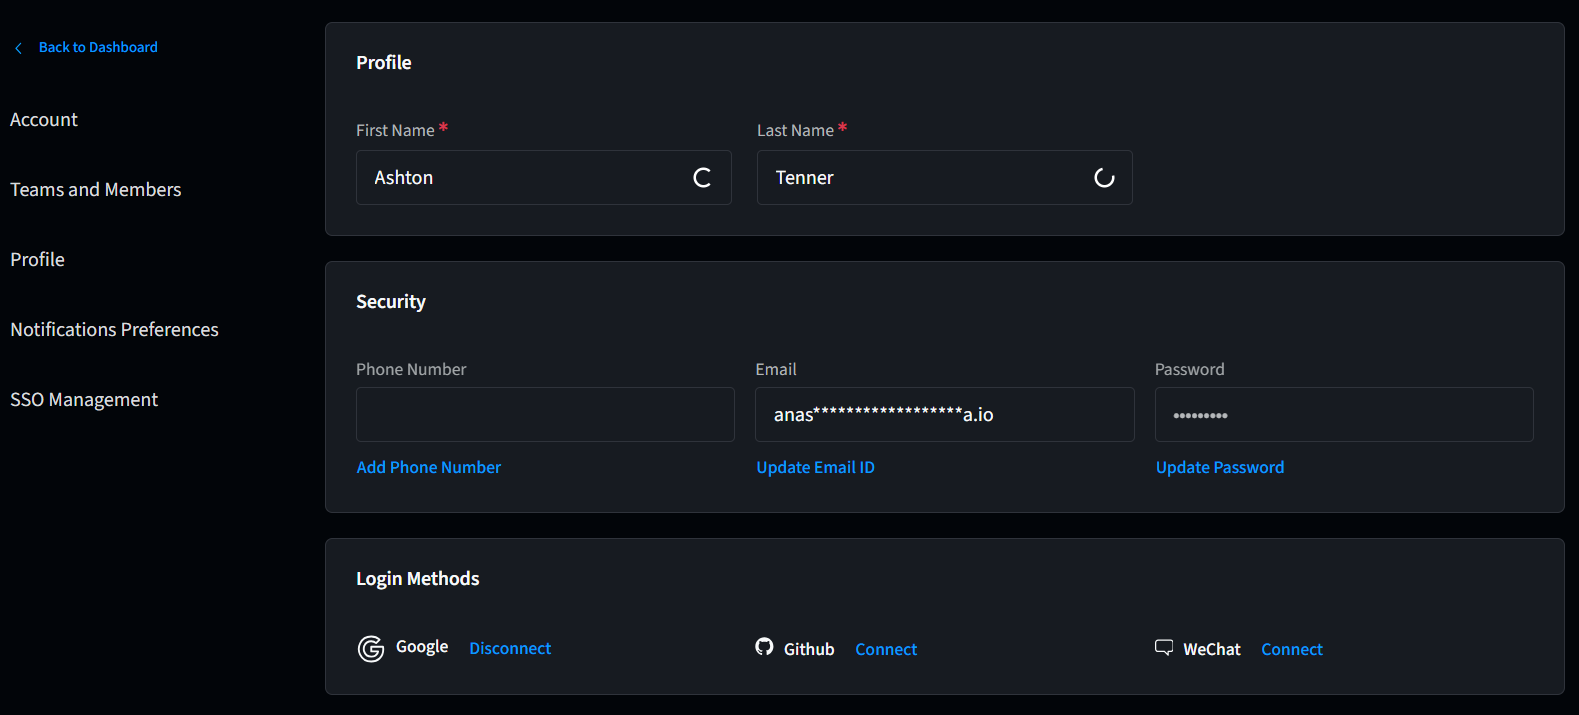
On the **Profile** page, you can view and edit your phone number, email address, password, and login methods.
### Change phone number, email address, or password [#change-phone-number-email-address-or-password]
1. Find **Phone Number**, **Email**, or **Password** fields on the profile page, then click **Update**.
2. Follow the on-screen instructions to complete.
### Link a third-party account [#link-a-third-party-account]
1. On the profile page, find **GitHub**, **WeChat**, or **Google**, then click **Connect**.
2. Follow the on-screen instructions to complete.
### Reset your password [#reset-your-password]
If you forget your password, follow these steps to reset it:
1. Go to the [login page](https://sso.agora.io/login/) and click **Forgot password**.
2. Fill in your email address and click **Send email**. Agora sends an email to you.
3. Follow the instructions in the email to reset your password.
## Create and manage projects [#create-and-manage-projects]
This section shows how to create a project, view project information, and manage App Certificates in Agora Console.
### Restrictions [#restrictions]
* If your account has multiple members, only those assigned to the teams of **Admin**, **Engineer**, or an authorized custom team have access to the **Projects** page.
* Each Agora account can create up to 20 projects. If you need to create more projects, contact Agora by [submitting a ticket](https://agora-ticket.agora.io/).
### Create an Agora project [#create-an-agora-project]
To create a project, do the following:
1. Open the [Projects](https://console.agora.io/v2/project-management) page.
2. Click **Create New**.
3. Follow the on-screen instructions to enter a project name and use case, and check **Secured mode: APP ID + Token (Recommended)** as the authentication mechanism.
4. Click **Submit**. You can now see the project on the **Projects** page.
### View project information [#view-project-information]
For a project listed on the **Projects** page, you can do the following:
* View basic information, such as the last updated and created dates, name, and security status.
* Copy the App ID of the project.
* Click the pencil icon to open the project details page, where you can configure **Project Name**, copy **App Certificate** and **App ID**, and generate a **Temporary Token**.
### Manage app certificates [#manage-app-certificates]
An App Certificate is a string generated by Agora Console to enable token authentication. For different security requirements, Agora provides the following app certificate options:
* Primary Certificate: This certificate is used to generate tokens for temporary use or production environments.
* Secondary Certificate: This certificate is used to generate tokens for production environments only and does not apply to RESTful APIs.
### Enable the Primary Certificate [#enable-the-primary-certificate]
For high-security use-cases, enable the Primary Certificate as follows:
* If you choose **APP ID + Token** as the authentication mechanism when creating a project, the Primary Certificate is enabled by default. On the project details page, you can click the copy icon under **Primary Certificate** to view and copy it. In this case, you need to use the token generated by the **Primary Certificate** for authentication.
* If you choose **APP ID** as the authentication mechanism when creating a project, you need to enable the Primary Certificate manually. On the project detail page, click **Enable** under **Primary Certificate**.
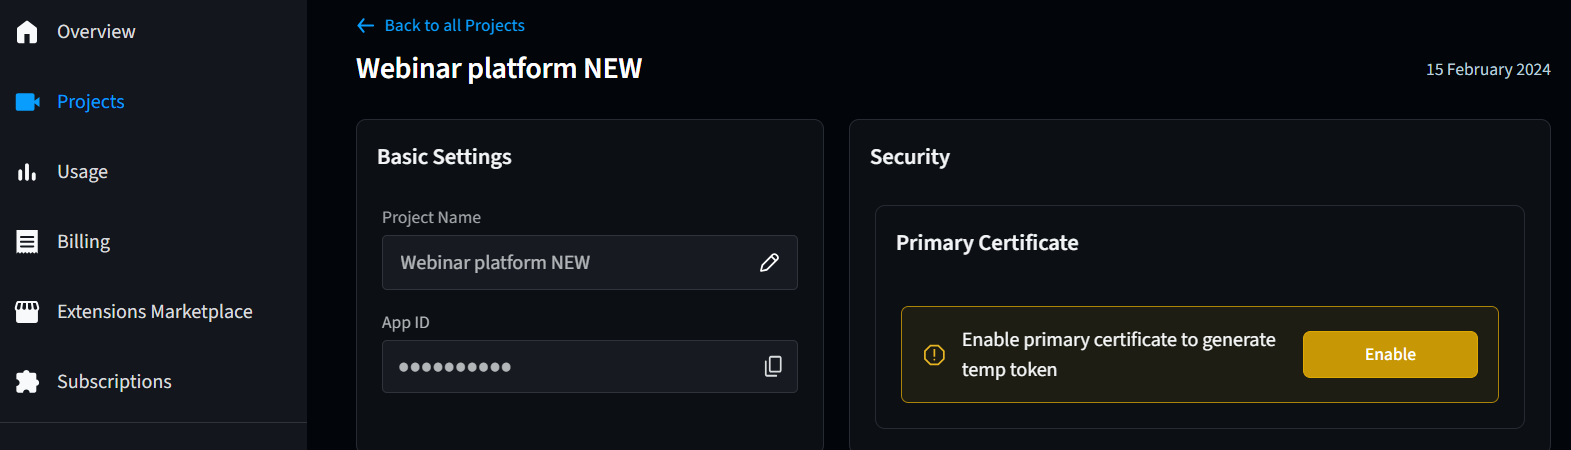
Once the Primary Certificate is enabled, you can click the copy icon to view and copy it. In this case, you can either complete authentication with the App ID only or use tokens generated by the **Primary Certificate** for authentication.
### Enable the Secondary Certificate [#enable-the-secondary-certificate]
If you need to change the Primary Certificate after enabling it, you can enable the Secondary Certificate.
On the project detail page, click **Add a Certificate**.
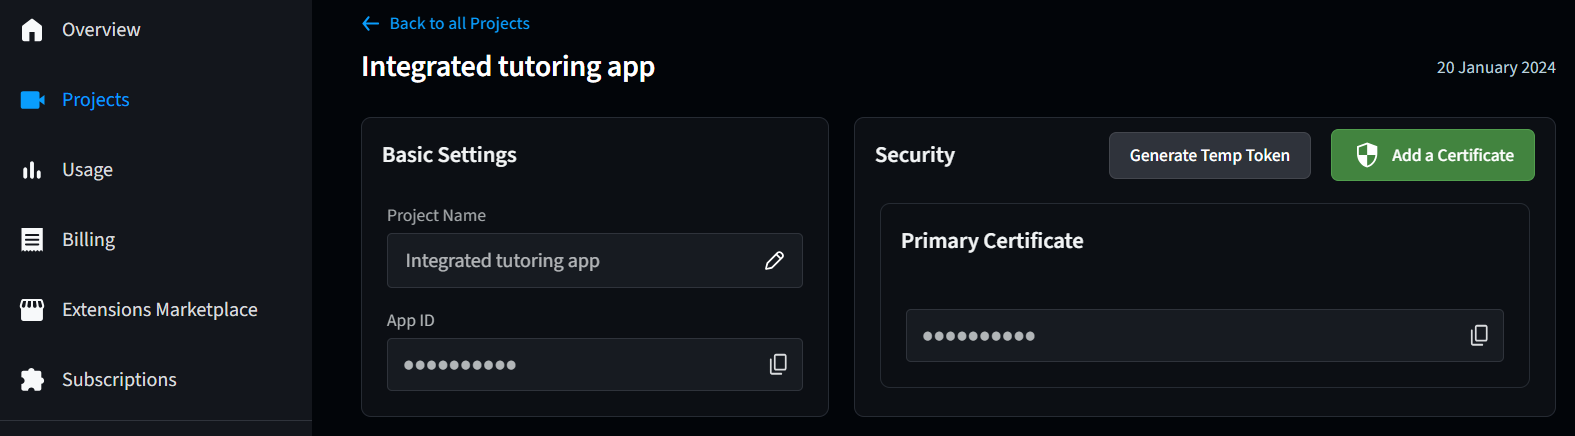
The **Secondary Certificate** is now enabled.
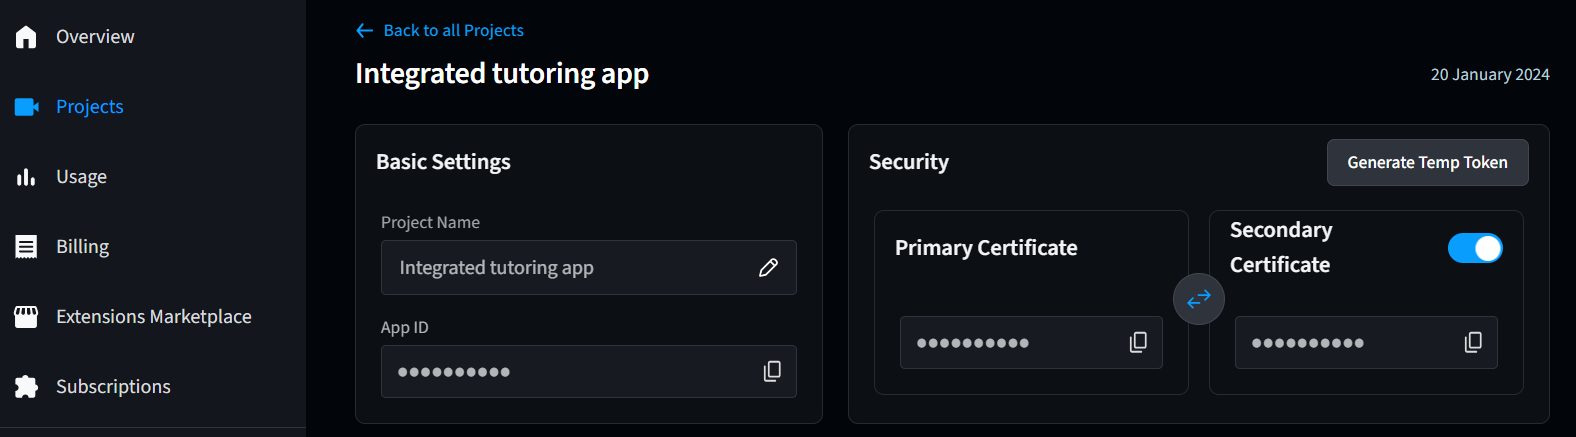
Once the Secondary Certificate is enabled, you can click the copy icon to view and copy it. In this case, both the Primary and Secondary Certificate can be used to generate tokens for authentication.
### Switch to a new Primary Certificate [#switch-to-a-new-primary-certificate]
If you suspect that your primary certificate has been compromised, swap the primary certificate with the secondary certificate and delete the original primary certificate to avoid risks. Replacing the primary certificate may impact your online business. Best practice is to replace the primary certificate only when necessary. If you replace the primary certificate but do not delete the secondary certificate (the original primary certificate), the tokens previously generated using this certificate can still be used.
To switch to a new Certificate, follow these steps:
1. [Enable the Secondary Certificate](#enable-the-secondary-certificate).
2. On the project detail page, click the arrows icon between the Certificates to swap them.
3. Turn off the switch next to the **Secondary Certificate** to disable it.

4. Follow the on-screen instructions to complete verification. If verified successfully, the status of the Secondary Certificate is updated to **Disabled**, and the **Delete** icon appears.
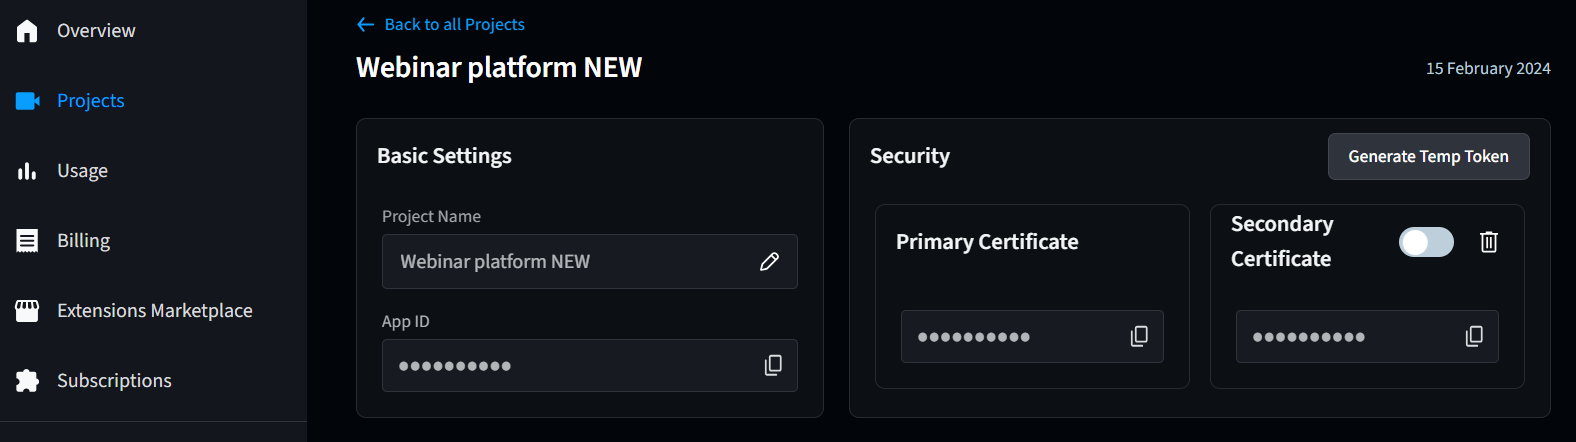
5. Click the **Delete** icon.
6. Follow the on-screen instructions to complete verification. If verified successfully, the **Delete** button disappears, and the current Secondary Certificate (the original Primary Certificate) is deleted.
Once a certificate is deleted, it cannot be restored. Before deleting the secondary certificate, make sure that most users have switched to the new certificate to avoid the following consequences:
* All tokens generated using the deleted certificate become invalid, and users can no longer use these tokens to join channels.
* Users who have joined the channel cannot specify new tokens through `renewToken`.
## Check usage [#check-usage]
This section explains how to check your usage of Agora products in Agora Console, such as Interactive Live Streaming, Broadcast Streaming, Media Push, On-Premise Recording, Cloud Recording, and Interactive Whiteboard.
### Restrictions [#restrictions-1]
* If your account has multiple members, only those assigned to the team of **Admin**, **Product/Operation**, or an authorized custom team have access to the **Usage** page.
* You can only view the usage data for the past 12 months.
* Data on the **Usage** page can differ from the actual amount. For the most accurate usage data, see the bills sent to your account.
### Procedure [#procedure]
Follow these steps to check your usage:
1. Enter the [Usage](https://console.agora.io/v2/usage) page in Agora Console.
2. (Optional) Add filters for the usage data, as follows:
* Select a time frame and data granularity.
* Select **All Projects** or a specific project from the dropdown menu.
* Select a product to view its usage data.
* Check **View Breakdown**.

## Manage members and teams [#manage-members-and-teams]
Once you add members to your Agora account, you are assigned to the team of **Admin** and can add these members to different teams with specified permissions.
### Add a member [#add-a-member]
Follow these steps to add a member to your account:
1. Log in to [Agora Console](https://console.agora.io/v2), click your account name in the top-right corner, and click **Settings** in the dropdown menu.
2. In the left navigation panel, click **Teams and members**, then select the **Members** tab.
3. Click the **Add New Member** button, fill in the email address of the new member, and choose a team from the dropdown menu. Then click **OK**.
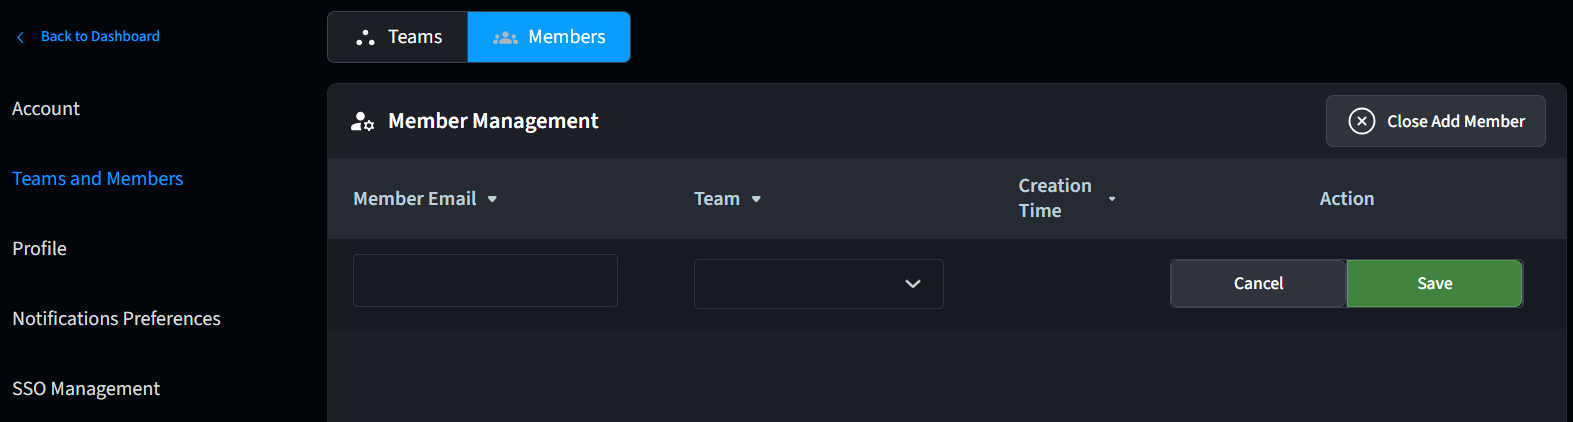
4. Agora sends a confirmation email to this address. The new member should follow the instructions in the email to finish joining the project.
### Manage members [#manage-members]
On the [Teams and members](https://console.agora.io/v2/teams-members) page, **Members** tab, you can do the following:
* Click the pencil icon to change the team that a member belongs to.
* Delete a member.
Only the main account can delete a member account. Member accounts assigned to the Admin team cannot delete a member account.
### Manage teams and permissions [#manage-teams-and-permissions]
On the **Teams and members** page, **Teams** tab, you can view the permissions assigned to teams. Agora predefines five teams for you. The permissions of each predefined team are as follows:
* **Admin** has full access to all projects. The administrator can view usage data and finance information, manage members and teams, manage projects, and view Agora Analytics reports.
* **Finance** can view finance information of all projects.
* **Product/Operation** can view usage data of all projects.
* **CS/Maintenance** can view Agora Analytics reports of all projects.
* **Engineer** can manage projects and view Agora Analytics reports of all projects.
### Add a custom team [#add-a-custom-team]
Follow these steps to add a custom team:
1. On the **Teams and Members** page, **Teams** tab, click **Add New Team**.
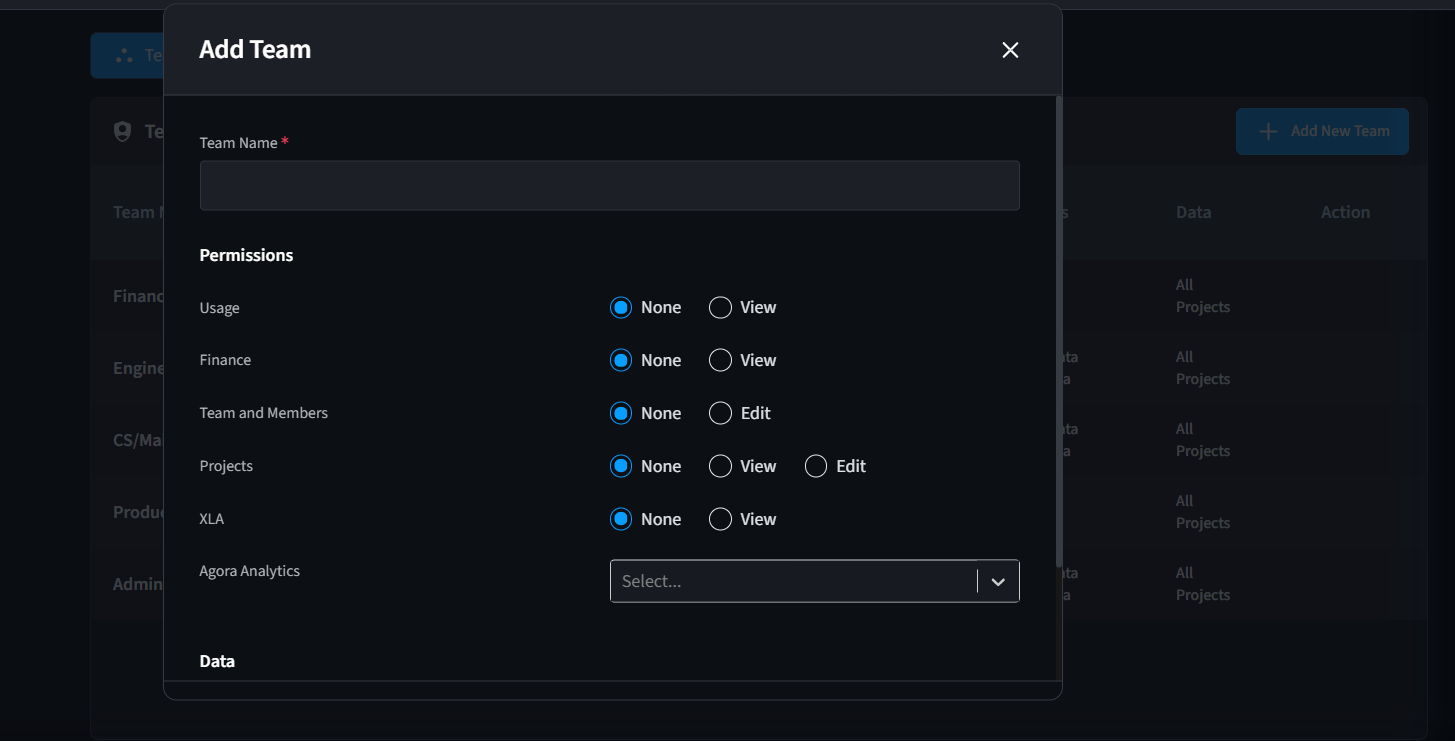
2. Fill in the team name, and select the permissions of this team in the **Usage**, **Finance**, **Teams and Members**, **Project**, **Agora Analytics**, and **Data** columns.
3. Click **OK**.
## Integrate with Okta [#integrate-with-okta]
If you are using [Okta](https://www.okta.com/) as the identity provider for your app, you can configure Agora Console so that your team members can log into Agora using their Okta accounts. You will need:
* An Okta developer account with admin privileges
* An Agora account assigned to the **Admin** team
* A Premium or Enterprise Agora Support package
### Configuration steps [#configuration-steps]
1. Apply for Okta integration in Agora Console.
Log in to your Agora account. On the [SSO Management](https://console.agora.io/settings/sso-management) page, click **Request**.
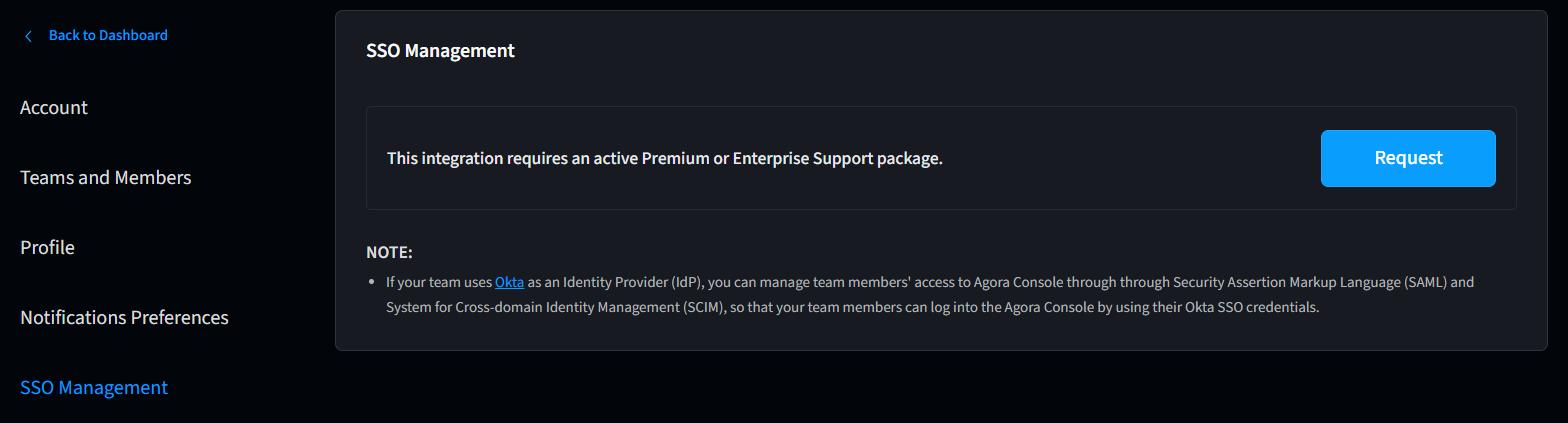
Once you apply, a request is sent to Agora to enable integration for you.
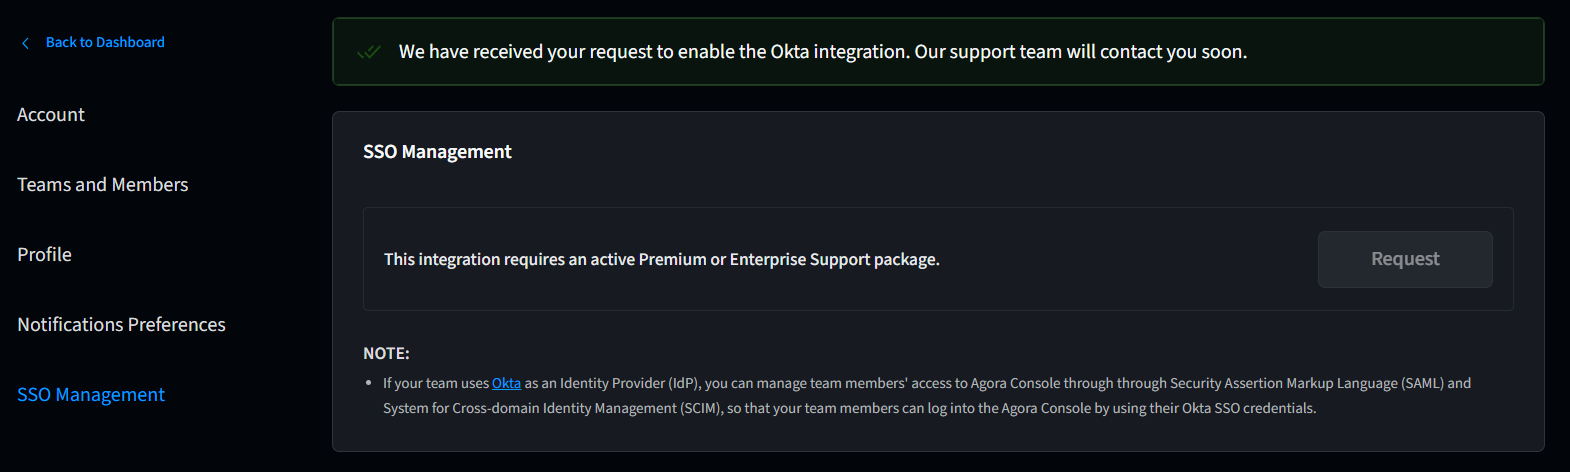
When your application is processed by Agora, **SAML Configuration** on the same page is automatically enabled and a set of **SSO URL** and **Audience URI** is generated.
2. Create a SAML integration for Agora in Okta Console.
3. Log in to your Okta developer account as a user with administrative privileges and click **Admin** in the upper right corner.
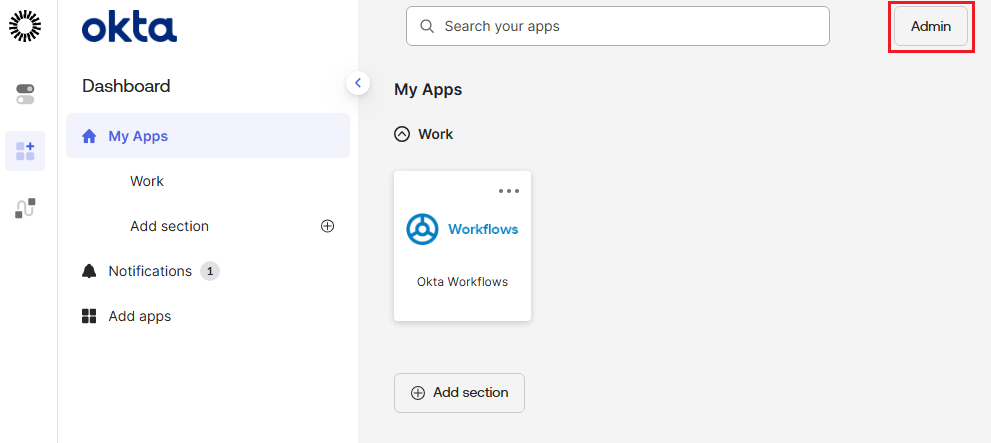
4. Go to **Applications** > **Applications** and click **Create App Integration**.
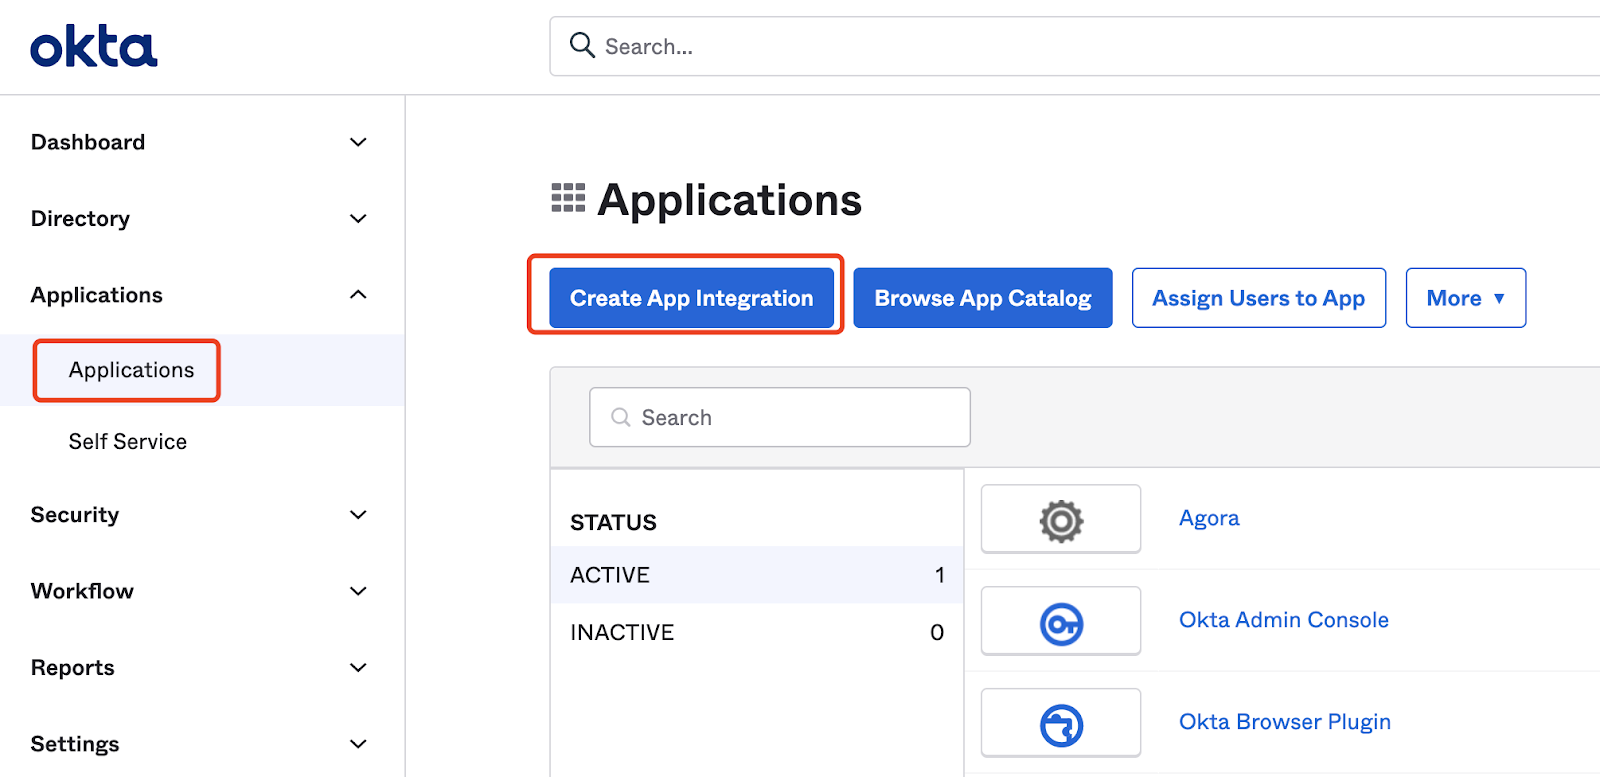
5. In the **Sign-in method** section, select **SAML 2.0** and click **Next**.
6. On the **General Settings** tab, enter a name for this integration, for example, `Agora`, and click **Next**.
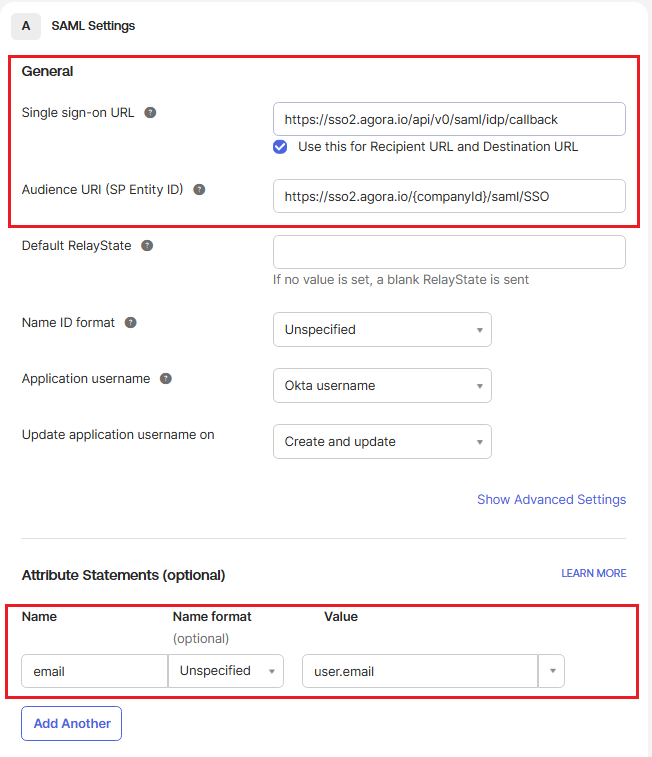
7. On the **Configure SAML** tab, fill in the following SAML configurations generated in Agora Console:
* In the **Single sign on URL** field, enter `https://sso2.agora.io/api/v0/saml/idp/callback`.
* In the **Audience URI (SP Entity ID)** field, enter `https://sso2.agora.io/{companyId}/saml/SSO` where `{companyId}` is your company ID.
* In the **Attribute Statements (optional)** section, add the following attribute:
| Name | Value |
| :------ | :----------- |
| `email` | `user.email` |
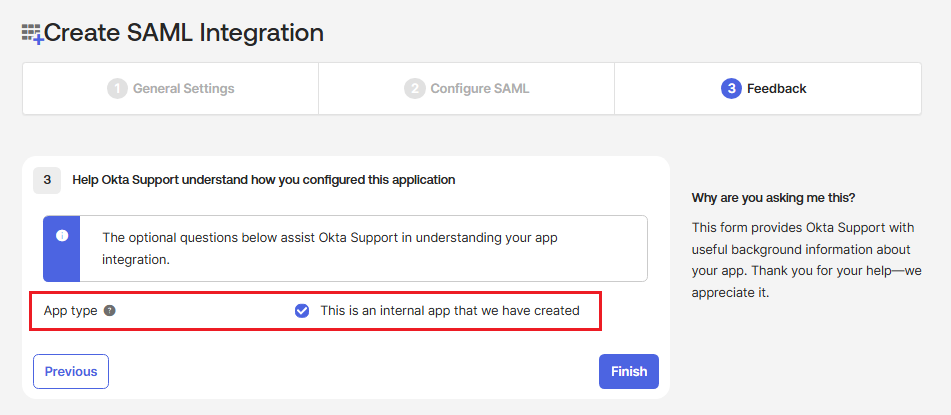
8. On the **Feedback** tab, select **I'm an Okta customer adding an internal app** and tick **This is an internal app that we have created**, then click **Finish**.
9. View IdP information in Okta Console
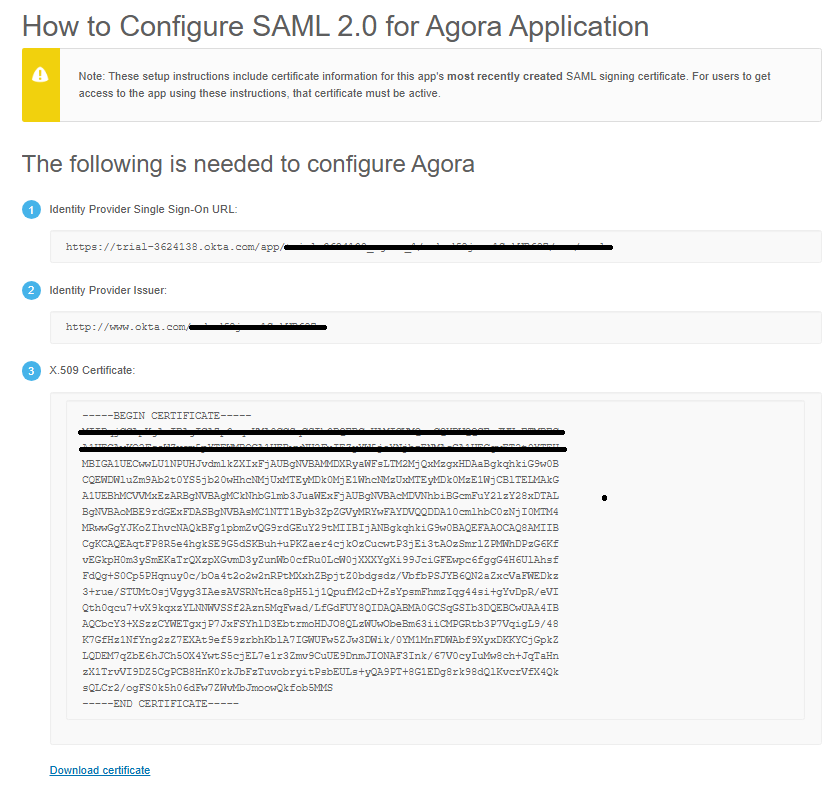
10. In Okta Console, select the **Sign On** tab for Agora integration and click **View Setup Instructions**. You see the following information:
* **Identity Provider Single Sign-On URL**: At the end of this procedure, your team members use this URL to sign in to Agora Console
* **Identity Provider Issuer**
* **X.509 Certificate**
11. Configure SAML settings in Agora Console
In the **SAML Configuration** section on the [SSO Management](https://console.agora.io/settings/sso-management) page in Agora Console, enter the following information from Okta Console:
* **Identity Provider Single Sign-On URL**
* **Identity Provider Issuer**
* **X.509 Certificate**, including the `BEGIN CERTIFICATE` and `END CERTIFICATE lines`.
Click **Save**.
5. Manage access
You can manage access for your team members manually using SAML, which is enabled when you apply for Okta
integration in Agora Console, or automatically, if you additionally enable SCIM. Manual management means that adding, managing, and removing a team member's access must be done in both, Okta and Agora Console. Automatic management means that SCIM automatically adds, manages, and removes members' access to Agora Console when you make changes in Okta.
**Note**: Once enabled, SAML is applicable for both, existing and newly created Agora accounts for team members. For new accounts, however, log in as the admin in Agora Console and create an account *before* it is configured in Okta. SCIM is applicable only for new accounts.
* Manual management with SAML
1. In Agora Console, add team members and choose their teams. For details, see [Manage members and teams](#manage-members-and-teams).
2. In Okta Console, go to **Directory** > **People**. Ensure that the email address of each team member is the same as that in Agora Console.
3. Go to **Applications** > **Applications** > **Agora integration**.
4. On the **Assignments** tab, click **Assign** and select **Assign to People**.
5. Enter the team members that need to sign in to Agora Console and click **Assign** for each. Click **Done**.
* Automated management with SCIM
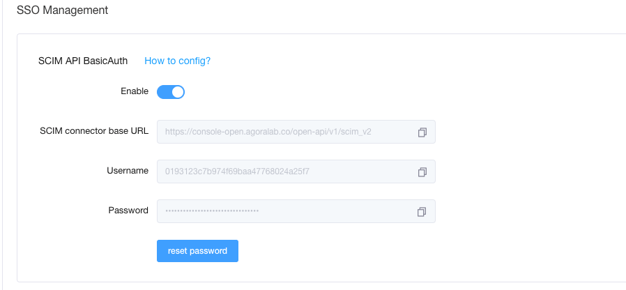
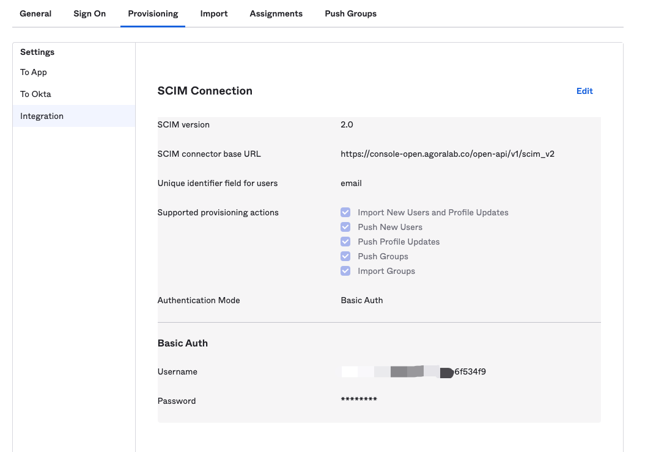
1. In Agora Console, enable **SCIM API Basic Auth** on the **SSO Management** page. A set of username and password is generated, along with the SCIM connector base URL.
2. In Okta Console, select the **General** tab under **Agora integration** and click **Edit**.
3. In the **Provisioning** section, select **SCIM** and click **Save**.
4. Select the **Provisioning** tab under **Agora integration**, then under **Settings** > **Integration** click **Edit**. Make the following changes:
* In **SCIM connector base URL**, enter the corresponding URL from Agora Console.
* In **Unique identifier field for users**, enter `email`.
* Under **Supported provisioning actions**, tick all the checkboxes.
* In **Authentication Mode**, select **Basic Auth**.
* Under the **Basic Auth** section, enter the username and password from the SSO management page in Agora Console.
After enabling and configuring Okta integration, the [Big Bang feature](https://help.okta.com/oie/en-us/content/topics/reference/glossary.htm) is enabled by default. This means that login
to Agora Console with email and password is no longer available and your team members can log in only through Okta.
## Billing center [#billing-center]
This section shows how to check your account balance, add money to your account, view transactions, and make a withdrawal in Agora Console.
### Restrictions [#restrictions-2]
If your account has multiple members, only those assigned to the teams of **Admin**, **Finance**, or an authorized custom team have access to the **Billing** page.
### Check account balance [#check-account-balance]
After logging in to [Agora Console](https://console.agora.io/v2), you can see your account balance in the **Billing** panel on the **Overview** page.
### Add money to account [#add-money-to-account]
You can add money to your account either with a credit card or via bank transfer.
### Credit card [#credit-card]
To add money to your account with a credit card, follow these steps:
1. In [Billing](https://console.agora.io/v2/billing), select the **Credit Card** tab.
2. (Optional) If you have not added a credit card to your account, follow these steps:
3. Click **Add New Card**.
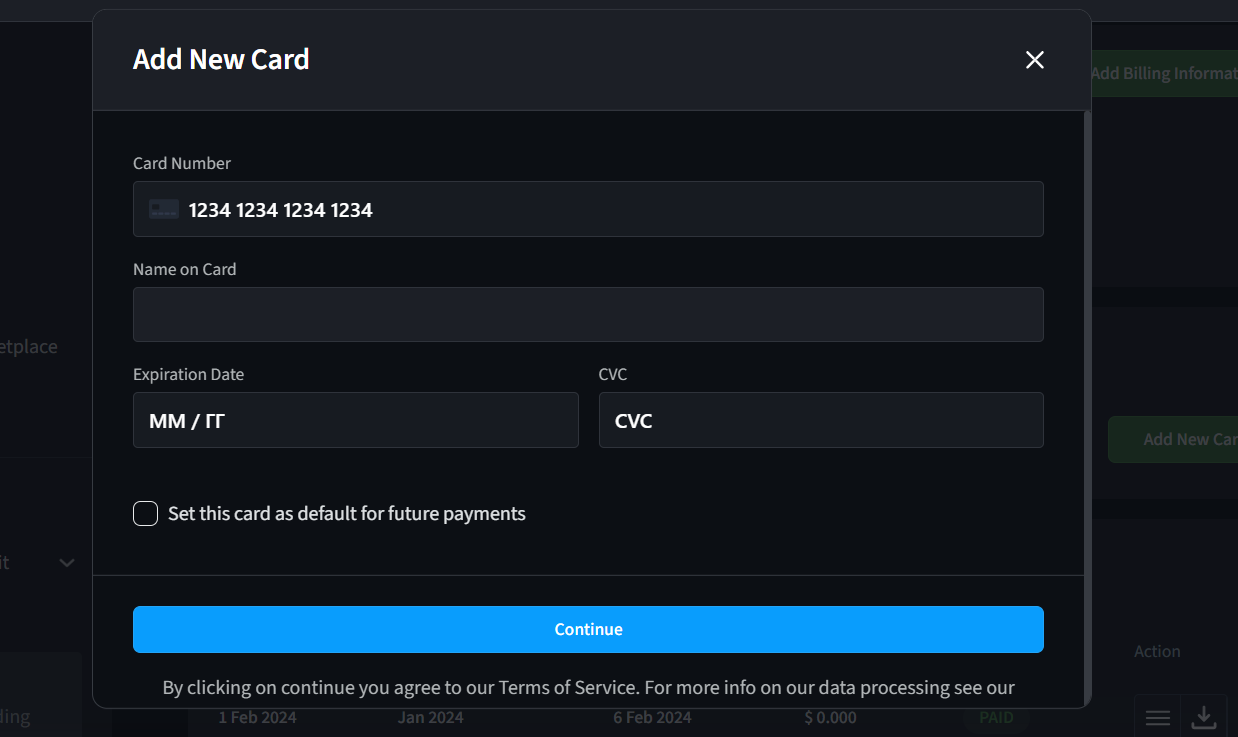
4. Enter the card number, card holder name, expiration date, and CVC.
5. Choose whether or not to set this card as the default credit card.
6. Click **Continue**.
7. Select a credit card, enter the **Payment Amount**, and click **Pay**. If the payment is successful, you see a "Payment Succeeded" message.
### Bank transfer [#bank-transfer]
To add money to your account via bank transfer, follow these steps:
1. In [Billing](https://console.agora.io/v2/billing), select the **Bank Transfer** tab.
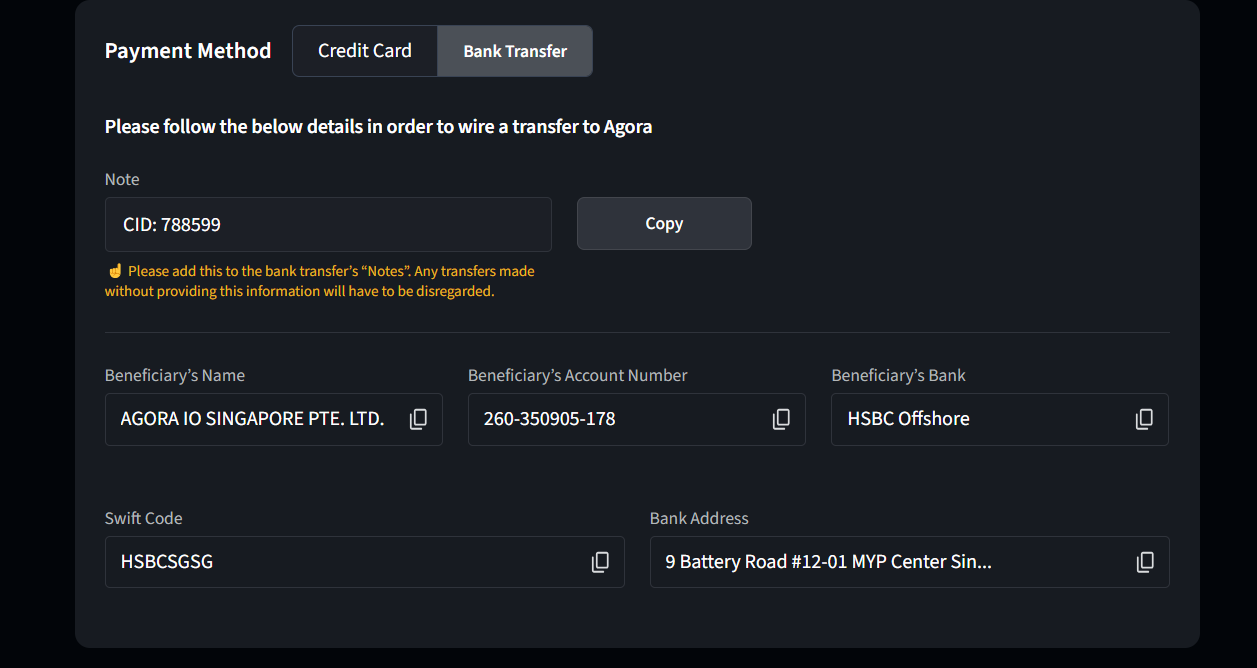
2. Follow the on-screen instructions to complete.
### View invoices and transactions [#view-invoices-and-transactions]
In [Billing](https://console.agora.io/v2/billing), scroll down to see **Your Invoices** and **Your Transactions**, respectively.
You can also click **View all** > **Export CSV** in the top right corner to export transactions and invoices as a CSV file.
## Submit a ticket [#submit-a-ticket]
To ask Agora support a question, follow these steps:
1. Log in to [Agora Console](https://console.agora.io/v2).
2. Click **Get Support** > **Create Support Ticket**
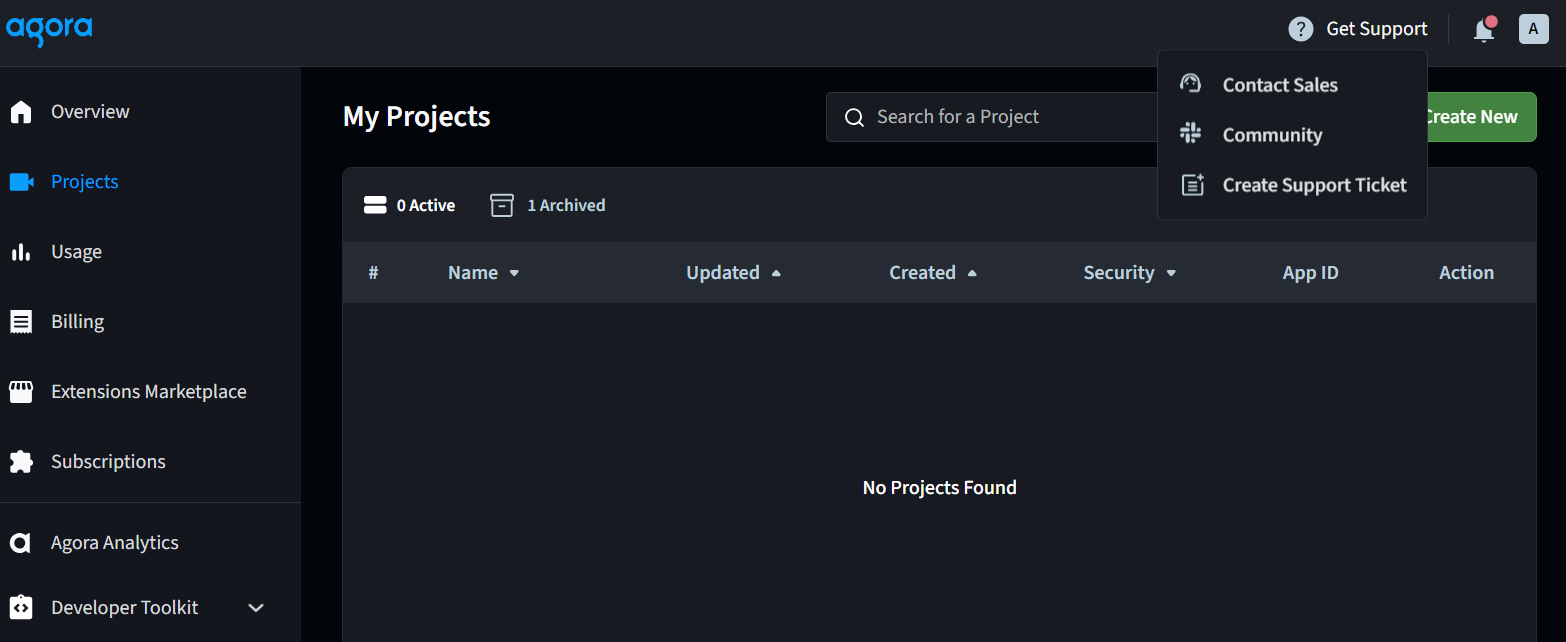
3. Type in your question or keywords to see if the question has been answered. If you cannot find your answer, select a category and submit a ticket to Agora’s customer support.
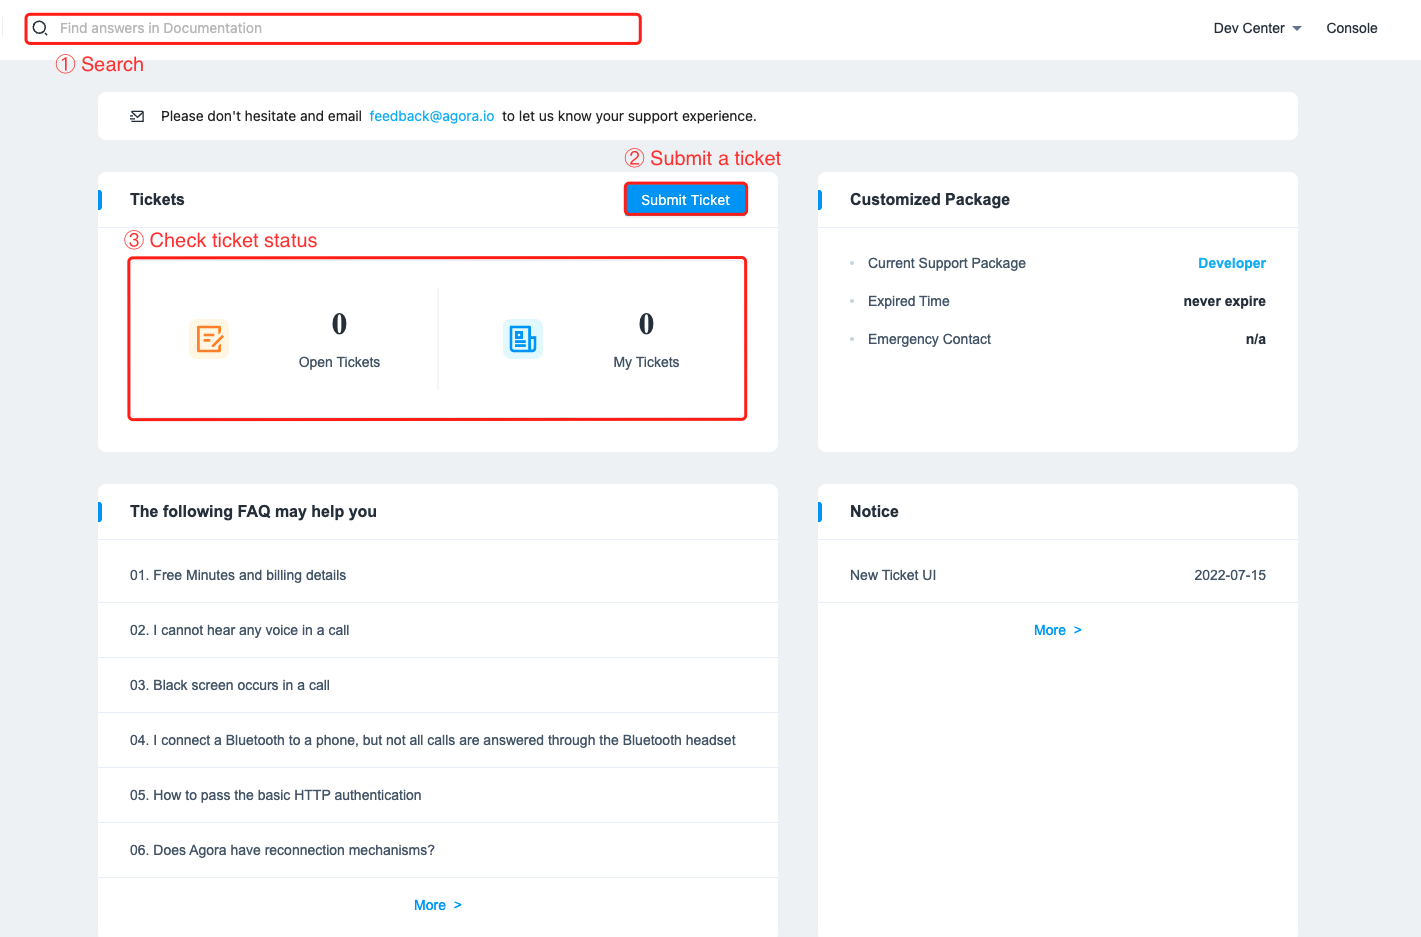
You can track the status of your ticket under **Tickets**.
## Delete your Agora account [#delete-your-agora-account]
This section describes how to delete your Agora account created with an email address or phone number.
Before deleting your Agora account, ensure that the following requirements are met:
* You are the creator of the account to be deleted.
* The account to be deleted is an Agora account created in [Agora Console](https://console.agora.io/v2), not a reseller account created in [Agora Reseller Console](https://reseller.agora.io/).
* There are no active projects under your account. If there are any, go to the [Projects](https://console.agora.io/v2/project-management) page to disable all active projects.
* Your account balance is zero. If your account balance is positive, request a withdrawal. If your account balance is negative, add money to your account.
* Your bill for the previous month has been issued.
* No usage is generated in the current month.
* All of your packages have either expired or been used up, including:
* Video SDK and Cloud Recording packages.
* Support packages.
* Extensions Marketplace packages.
* There are no members under your account. If there are any, go to the [Teams and Members](https://console.agora.io/v2/teams-members) page to delete all members.
### Procedure [#procedure-1]
Follow these steps to delete your Agora account:
1. Log in to [Agora Console](https://dashboard.agora.io/), click your account name in the top right corner and select **Settings** in the dropdown.
2. In the left navigation panel, click **Account**.
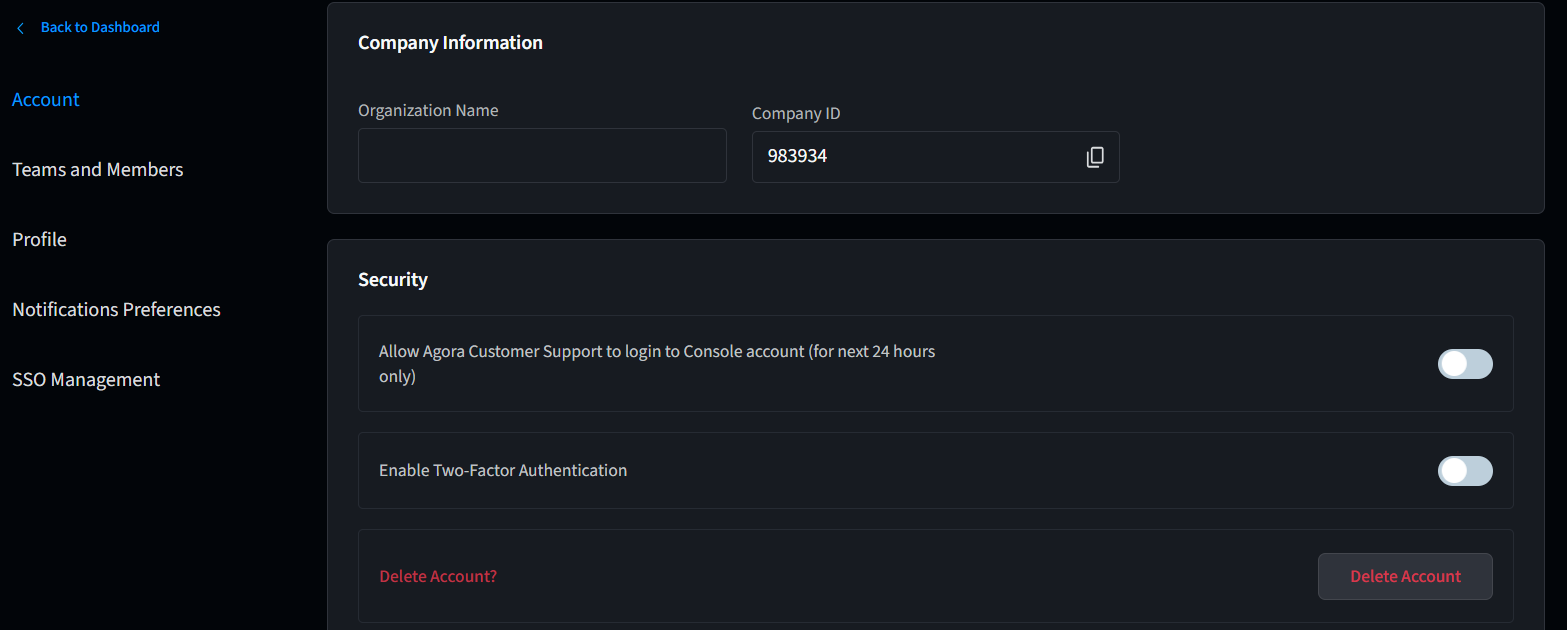
3. Ensure that you meet all the prerequisites, and click **Delete Account** at the bottom of the page.
4. Read the pop-up prompt carefully and fill in the confirmation field. Click **Delete Account**.
If any prerequisite is not met, an error message appears after you click **Delete Account**. Check the [Prerequisites](#prerequisites) and try again.
## Reference [#reference]
For information on using Agora REST authentication, see [RESTful authentication](channel-management-api/restful-authentication).