# Set up SIP trunk (/en/ai/studio/deploy/sip-trunk)
> For AI agents: see the complete documentation index at [llms.txt](/llms.txt).
This guide walks you through configuring an Elastic SIP Trunk to work with Agent Studio for both inbound calls (customers call your AI agent) and outbound calls (your AI agent calls customers).
## Prerequisites [#prerequisites]
Before you begin, ensure that you have:
* An active SIP trunk account
* A phone number that supports SIP Trunking
## Understand the setup [#understand-the-setup]
Agent Studio supports both inbound and outbound calls through Elastic SIP Trunk, but each direction requires different configuration in both SIP trunk configuration and Studio. The table below summarizes the key differences.
| | Inbound | Outbound |
| -------------------- | ------------------------------------------------------------------------------------------ | -------------------------------------------------------------------------------------------- |
| **Use case** | Customer support hotline, IVR replacement, appointment booking | Outbound campaigns, appointment reminders, follow-up calls |
| **Call direction** | External caller dials your SIP trunk number → SIP trunk routes to Agora → AI Agent answers | Agora initiates call via SIP trunk → SIP trunk connects to external number → AI Agent speaks |
| **SIP trunk config** | Origination URI (SIP trunk sends calls to Agora) | Termination URI + IP ACL (Agora sends calls to SIP trunk) |
| **Studio Config** | Import number → assign to Inbound agent | Import number → use in Campaign or Outbound agent |
## Basic setup [#basic-setup]
The following steps are required for both inbound and outbound calling:
1. **Verify your SIP trunk phone number**
To confirm your phone number is ready for SIP trunk configuration:
1. Log in to [Twilio Console](https://console.twilio.com/).
2. Navigate to **Phone Numbers → Manage → Active Numbers**.
3. Check that the number you want to use is active and supports SIP Trunking.
4. If you do not have a number, click **Buy a number** and select a number from the list.
2. **Create or select an Elastic SIP Trunk**
To set up a trunk that handles inbound and outbound calls:
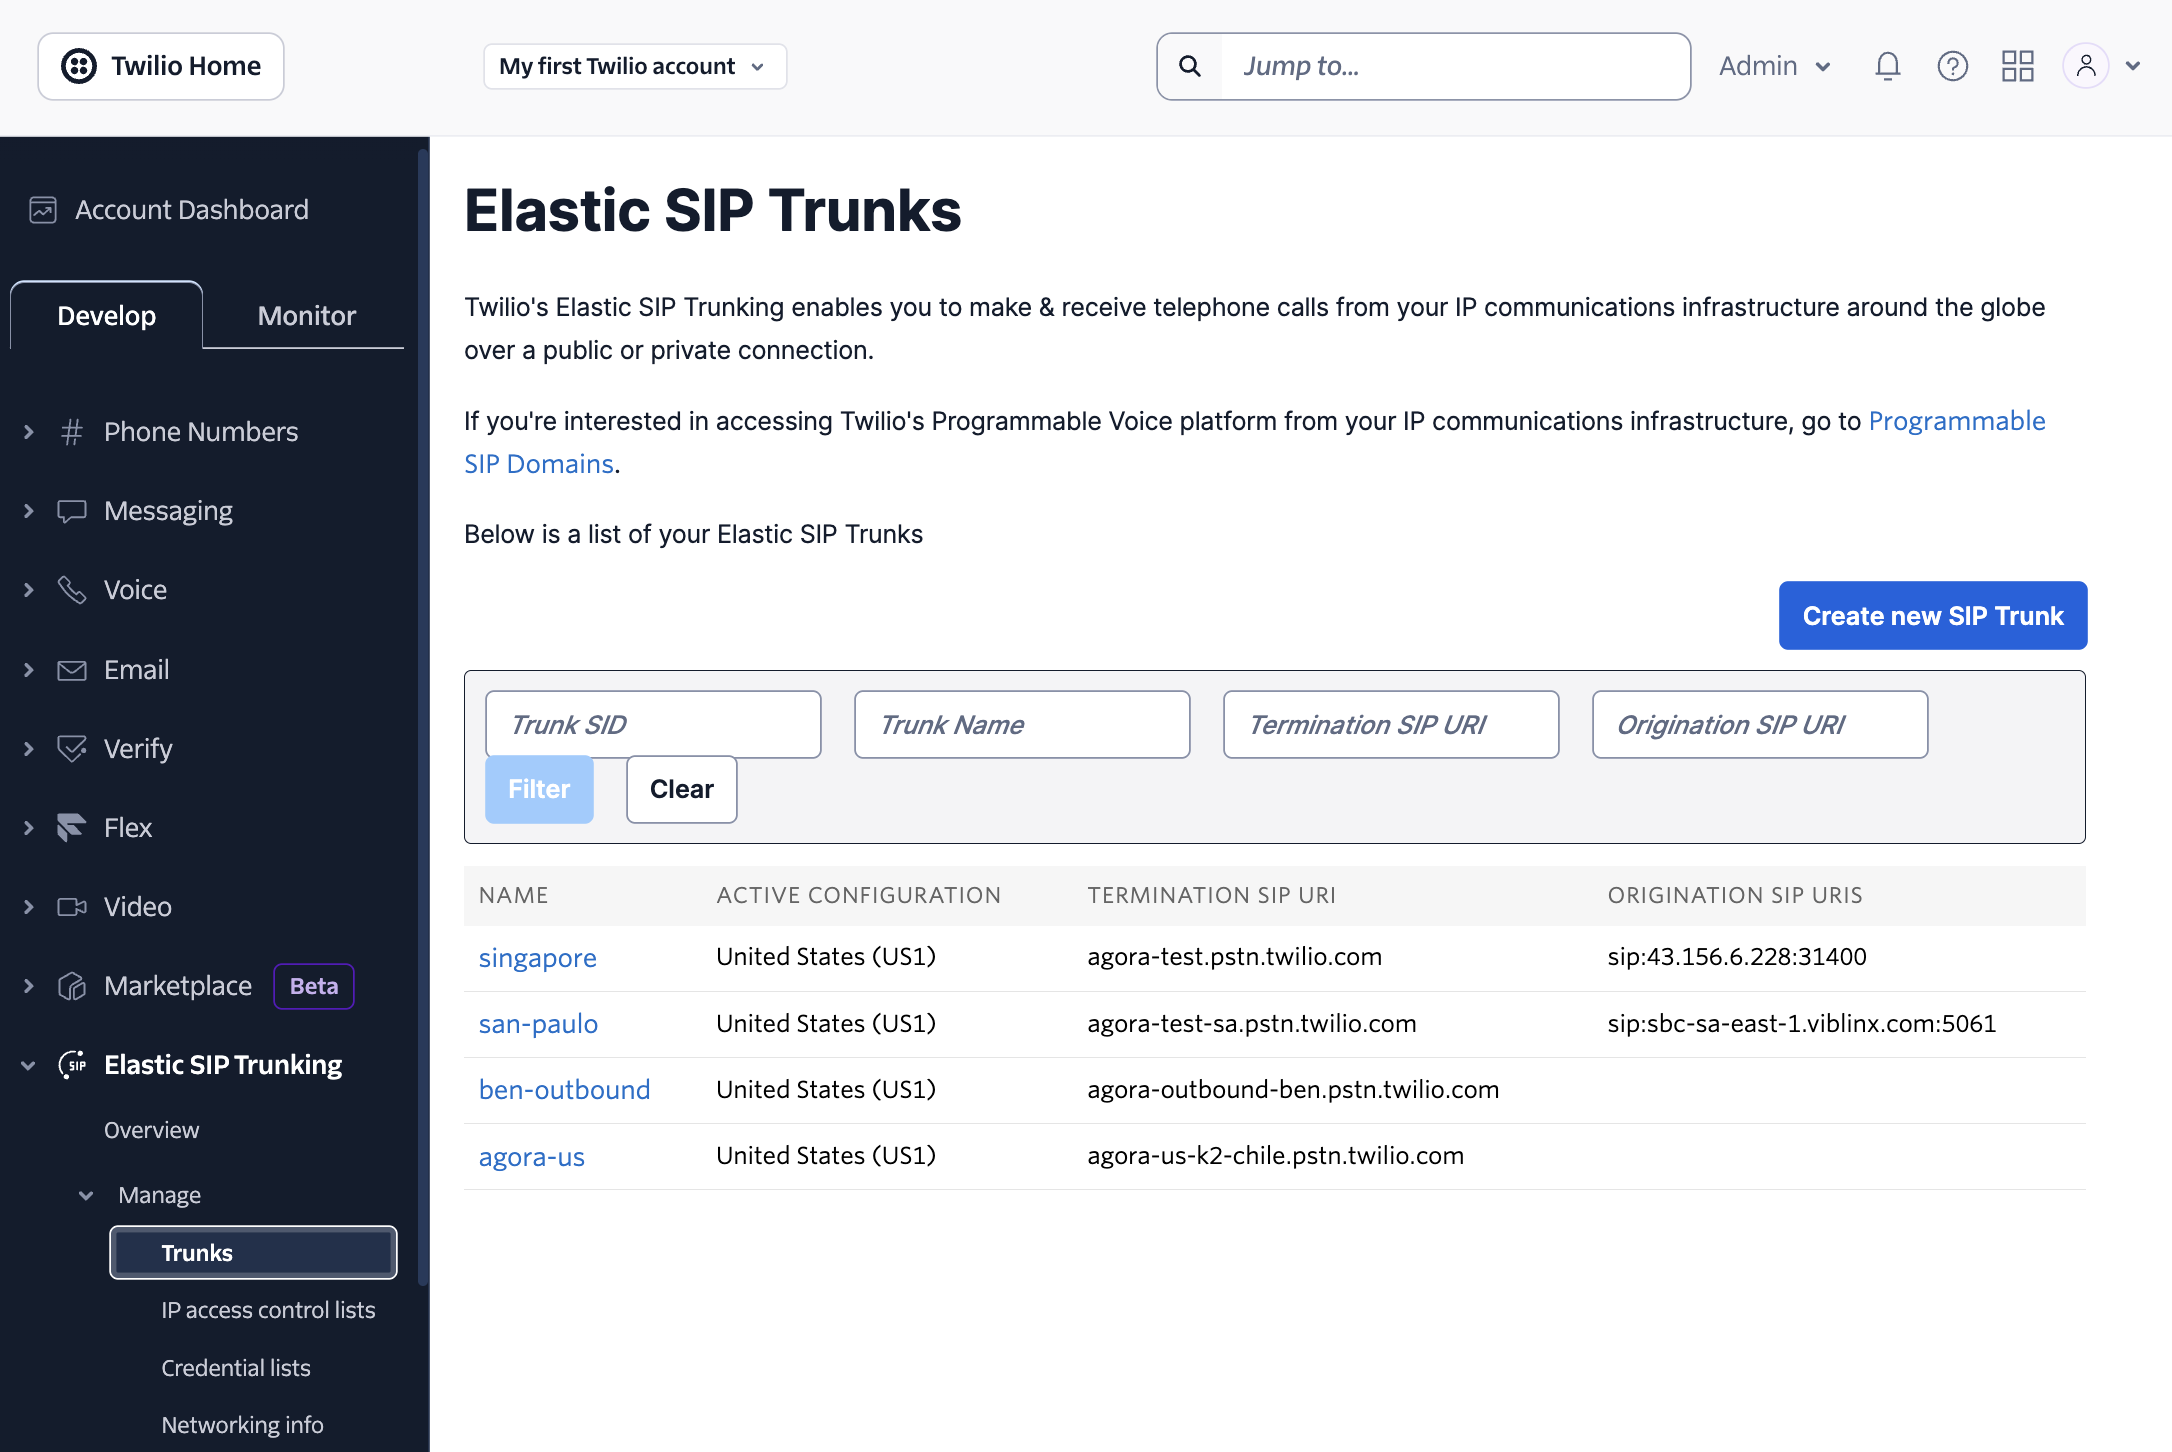
1. Go to **Elastic SIP Trunking → Manage → Trunks** in Twilio Console.
2. Click **Create a new SIP Trunk** (or select an existing one).
3. Give it a descriptive name. For example, “Agora Studio – Production”
Info
You can use the same trunk for both inbound and outbound calling or create separate trunks for easier management. Agora recommends using separate trunks if you have different security requirements for inbound and outbound.
3. **Assign the phone number to the Elastic SIP Trunk**
To link your phone number with the SIP trunk:
1. Go to **Phone Numbers → Manage → Active Numbers**.
2. Select the phone number.
3. Under **Voice Calling** settings, set the number to use your Elastic SIP Trunk.
4. Save changes.
4. **Check secure trunking setting**
To determine which transport protocol to use in Agent Studio:
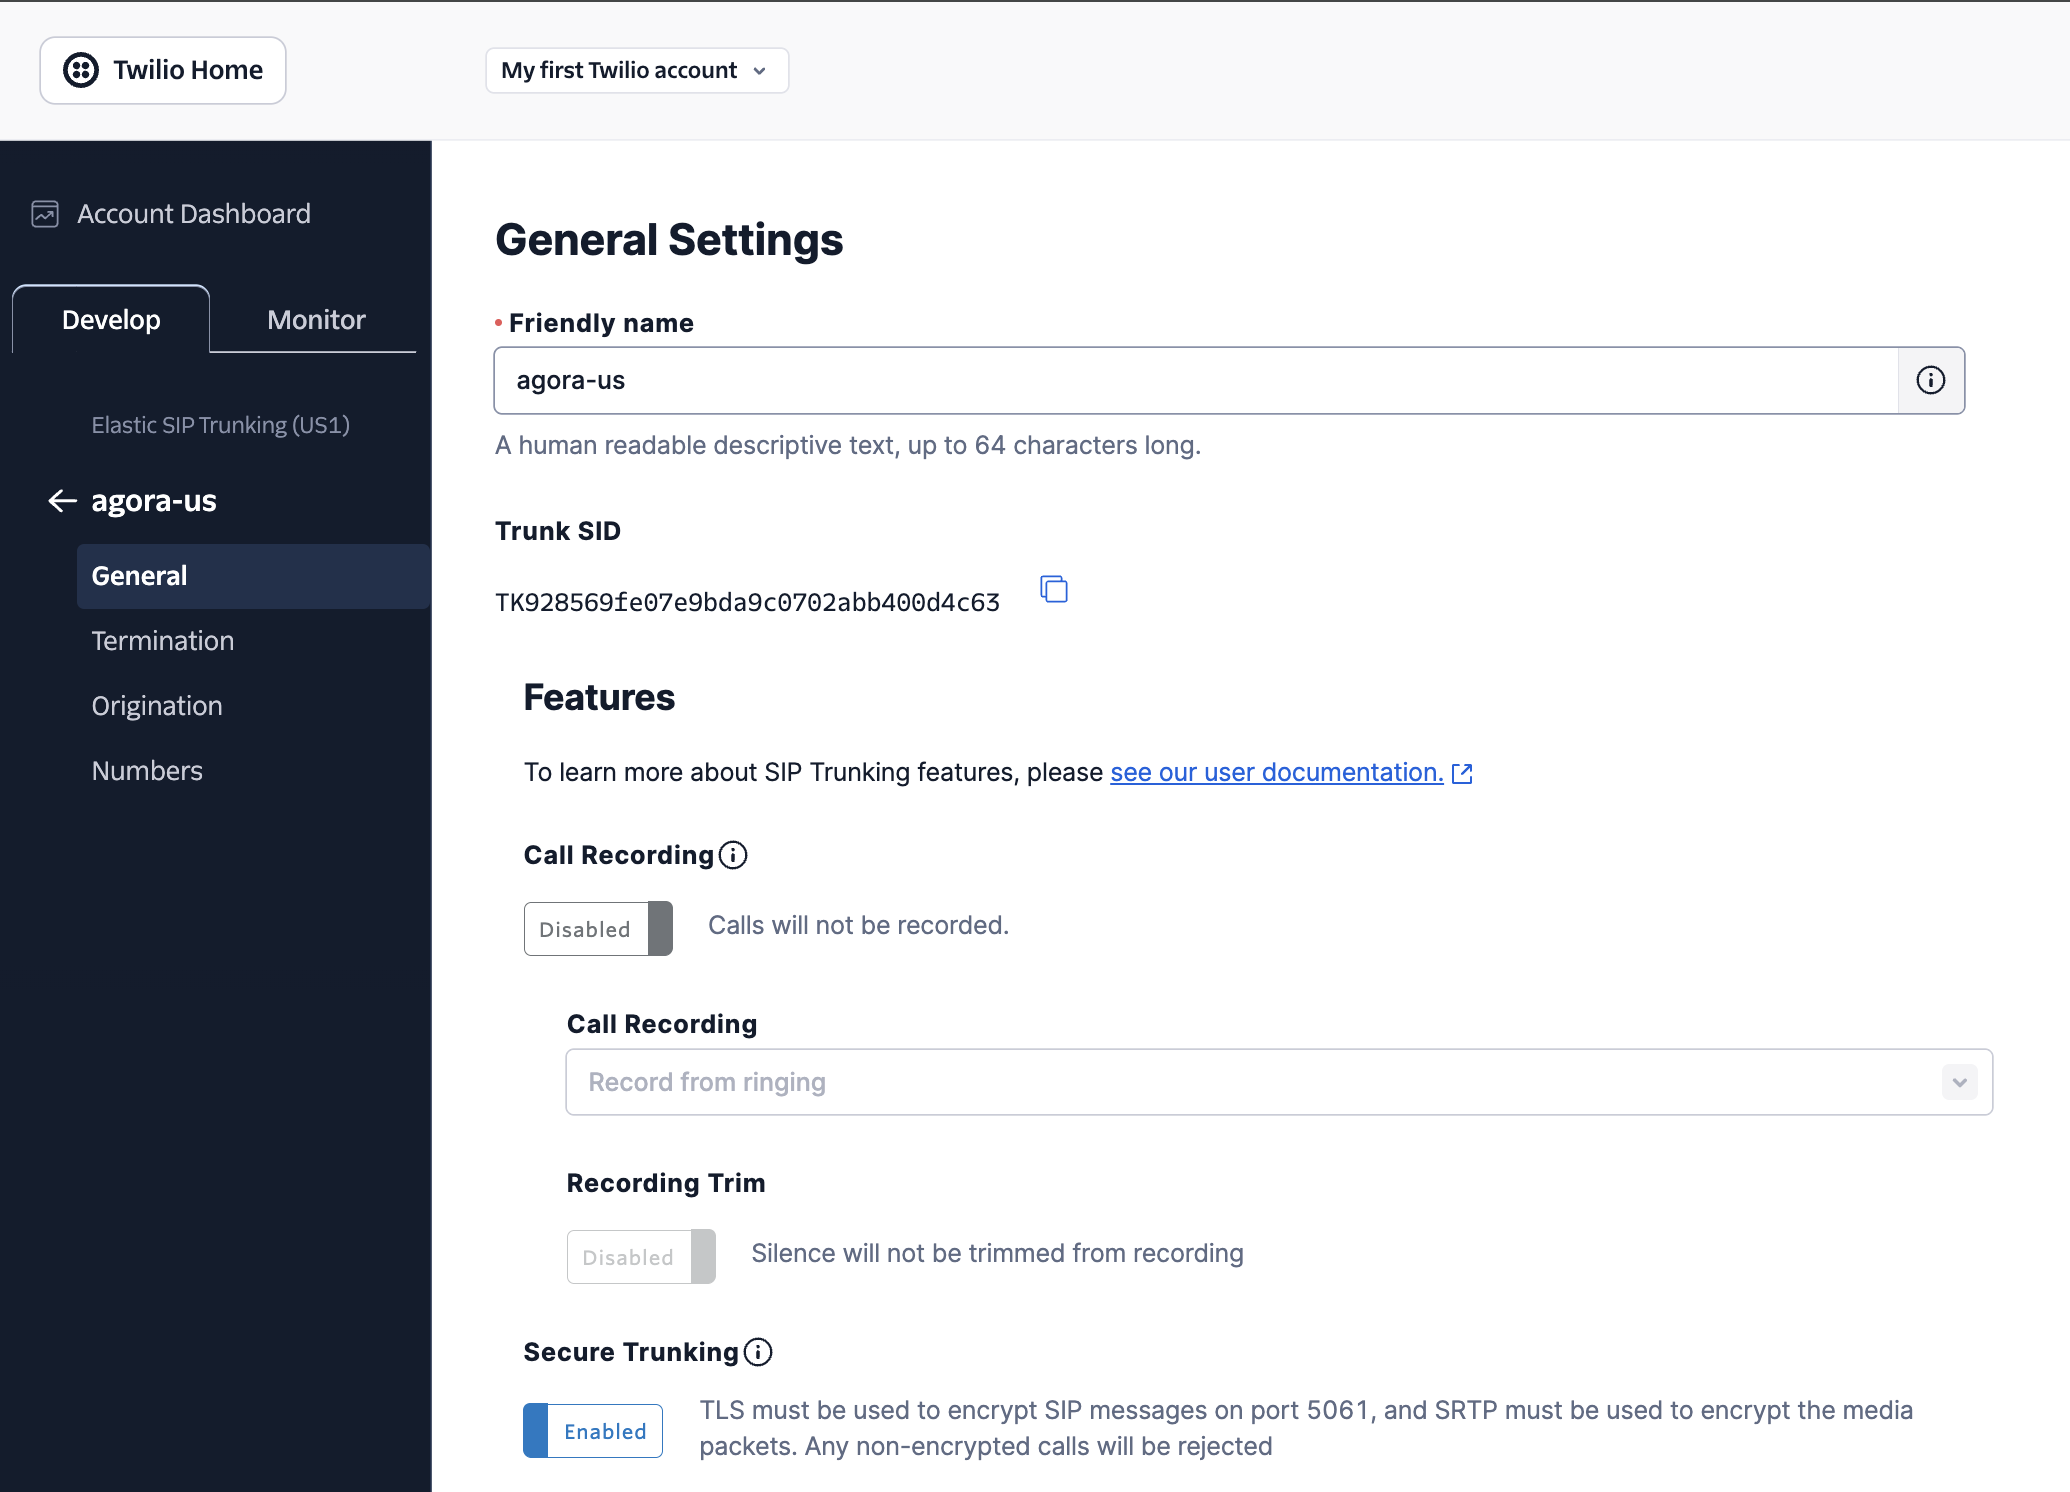
1. Open **SIP Trunk → General Settings**.
2. Locate **Secure Trunking**.
3. Check whether it is enabled or disabled:
* **Enabled**: Choose **TLS** when in Agent Studio configuration.
* **Disabled**: Choose **TCP** or **UDP** in Agent Studio configuration.
4. Save any changes.
Caution
The transport setting in Agent Studio must match SIP trunk’s Secure Trunking setting. A mismatch causes calls to fail silently.
## Outbound calling setup [#outbound-calling-setup]
Complete the following steps to enable your agent to make outbound calls through your SIP trunk phone number.
1. **Configure the Termination URI**
To set up the domain that Agora will use to reach your SIP trunk:
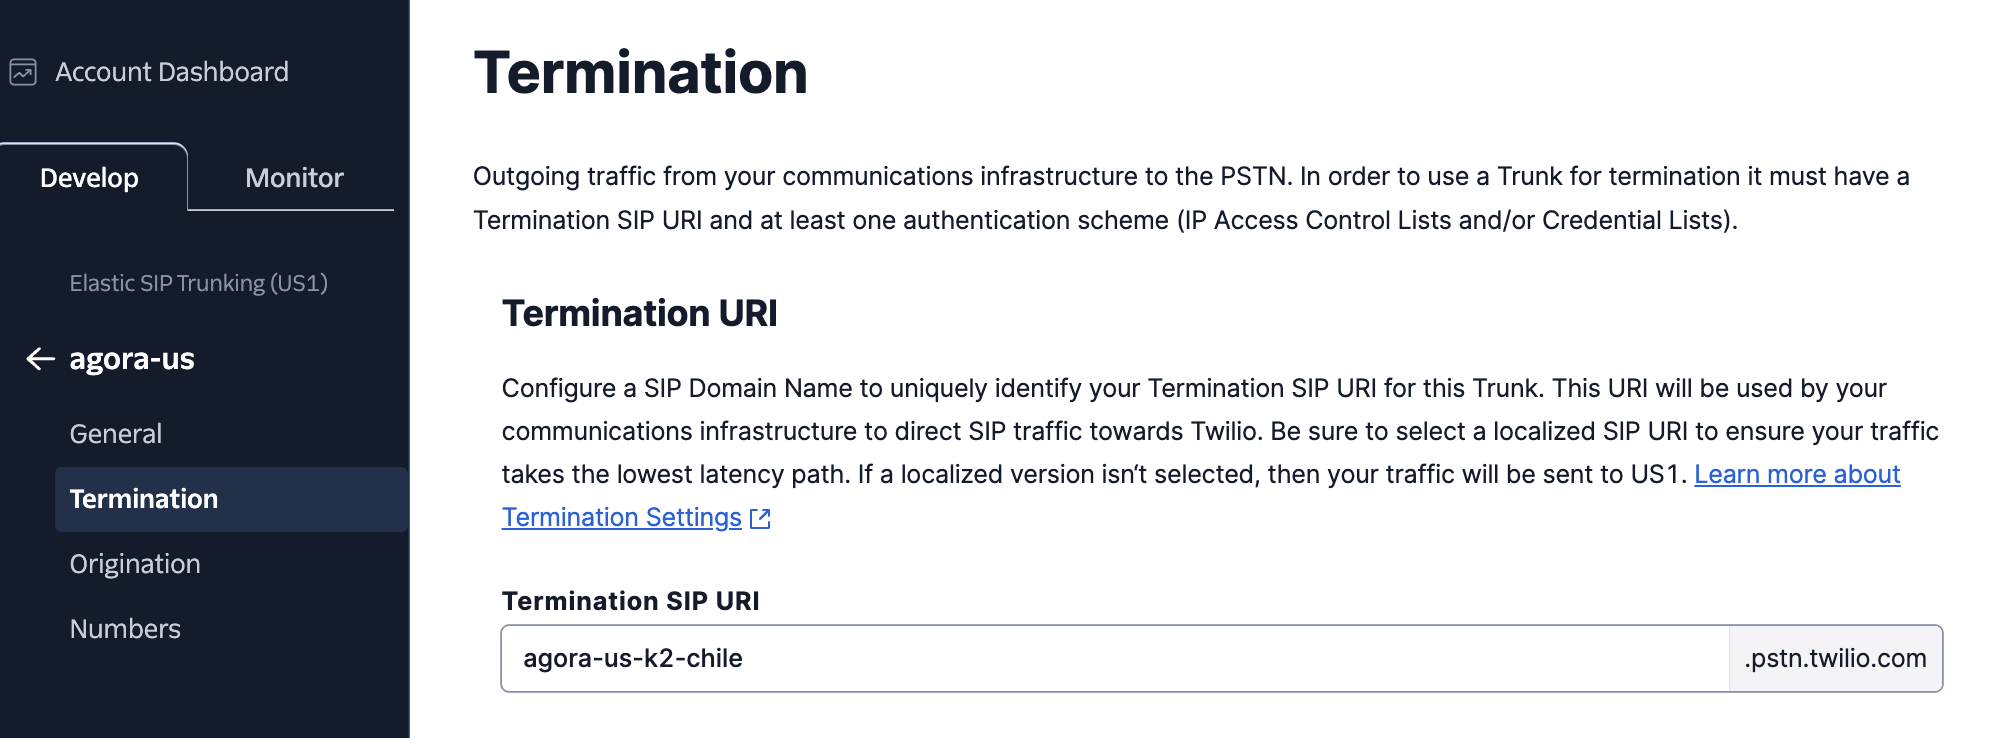
1. In your SIP Trunk, go to **Termination**.
2. Set a custom **Termination SIP URI**. For example: `yourcompany.pstn.twilio.com`.
3. This domain is required later in Agent Studio as the **SIP Trunk Address**.
2. **Create an IP Access Control List** (Whitelist)
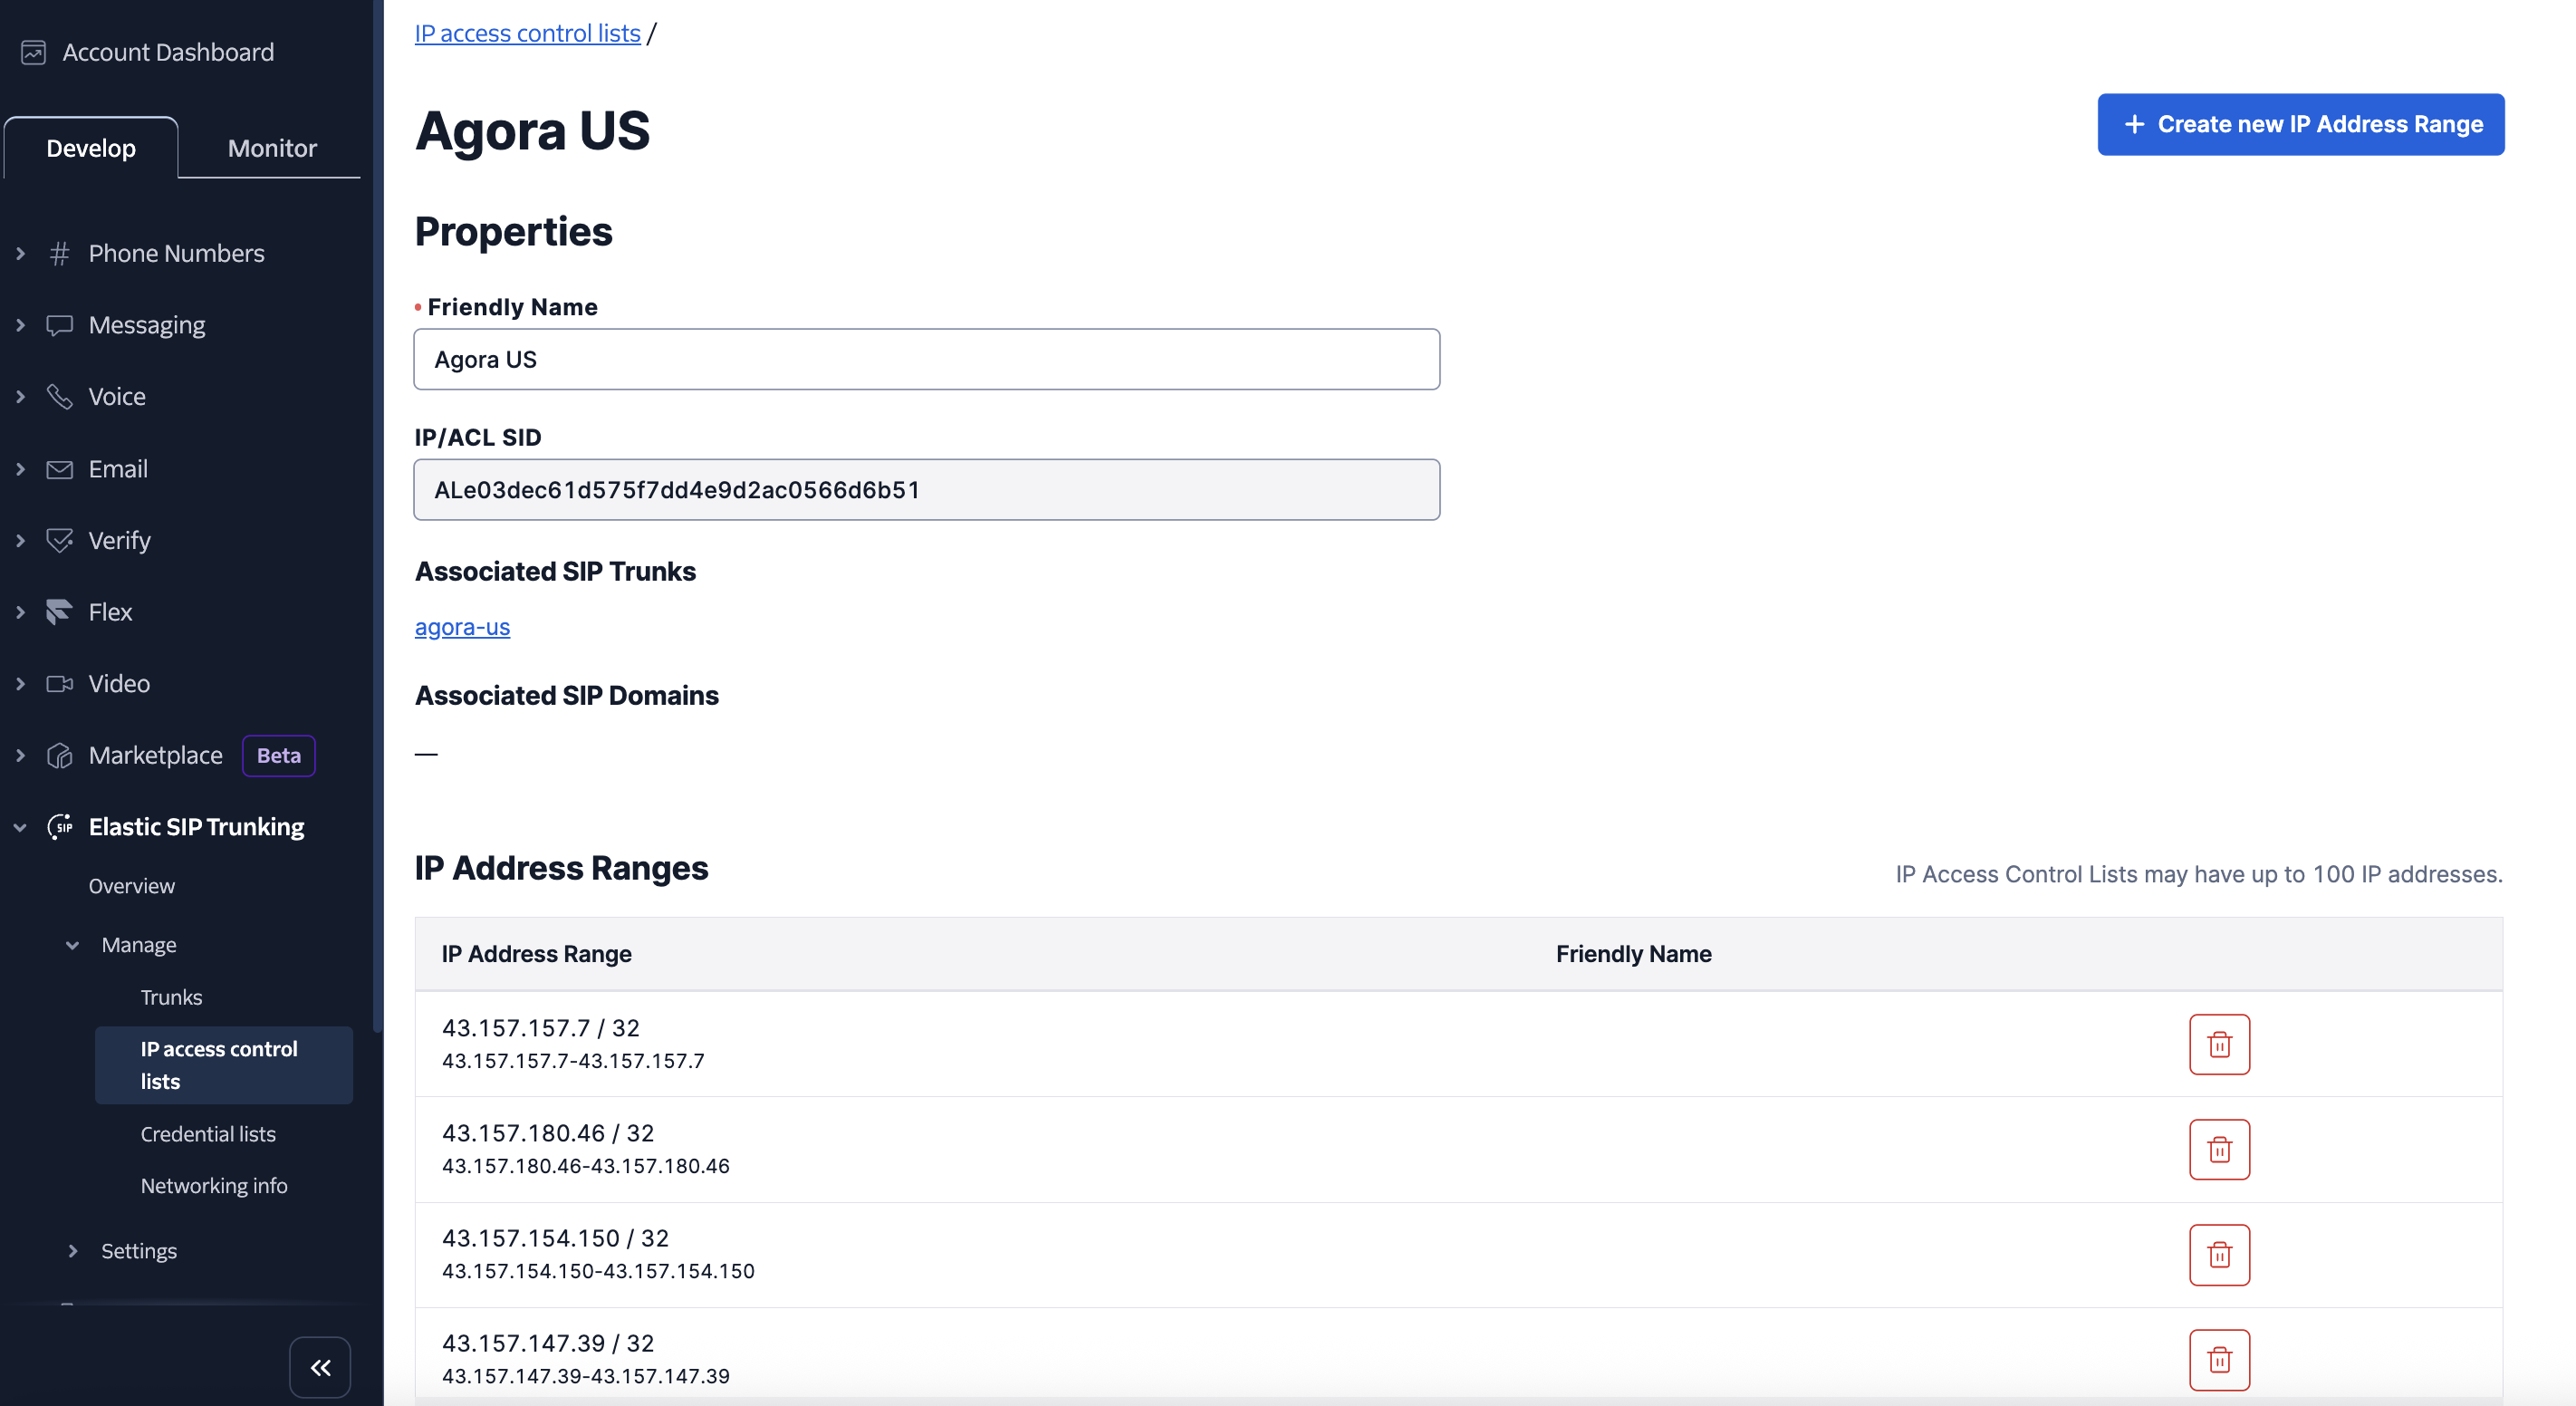
Without correct IP whitelisting, SIP trunk blocks Agora traffic. To allow Agora's traffic through Twilio create an Access Control List (ACL):
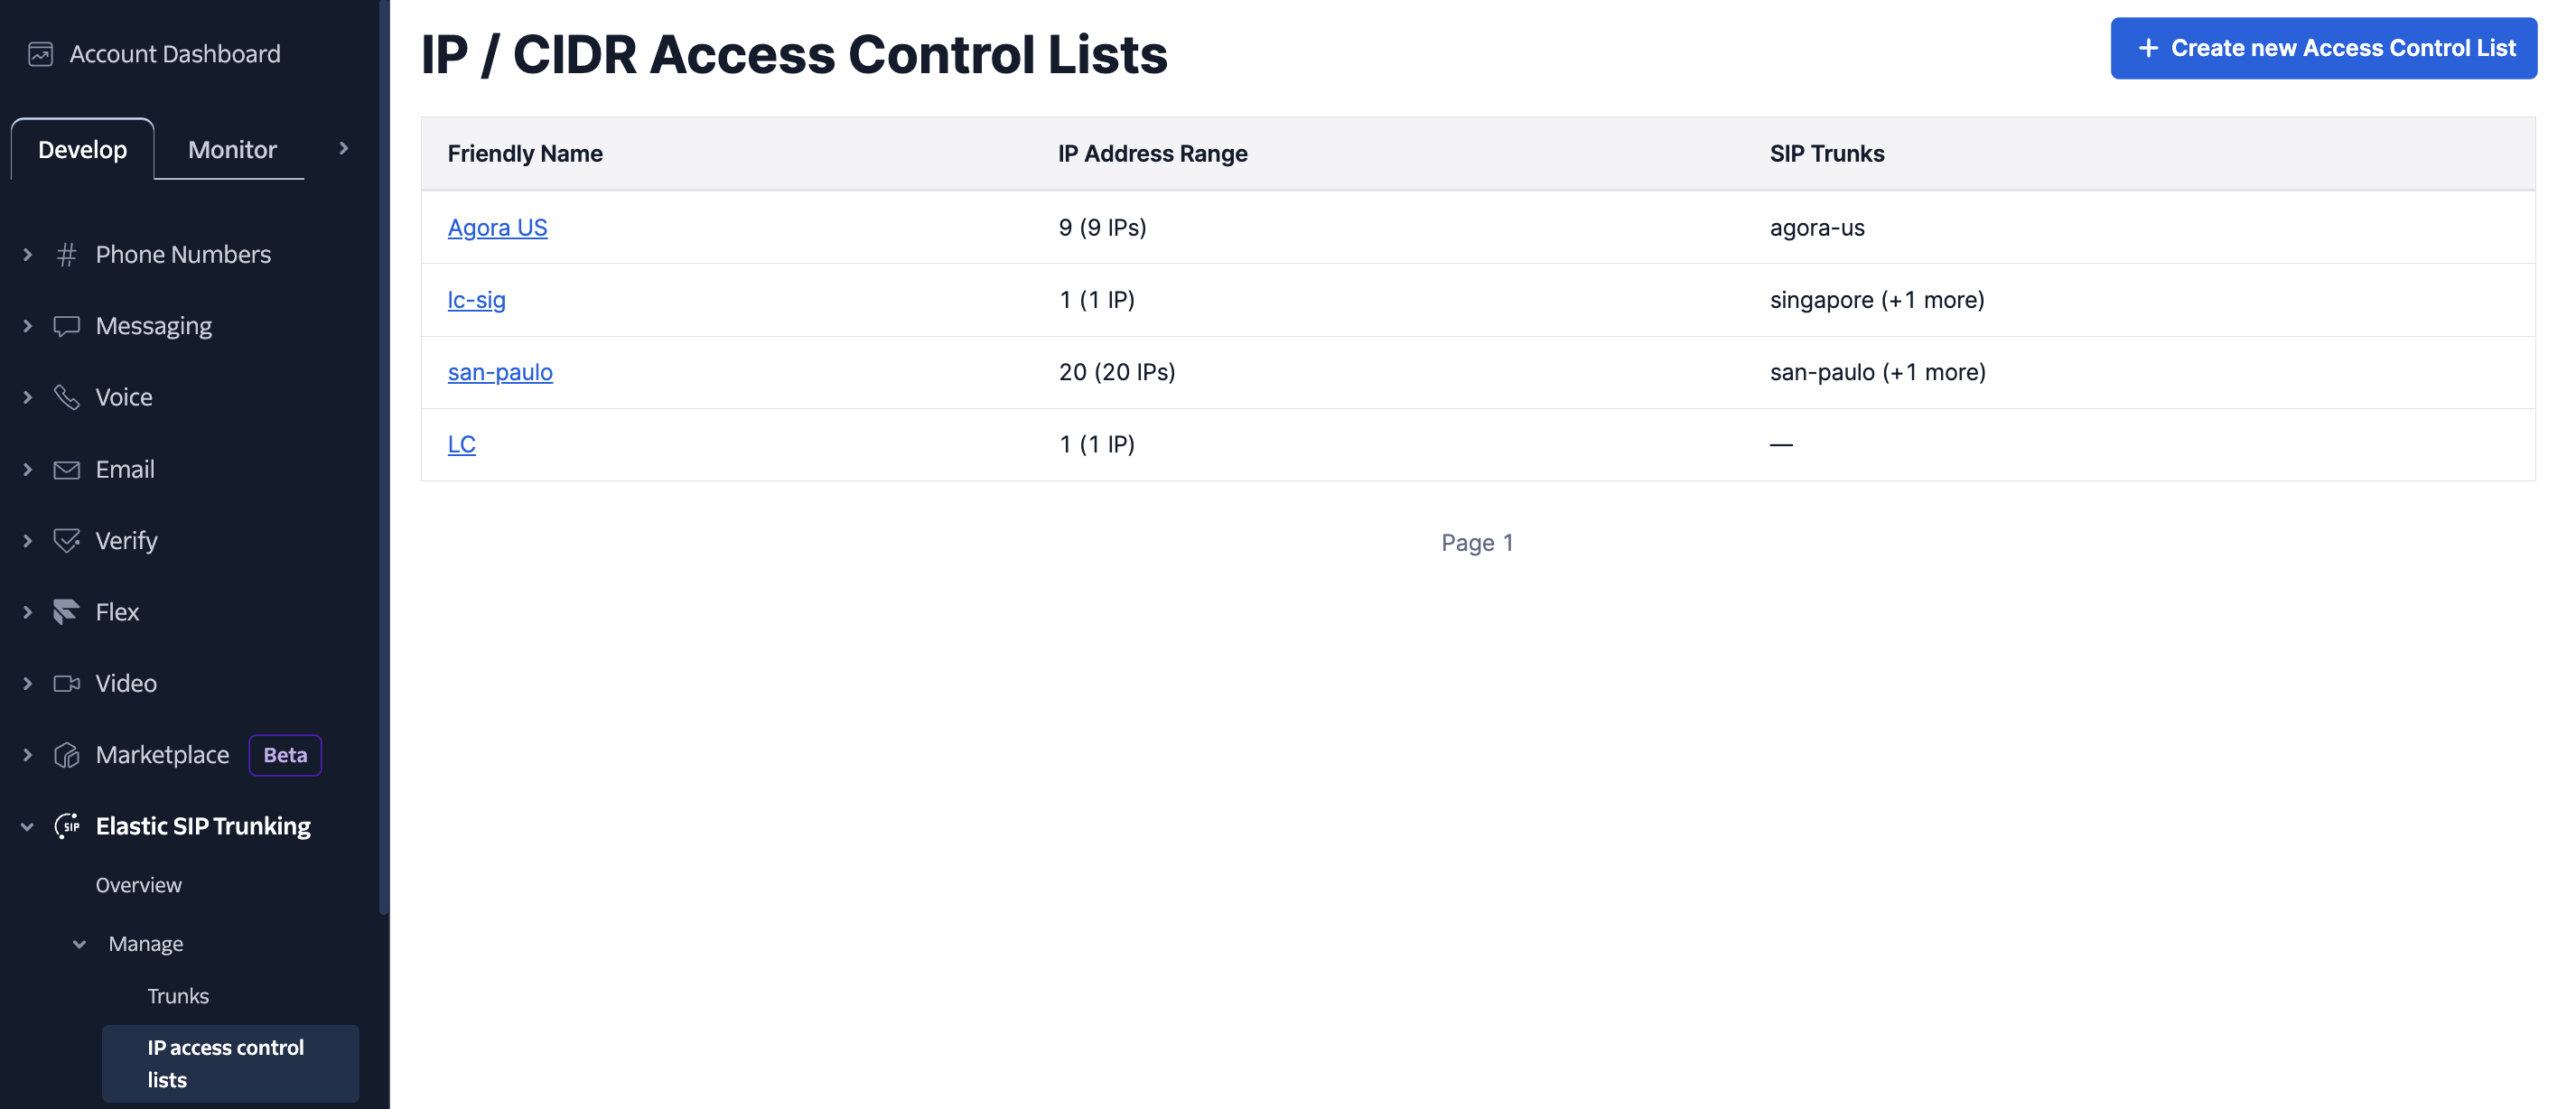
1. Go to **Elastic SIP Trunking → Manage → IP Access Control Lists**.
2. Click **+ Create new Access Control List**.
3. Give your ACL a descriptive name.
4. Depending on the country code for your phone number, add the corresponding Agora SIP outgoing IPs to the ACL:
+1 (United States)
```text
49.51.250.59
49.51.250.76
```
+52 (Mexico), +54 (Argentina), +55 (Brazil), +56 (Chile), +51 (Peru), +44 (United Kingdom), +33 (France), +49 (Germany), +39 (Italy), +34 (Spain), +61 (Australia), +64 (New Zealand)
```text
43.157.157.7
43.157.180.46
43.157.154.150
43.157.147.39
43.157.160.149
43.157.170.160
43.157.176.50
43.157.182.24
43.157.150.207
43.157.146.198
43.157.186.243
43.157.149.172
```
+82 (South Korea), +65 (Singapore), +81 (Japan), +91 (India), +886 (Taiwan), +27 (South Africa), +20 (Egypt), +254 (Kenya)
```text
3.111.249.176
15.207.132.164
13.205.109.117
13.127.230.35
13.200.127.200
13.205.242.117
13.232.246.98
13.235.159.216
43.204.61.200
52.66.173.52
65.1.195.82
65.1.38.21
```
5. Save the Access Control List.
3. **Add IP Access Control List**
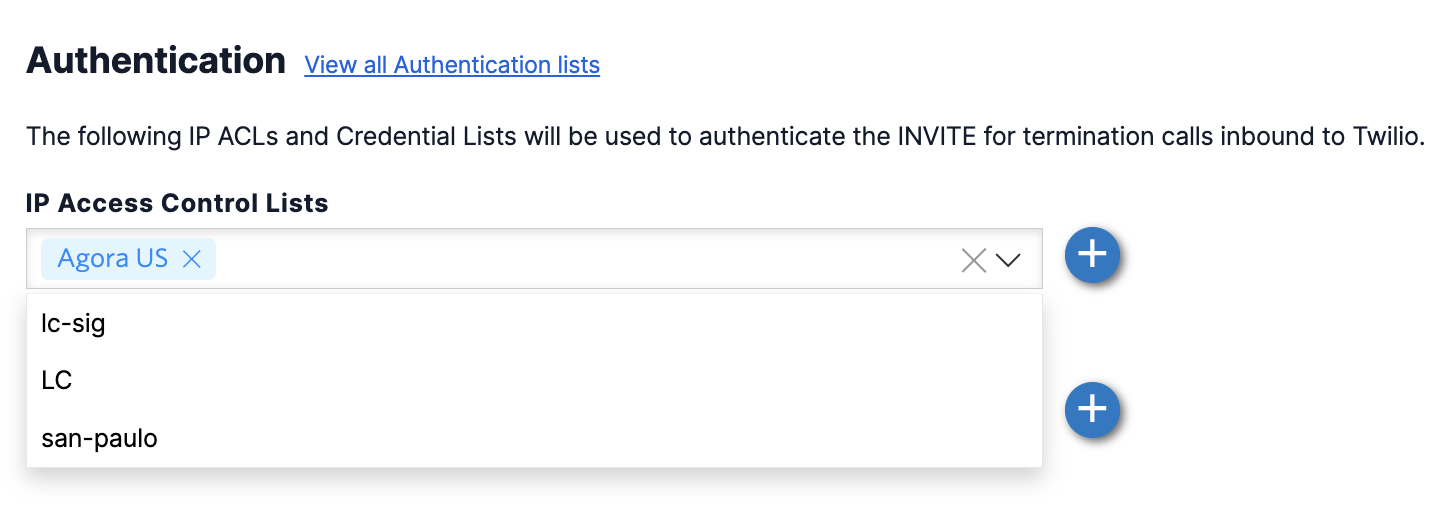
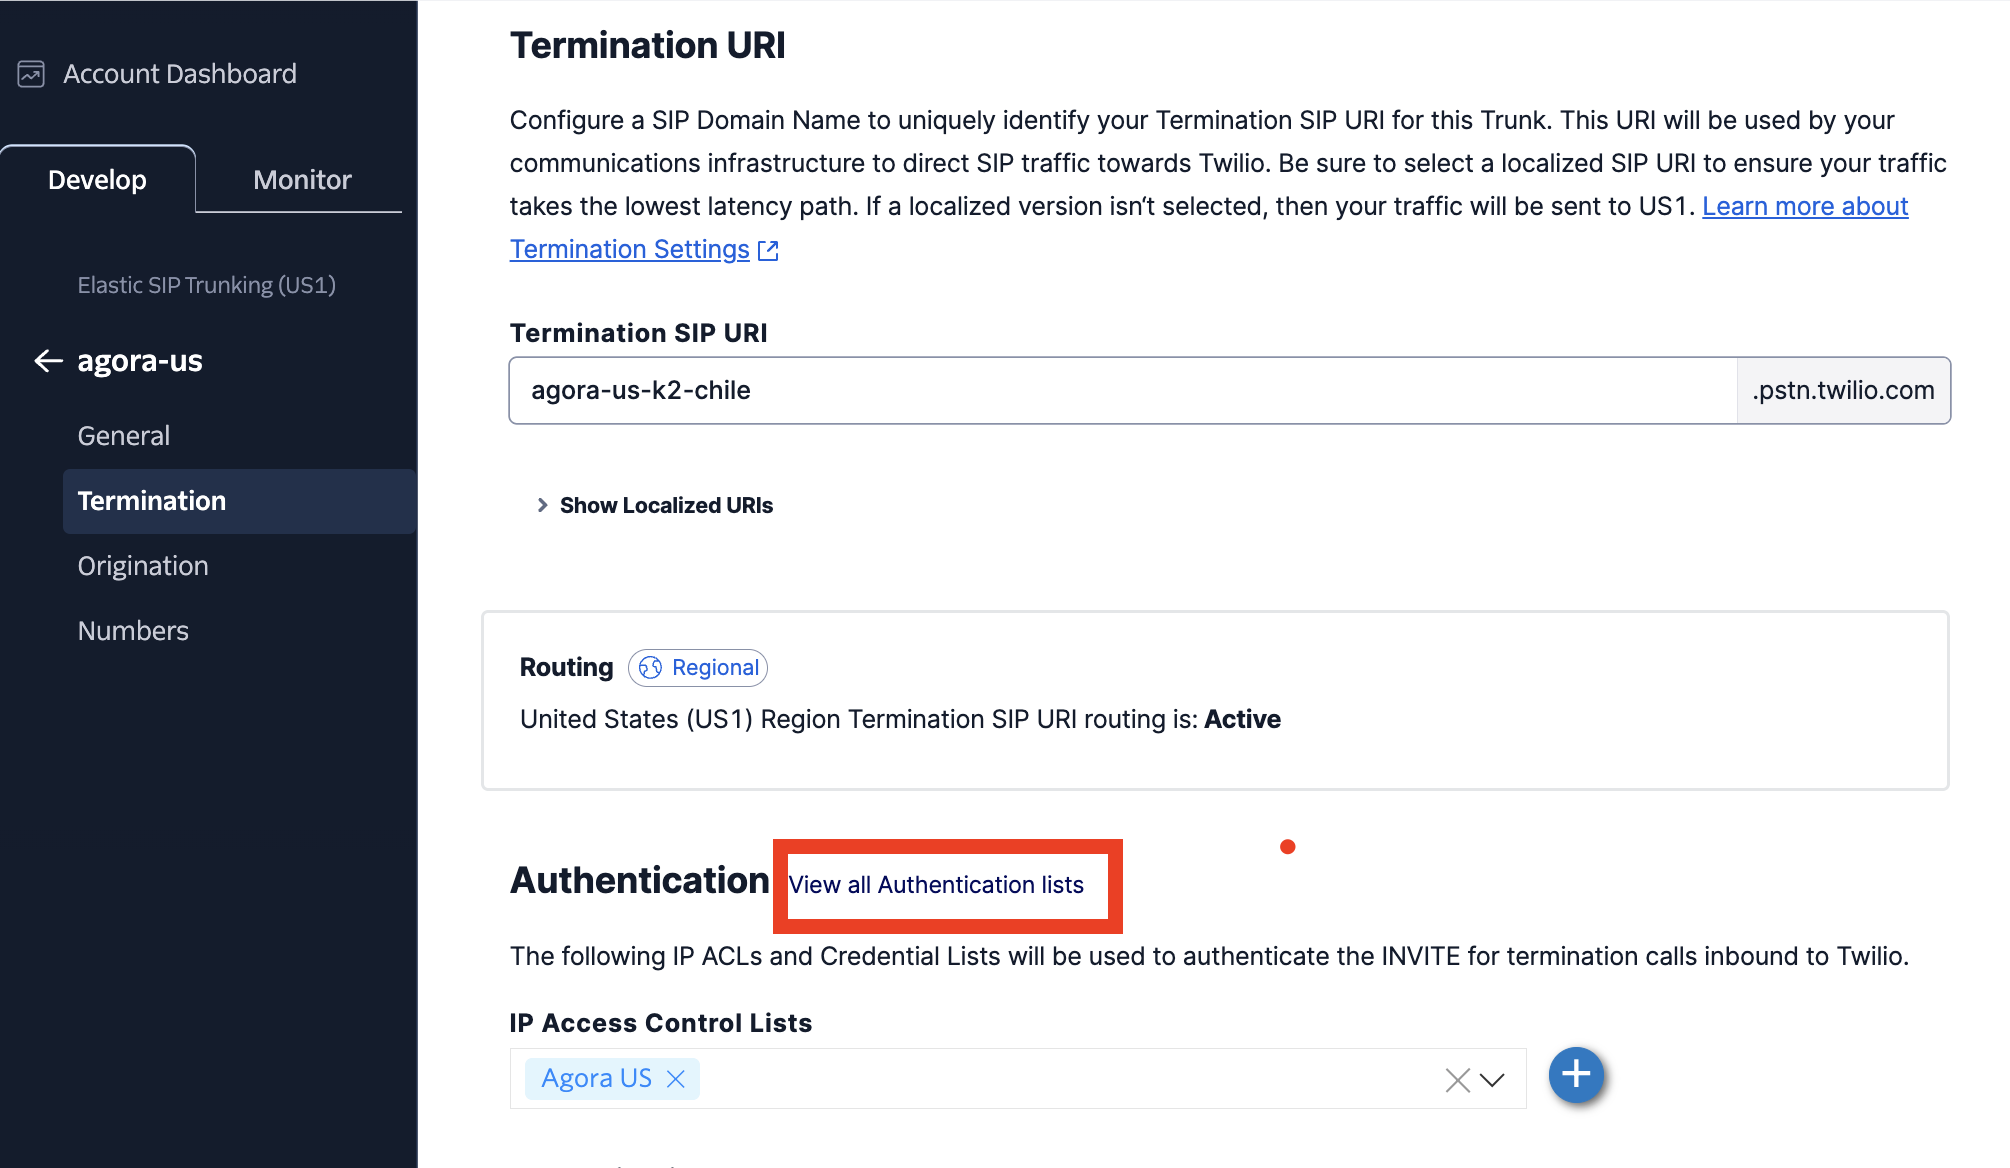
1. In your SIP Trunk, go to **Termination → Authentication**
2. Under **IP Access Control Lists**, select the authentication list you just created. If you do not see the list you created, access the list by clicking **View all Authentication lists**.
3. Click **Save**.
4. **Credential Lists** (Optional)
You can create username and password authentication if required.
* If you do not specify a credential list, it allows you to leave the username and password blank in Agent Studio.
* If you configure a credential list you must specify the same username and password in Agent Studio.
To set up a credential list:
1. Under **Authentication**, find **Credential Lists**.
2. Use the `+` button to create a new list.
3. Give your list a descriptive name.
4. Specify a username and password.
5. Click **Save**.
5. **Import the number in Agent Studio**
Once your SIP trunk is configured, import the number into Studio. See [Import a phone number](import) for step-by-step instructions. Use your Termination URI as the SIP Domain and match the Transport protocol to your Secure Trunking setting.
## Inbound calling setup [#inbound-calling-setup]
Complete the following steps to enable customers to call your agent through your SIP trunk phone number.
1. **Configure Origination URI**
1. In your SIP Trunk, go to **Origination**
2. Click **Add new Origination URI**
3. Enter the Agora SIP Origination URI for your region:
The Origination URI depends on the country code of your phone number. Select the URI for your region and enter it in SIP trunk.
* **United States**
| Transport | URI |
| --------- | ------------------------------------ |
| TLS | `sip:sbc-us-west-1.viblinx.com:5061` |
| TCP/UDP | `sip:sbc-us-west-1.viblinx.com:5060` |
**Supported country codes**: +1 (United States)
* **Americas, Europe, Oceania, and Brazil**
| Transport | URI |
| --------- | ------------------------------------ |
| TLS | `sip:sbc-sa-east-1.viblinx.com:5061` |
| TCP/UDP | `sip:sbc-sa-east-1.viblinx.com:5060` |
**Supported country codes**: +52 (Mexico), +54 (Argentina), +55 (Brazil), +56 (Chile), +51 (Peru), +44 (United Kingdom), +33 (France), +49 (Germany), +39 (Italy), +34 (Spain), +61 (Australia), +64 (New Zealand)
* **Asia-Pacific, India, and Africa**
| Transport | URI |
| --------- | ----------------------------------- |
| TLS | `sip:sbc-ap-south.viblinx.com:5061` |
| TCP/UDP | `sip:sbc-ap-south.viblinx.com:5060` |
**Supported country codes**: +82 (South Korea), +65 (Singapore), +81 (Japan), +91 (India), +886 (Taiwan), +27 (South Africa), +20 (Egypt), +254 (Kenya)
4. Set Priority to `10` and Weight to `10` (default).
5. Click **Add**.
2. **Configure number routing**
1. Go to **Phone Numbers → Manage → Active numbers**
2. Select the number you want to use for inbound calling.
3. Under **Voice Configuration → Configure with**, select **SIP Trunk**
4. Choose the trunk you created in [Basic setup](#basic-setup).
5. Click **Save configuration**.
3. **Import the number in Agent Studio**
Once SIP trunk origination and routing is configured, import the number in Agent Studio and associate it with an agent to answer inbound calls. See [Handle inbound calls](inbound) for step-by-step instructions.
## Configuration checklist [#configuration-checklist]
Before testing inbound and outbound calls, make sure you address each item in the checklist:
| Item | Inbound | Outbound |
| --------------------------------------------------- | -------------------- | ---------------------- |
| Assign phone number to SIP Trunk | ✅ Required | ✅ Required |
| SIP Trunk Address | ✅ Required | ✅ Required |
| Configure Origination URI (SIP trunk → Agora) | ✅ Required | ❌ Not needed |
| IP Access Control List | ❌ Not needed | ✅ Required |
| Credential List | ❌ Not needed | ⚠️ Optional |
| Secure trunking setting matches Transport in Studio | ✅ Required | ✅ Required |
| Import number in Studio | ✅ Required | ✅ Required |
| Assign number in studio | ✅ Assign to an agent | ✅ Assign to a campaign |
## Troubleshooting [#troubleshooting]
If you encounter issues with your SIP trunk setup, use the following table to identify and resolve common problems.
| Symptom | Cause | Solution |
| ------------------------------------ | ------------------------------------ | ----------------------------------------------------------------------------------- |
| Inbound calls don't reach agent | Origination URI not set or incorrect | Verify the Origination URI in SIP trunk matches what Studio shows |
| Outbound calls rejected by SIP trunk | IP ACL missing or incomplete | Add all Agora SIP IPs to the SIP trunk IP Access Control List |
| Calls connect but no audio | Transport mismatch (TLS vs TCP/UDP) | Match the Secure Trunking setting in SIP trunk with the Transport setting in Studio |
| One-way audio | Firewall or NAT issue | Ensure Agora SIP IPs are whitelisted on both sides |
| "403 Forbidden" in SIP trunk logs | Authentication failed | Check Credential List or IP ACL configuration |
| Call drops after \~30 seconds | SIP session timer timeout | Check SIP Trunk timeout settings |
## Next steps [#next-steps]
* [Import a phone number](import): Import your configured SIP trunk number into Studio
* [Set up a campaign](campaign): Use your imported number to create an outbound calling campaign
* [Handle inbound calls](inbound): Associate a number with an agent to answer inbound calls
* [Publish your agent](deploy-agent): Publish an agent to use with your imported number