# Manage integrations (/en/ai/studio/build/integrations)
> For AI agents: see the complete documentation index at [llms.txt](/llms.txt).
Agent Studio provides centralized management of credentials, MCP servers, and knowledge bases through the **Integration** interface. Store and reuse API keys and configuration settings for your LLM, ASR, and TTS providers across all agents, making it easy to update provider settings in one place.
## Credentials [#credentials]
To save your credentials for a vendor:
1. From the left sidebar, select **Integration**.
2. At the top of the page, select **Credentials**.
3. Click **`+ Add Credential`**.
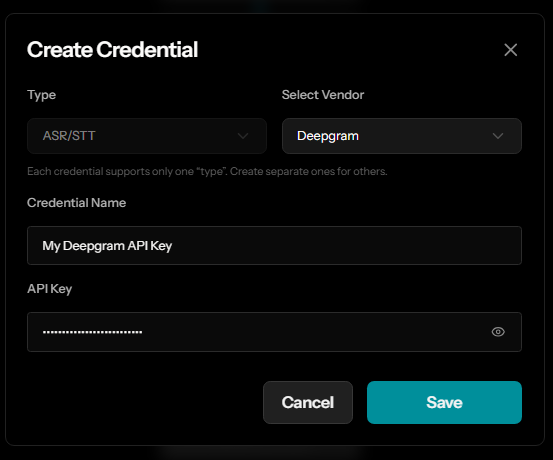
4. From the **Type** dropdown, select **ASR**, **LLM**, or **TTS**.
5. Select the **Vendor** from the dropdown for which you want to add the credential.
6. Enter a descriptive name for your credential.
7. Paste your provider API key and fill in other related parameters, if any.
8. Click **Save**.
After you add a credential, you can select it from the **Credential** dropdown when customizing your ASR, LLM, or TTS configuration for any agent.
You can edit and delete credentials using the **Actions** column in the credential list.
Caution
Deleting a credential affects all agents that use it. Verify that no active agents depend on the credential before deleting, or update those agents to use a different credential first.
### Credential security [#credential-security]
Credentials stored in **Integrations** are:
* Encrypted and securely stored in your Agora account
* Only accessible to users with access to your Agora project
* Never exposed in agent configurations or logs
Best practices
* Use descriptive names to distinguish between development, staging, and production credentials
* Rotate API keys regularly according to your security policies
* Delete unused credentials to minimize security exposure
## Knowledge bases [#knowledge-bases]
A knowledge base provides your agent with additional context by supplying reference documents that the agent can draw on during conversations. Once created, knowledge bases can be attached to any agent from the **Actions** panel.
To create a knowledge base:
1. From the left sidebar, select **Integration**.
2. At the top of the page, select **Knowledge Bases**.
3. Click **+ Add Knowledge Base**.
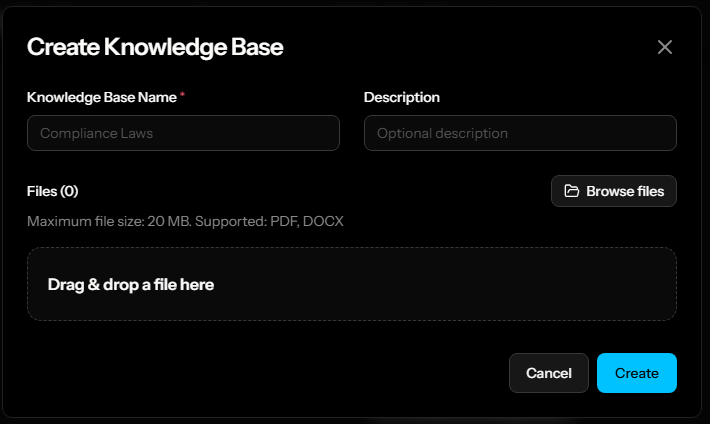
4. Enter a **Knowledge Base Name**.
5. Enter a **Description**.
6. Upload one or more files by clicking **Browse files** or dragging and dropping files into the upload area.
7. Click **Create**.
Info
Supported file formats: PDF, DOCX. Maximum file size: 20 MB per file.
You can delete knowledge bases using the **Actions** column in the knowledge base list.
## MCP servers [#mcp-servers]
MCP (Model Context Protocol) servers extend your agent's capabilities by enabling it to call tools provided by external services. Once added to **Integrations**, MCP servers can be attached to any agent from the **Actions** panel.
To add an MCP server:
1. From the left sidebar, select **Integration**.
2. At the top of the page, select **MCPs**.
3. Click **+ Add Server**.
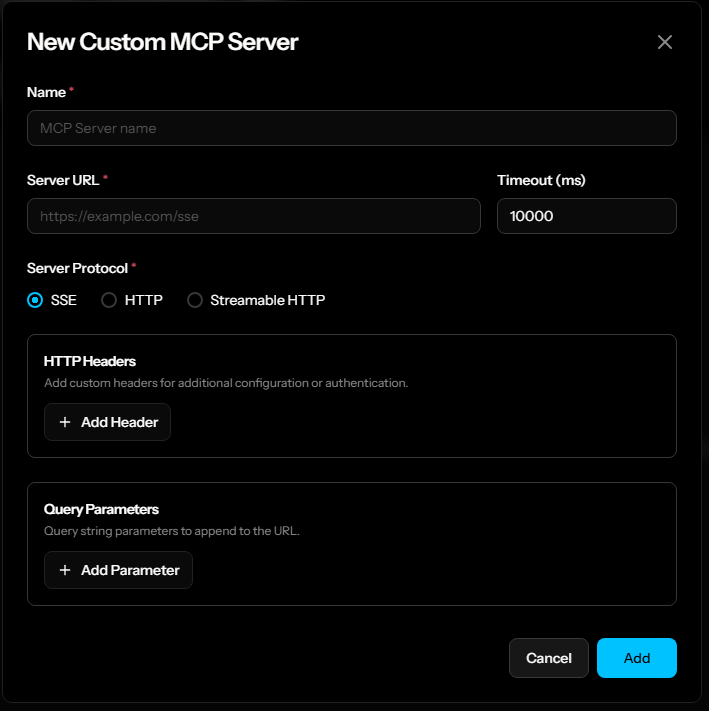
4. Enter a descriptive **Name** for the MCP server.
5. Enter the **Server URL**.
6. Set the **Timeout (ms)**. If the server does not respond within this duration, the agent stops waiting and continues executing.
7. Select the **Server Protocol**: **SSE**, **HTTP**, or **Streamable HTTP**.
8. Add **HTTP Headers** for authentication or additional configuration. (Optional)
9. Add **Query Parameters** to append to the server URL. (Optional)
10. Click **Add**.
You can edit, delete or check the status of an MCP server using the **Actions** column in the MCP server list.